Create accounts to represent the accounts you hold at financial institutions that you want to track in SEE Finance. You can also setup accounts for other purposes such as tracking assets, liabilities and personal loans. Learn how to create accounts manually, by download, and by importing files below.
Create an Account:
- Select "New Account..." from the program's Accounts menu or click on the + button beneath the main account list.
Select how to create
You will have the option to create accounts by manually entering account information, by downloading information from institutions, or by importing a file.

- Select how to create the account.
- Click "Continue".
Enter in the details for the account.

- Enter the desired name for the account.
- Select the account type for the account.
- Select the currency for the account.
- Set the balance and date for the balance as of when you want to begin tracking the account.
- For credit card accounts, set the credit limit.
- Then click "Create" to create the account.
Create accounts by setting up OFX Direct Connect download connections to supporting institutions. Check out the Transaction Downloads page to learn more about OFX Direct Connect downloads and for troubleshooting information.
Select the institution
Scroll or search to locate the desired institution.
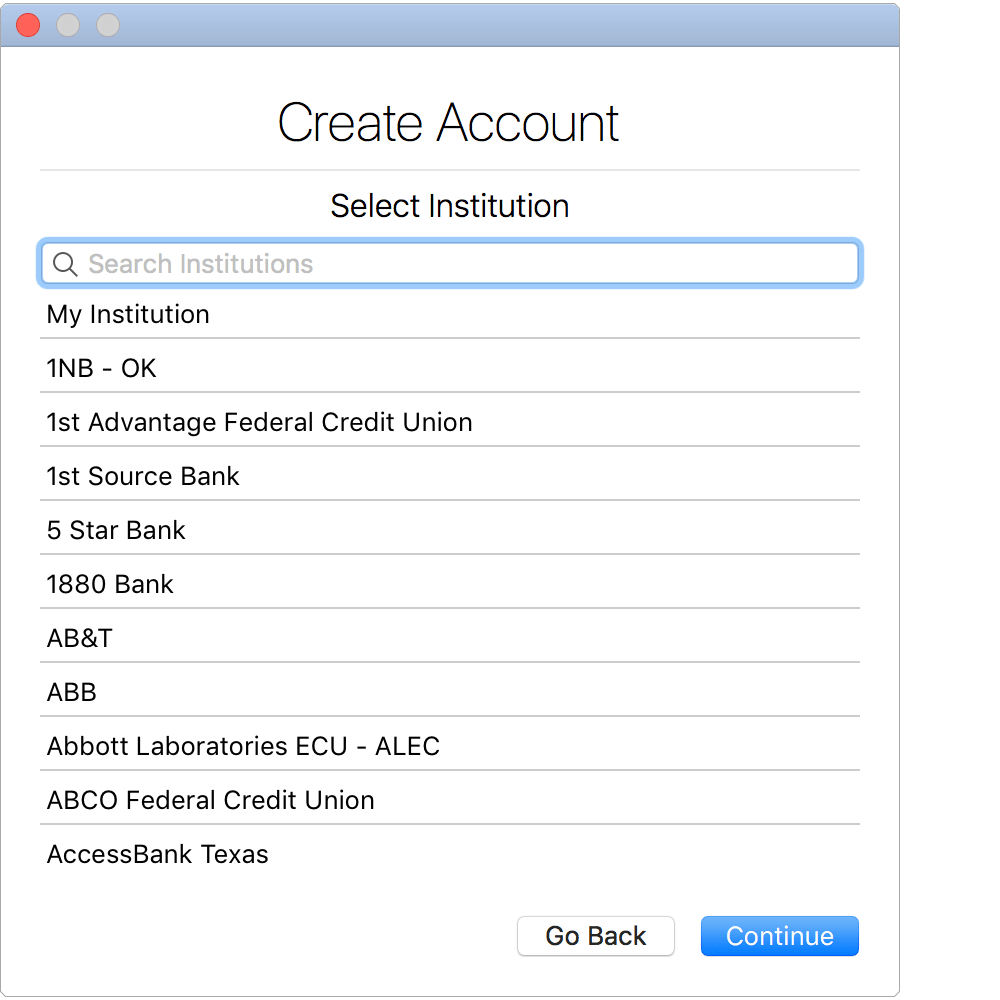
- Select the desired institution.
- Click "Continue".
Enter your login credentials
Fill in the Direct Connect login credentials for your account(s) at the institution.
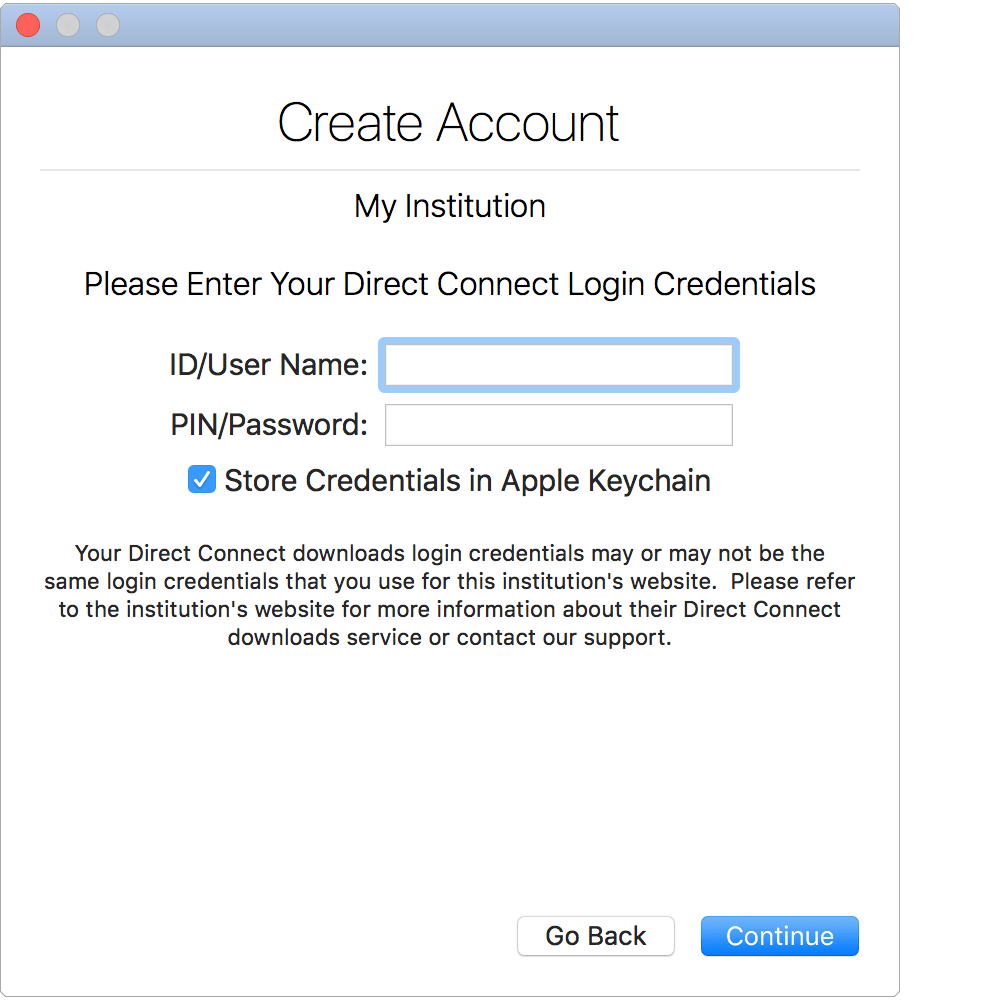
- Enter your Direct Connect login credentials for your account(s) at the institution.
- Select the option to "Store Credentials in Apple Keychain" if you'd like to store your login credentials securely in your Apple Keychain. If the login credentials are not stored in your Apple Keychain then you will need to enter them each time to download accounts.
- Then click "Continue".
![]() Note:
Your Direct Connect login credentials at the institution may or may not be the same as your login credentials for the institution's general website.
Note:
Your Direct Connect login credentials at the institution may or may not be the same as your login credentials for the institution's general website.
Change your PIN/Password if requested
Some institutions will prompt you to change your Direct Connect PIN/Password when setting up downloads in a program.
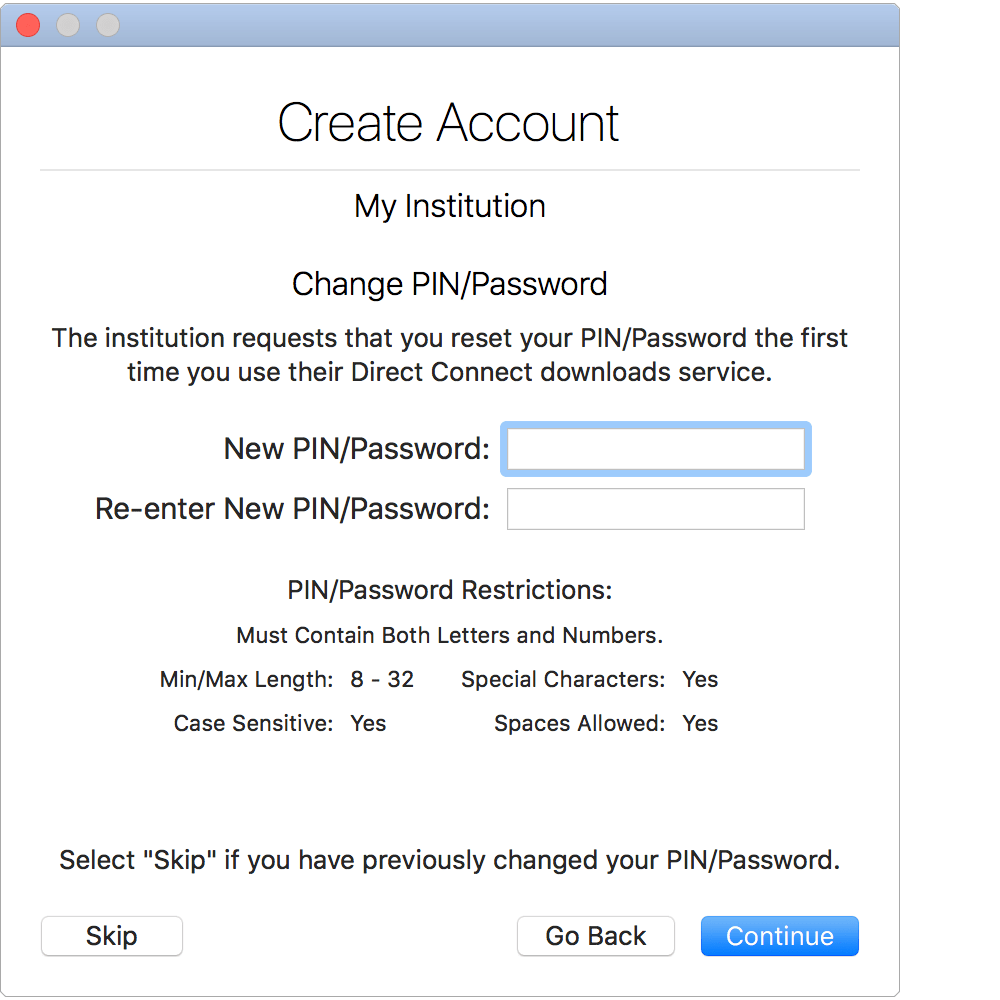
- Do one of the following:
- Click "Skip" if you have already done so in the past or if you just don't wish to change your PIN/Password.
- Fill in your old password and desired new password and click "Continue".
Account discovery
Most institutions will supply you with a list of available accounts for download based on your login credentials, referred to as "Account Discovery".
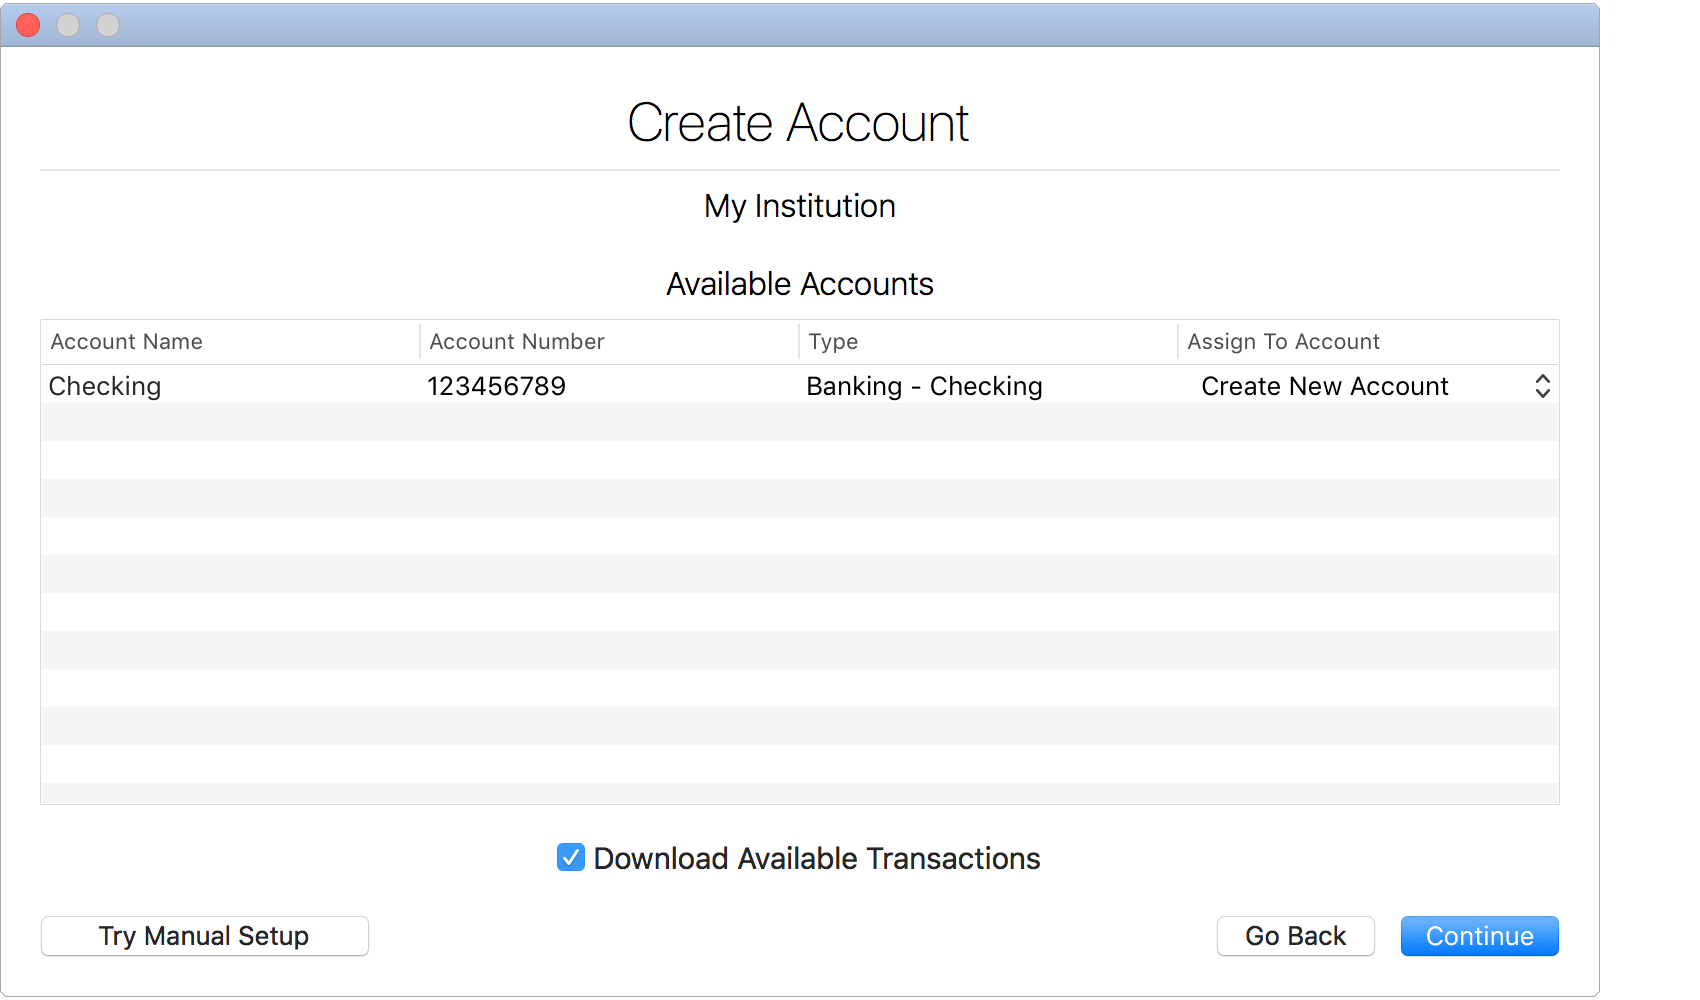
- Review the available accounts for download and do the following for each account:
- For accounts you want to create, set the "Assign to Account" option to "Create New Account". Then click on the "Account Name" and enter the name of the account as you want it to appear in the program.
- For accounts that should be assigned to an existing account, it should be automatically selected for the "Assign to Account" option if it has been setup before. Otherwise, you can set the "Assign to Account" to an existing account.
- For accounts that you don't want to create and that you don't want to assign to an existing account, set the "Assign to Account" option to "No Account Selected".
- Click "Continue" to create the account(s).
![]() Note:
You can also use the "Try Manual Setup" option to setup downloads for an account by providing specific account information.
Note:
You can also use the "Try Manual Setup" option to setup downloads for an account by providing specific account information.
Manual setup
Some institutions prefer you to manually enter the information for the account you want to setup downloads for. Enter the specific details for the account you want to setup.
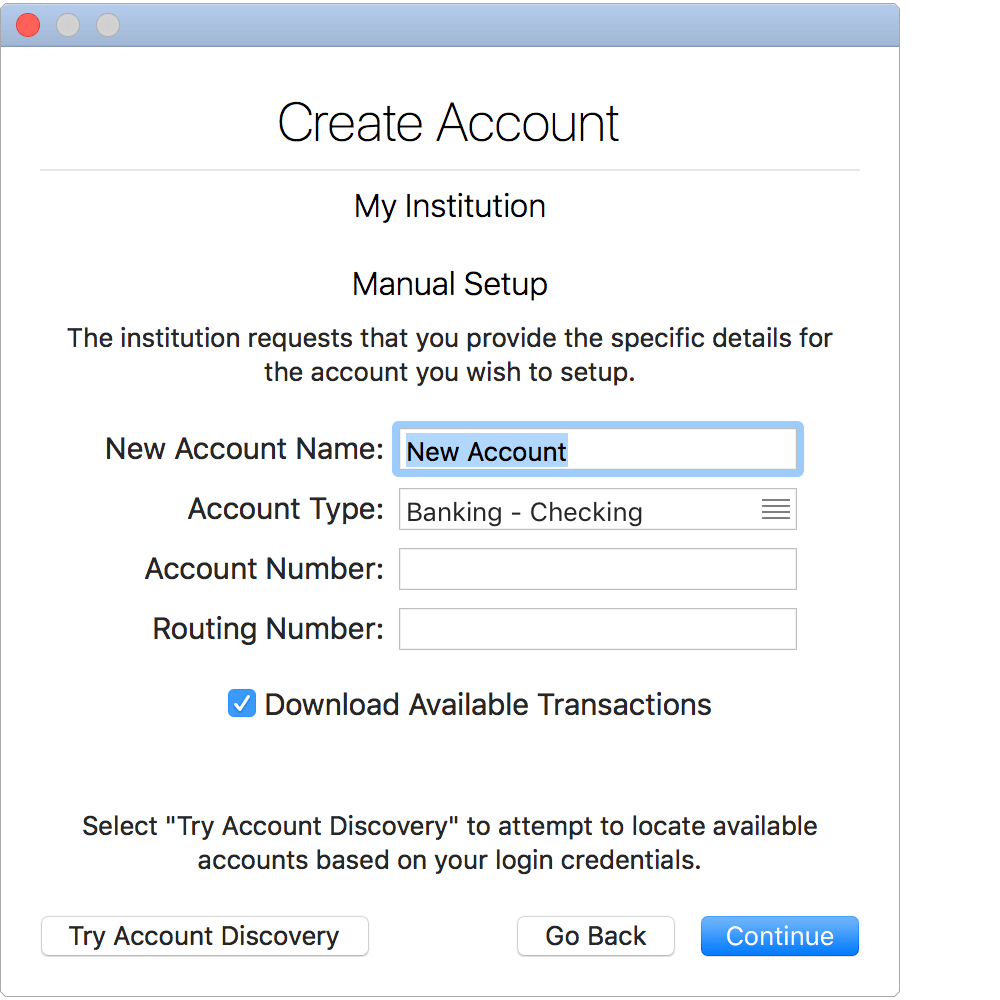
- Set the "Account Name" as you want the account to be named in the program.
- Select the account type.
- Enter the account number
- Enter the routing number (for banking accounts only).
- Click "Continue" to create the account.
![]() Note:
Some institutions allow for "Account Discovery" to provide you a list of available accounts for download based on your login credentials.
You can click "Try Account Discovery" to attempt to look up accounts based on your login credentials if desired.
Note:
Some institutions allow for "Account Discovery" to provide you a list of available accounts for download based on your login credentials.
You can click "Try Account Discovery" to attempt to look up accounts based on your login credentials if desired.
Troubleshooting downloads
Check out the Transaction Downloads page to learn more about OFX Direct Connect downloads in general and for troubleshooting information.
You can import accounts from QIF, QMTF, QFX and OFX files. QIF or QMTF files are the best choice when importing data from another finance program or website. QFX or OFX files are preferred when importing straight from an institution.
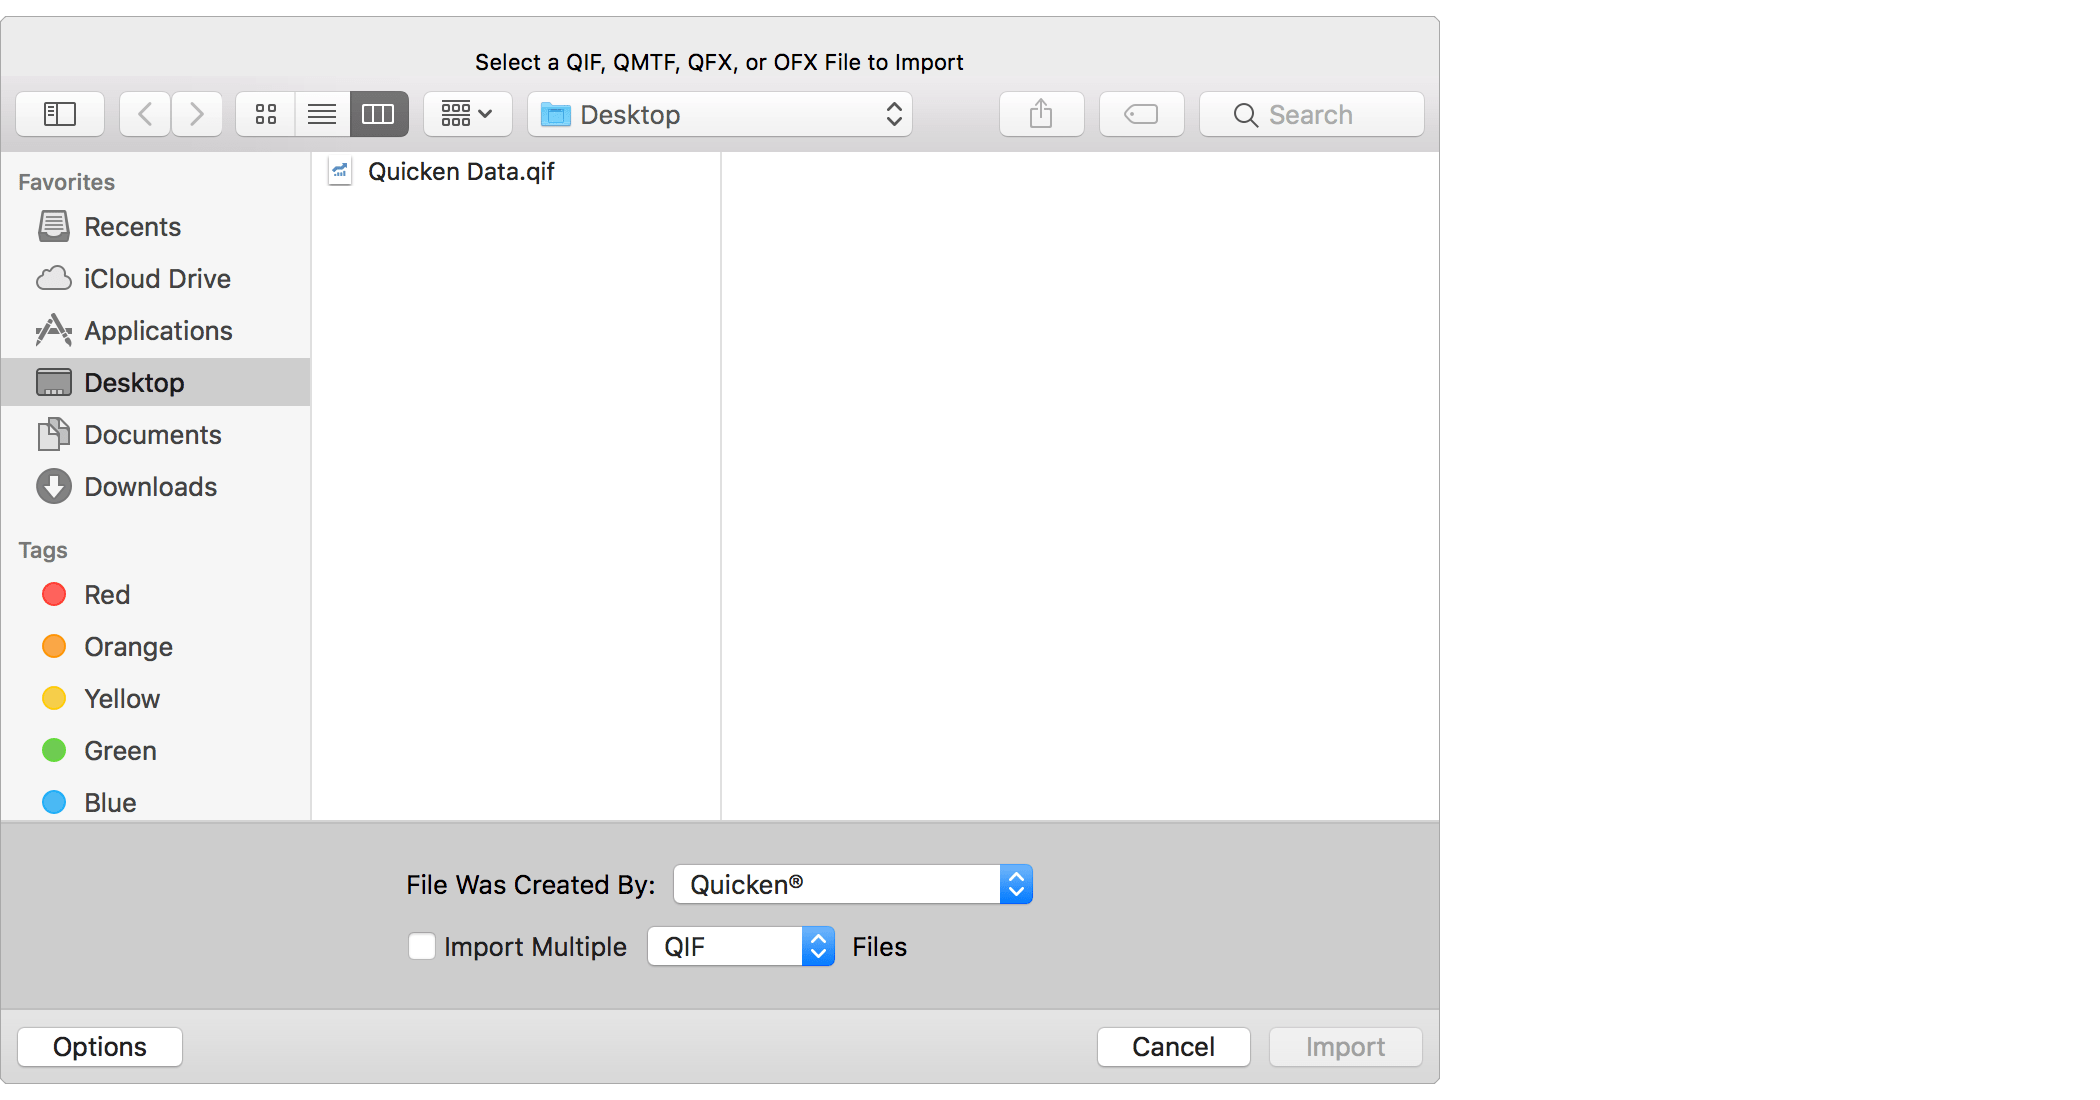
- Use the open file panel to select the QIF, QMTF, QFX or OFX file you'd like to import. On the bottom of the open file panel, set the "File Was Created By" option as appropriate for the file you are importing. You can also select the option to import multiple files at once.
- Click "Import" to continue and then follow the info below for the specific type of file you are importing.
![]() Note:
Make sure to set the "File Was Created By" option appropriately.
Doing so will have the program perform some additional verification of the data and check for known issues in the exports from other programs.
Note:
Make sure to set the "File Was Created By" option appropriately.
Doing so will have the program perform some additional verification of the data and check for known issues in the exports from other programs.
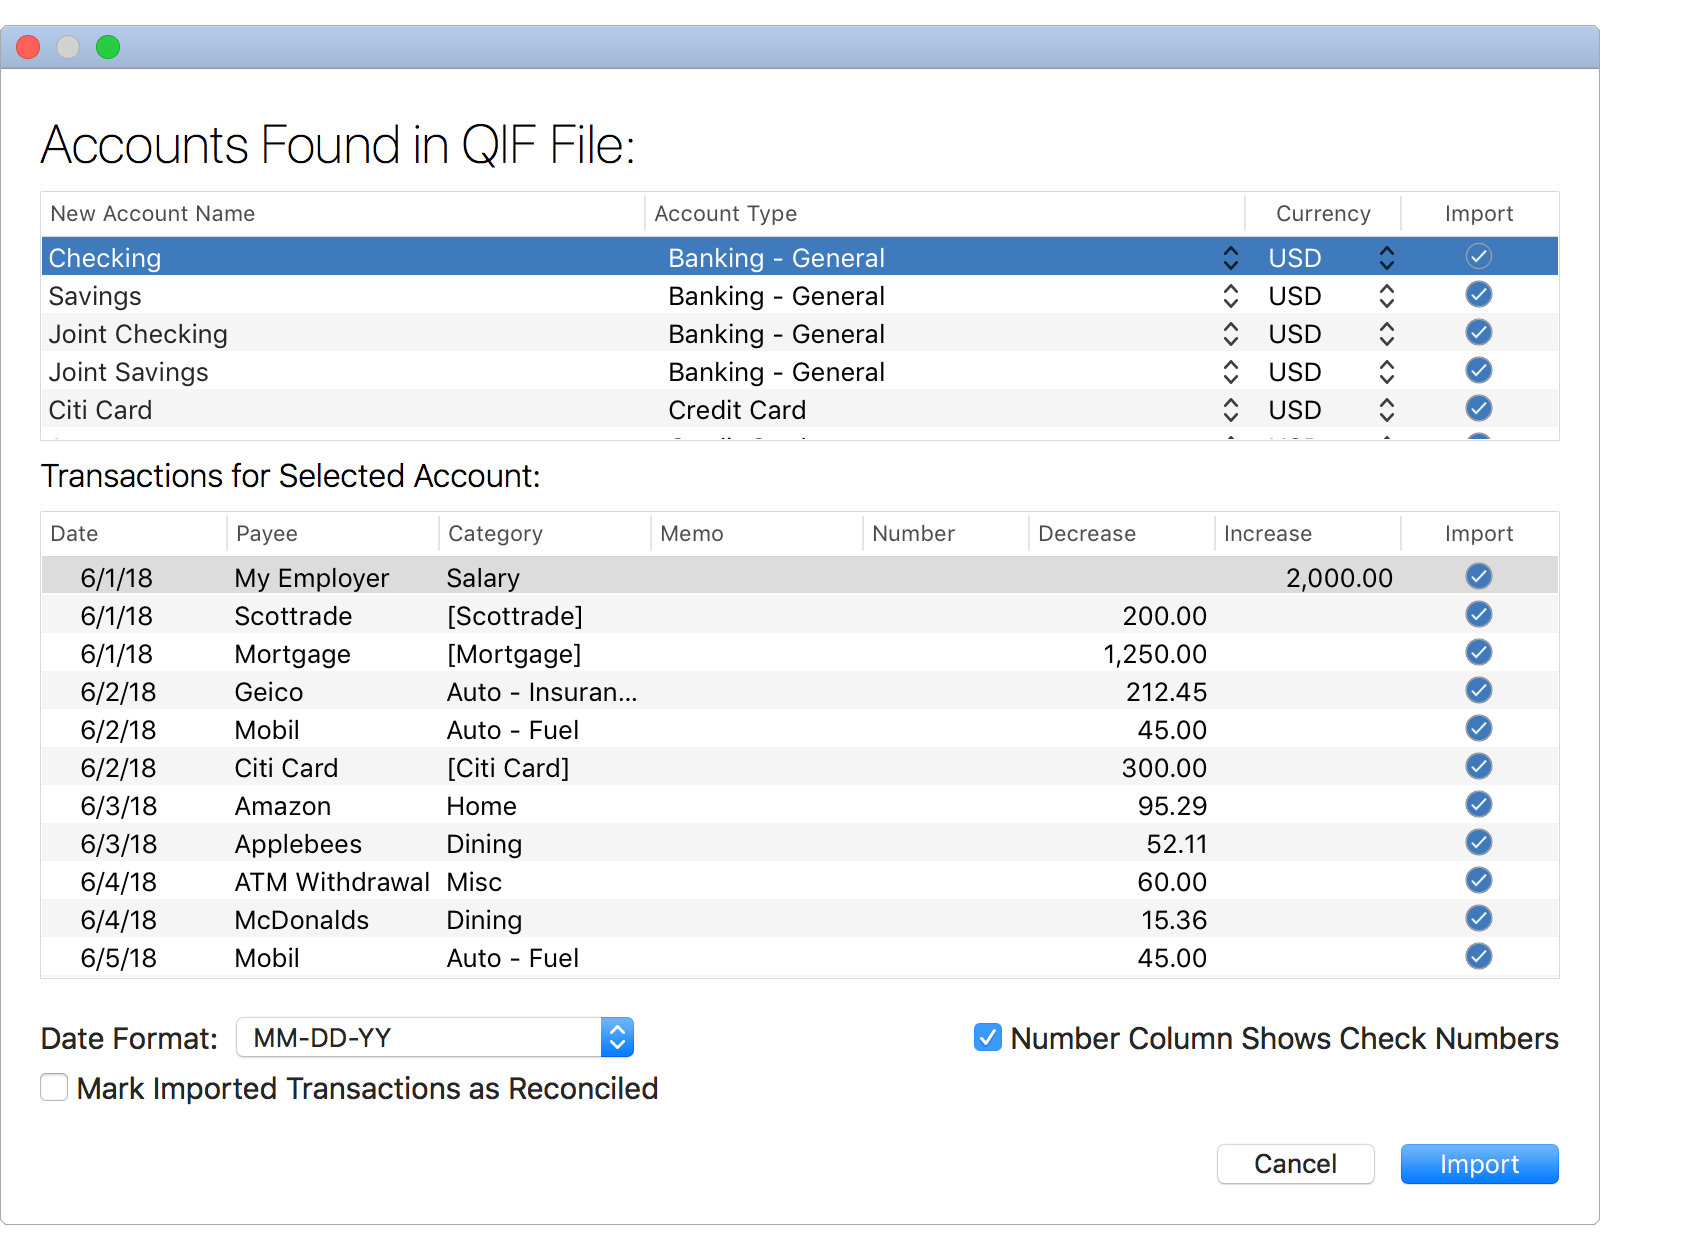
- Review the accounts and the transactions found in the QIF file. Uncheck the "Import" checkbox for any individual account(s) or transactions(s) you do not want to import.
- Check and adjust the account name, account type and currency for each account to import.
- Select the "Date Format" that most closely resembles the dates shown for transactions in the file.
- Check whether or not the "Number" column represents check numbers for transactions in the file.
- Check if you'd like all transactions to be marked as reconciled.
- Then click "Import" to import the selected accounts.
![]() Note:
Be sure to select the proper date format matching the dates shown in the file.
Select the "MM-DD-YY" option for dates such as "1/31/18" and select the "MM-DD-YYYY" option for dates such as "1/31/2018".
The "-" in date format options can take the place of various kinds of separators including slashes and spaces.
Note:
Be sure to select the proper date format matching the dates shown in the file.
Select the "MM-DD-YY" option for dates such as "1/31/18" and select the "MM-DD-YYYY" option for dates such as "1/31/2018".
The "-" in date format options can take the place of various kinds of separators including slashes and spaces.
![]() Tip:
Use the space bar to toggle the "Import" checkbox for the selected account or for the selected transaction(s).
Tip:
Use the space bar to toggle the "Import" checkbox for the selected account or for the selected transaction(s).

- Review the accounts and the transactions found in the QMTF file. Uncheck the "Import" checkbox for any individual account(s) or transactions(s) you do not want to import.
- Check and adjust the account name, account type and currency for each account to import.
- Select the "Date Format" that most closely resembles the dates shown for transactions in the file.
- Check whether or not the "Number" column represents check numbers for transactions in the file.
- Check if you'd like all transactions to be marked as reconciled.
- Then click "Import" to import the selected accounts.
![]() Note:
Be sure to select the proper date format matching the dates shown in the file.
Select the "MM-DD-YY" option for dates such as "1/31/18" and select the "MM-DD-YYYY" option for dates such as "1/31/2018".
The "-" in date format options can take the place of various kinds of separators including slashes and spaces.
Note:
Be sure to select the proper date format matching the dates shown in the file.
Select the "MM-DD-YY" option for dates such as "1/31/18" and select the "MM-DD-YYYY" option for dates such as "1/31/2018".
The "-" in date format options can take the place of various kinds of separators including slashes and spaces.
![]() Tip:
Use the space bar to toggle the "Import" checkbox for the selected account or for the selected transaction(s).
Tip:
Use the space bar to toggle the "Import" checkbox for the selected account or for the selected transaction(s).
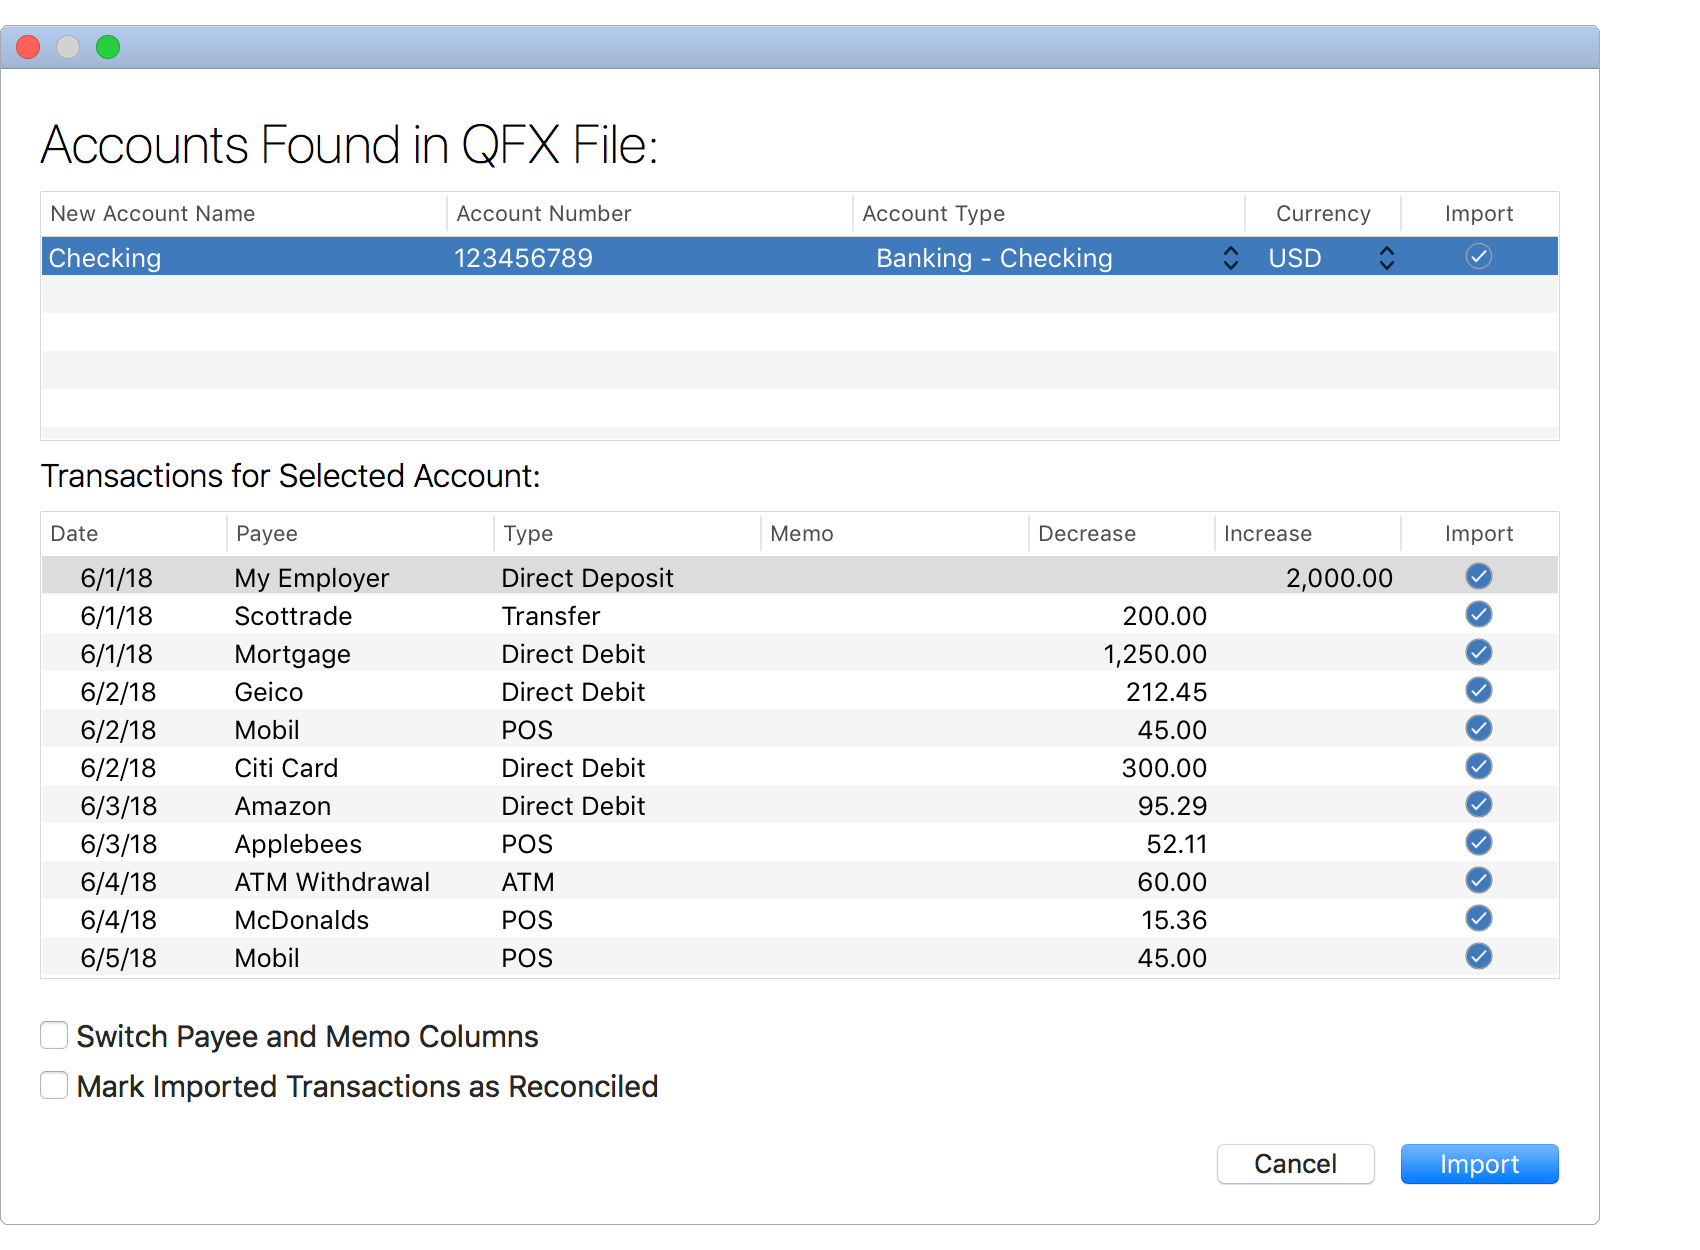
- Review the accounts and the transactions found in the QFX file. Uncheck the "Import" checkbox for any individual account(s) or transactions(s) you do not want to import.
- Check and adjust the account name, account type and currency for each account to import.
- If the information shown for transactions in the memo column is better suited for their payee, select the option to switch the payee and memo columns.
- Check if you'd like all transactions to be marked as reconciled.
- Then click "Import" to import the selected accounts.
![]() Tip:
Use the space bar to toggle the "Import" checkbox for the selected account or for the selected transaction(s).
Tip:
Use the space bar to toggle the "Import" checkbox for the selected account or for the selected transaction(s).

- Review the accounts and the transactions found in the OFX file. Uncheck the "Import" checkbox for any individual account(s) or transactions(s) you do not want to import.
- Check and adjust the account name, account type and currency for each account to import.
- If the information shown for transactions in the memo column is better suited for their payee, select the option to switch the payee and memo columns.
- Check if you'd like all transactions to be marked as reconciled.
- Then click "Import" to import the selected accounts.
![]() Tip:
Use the space bar to toggle the "Import" checkbox for the selected account or for the selected transaction(s).
Tip:
Use the space bar to toggle the "Import" checkbox for the selected account or for the selected transaction(s).
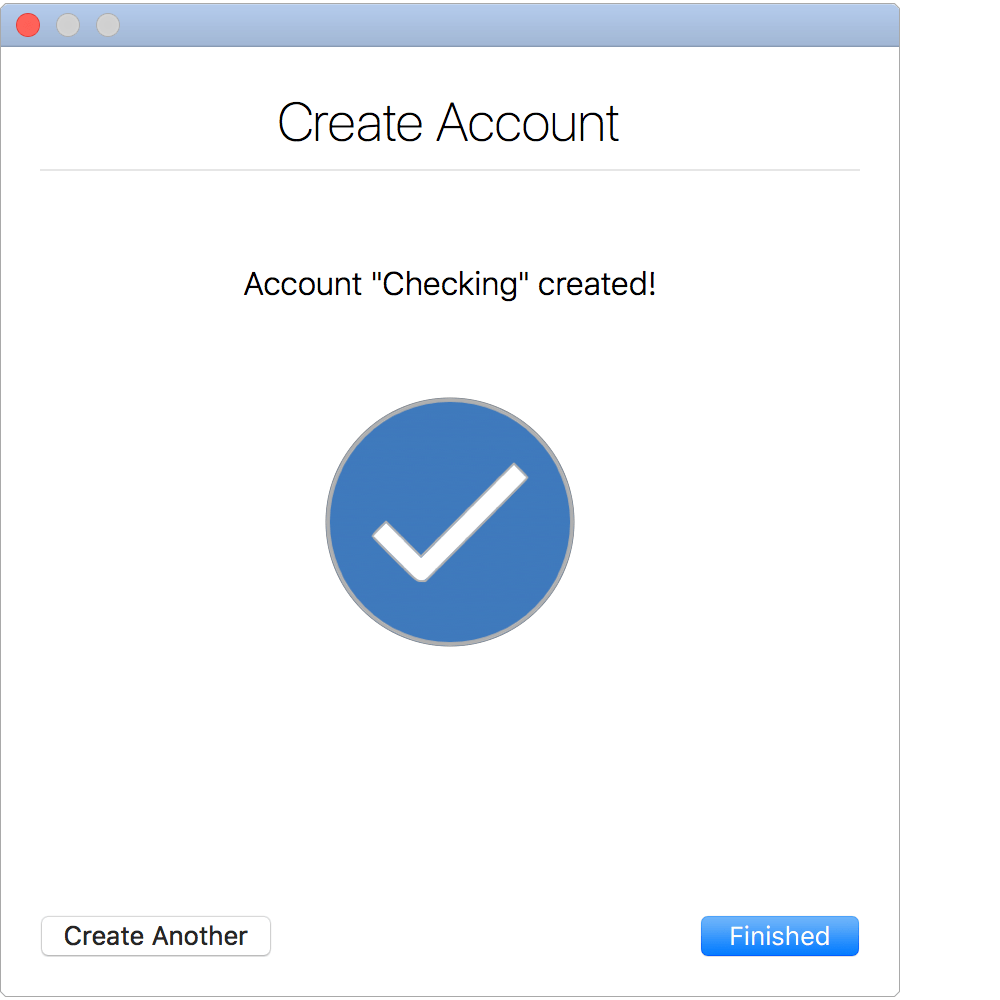
Summary
Create additional accounts by selecting to "Create Another". Click "Finished" when you are finished creating new accounts.
Begin updating your new account(s)
Categorize the transactions in your new account(s) to track your cash flow in detail. Customize settings for the account including account color and optional table columns.
![]() Note:
For investment accounts created manually you will need to record position adjustment transactions to setup the holdings in the account as of the date you want to begin tracking the account.
For investment accounts created by Direct Connect downloads or imported from QFX or OFX files you will need to update any initial position adjustment transactions to have a Price of the cost basis per share of those shares.
This is due to the information from the institution not containing cost basis information for shares held prior to the transactions available in the download/file.
Note:
For investment accounts created manually you will need to record position adjustment transactions to setup the holdings in the account as of the date you want to begin tracking the account.
For investment accounts created by Direct Connect downloads or imported from QFX or OFX files you will need to update any initial position adjustment transactions to have a Price of the cost basis per share of those shares.
This is due to the information from the institution not containing cost basis information for shares held prior to the transactions available in the download/file.