Create accounts by importing them from QIF, QMTF, QFX or OFX files. Accounts can also be created manually or by download. Learn how to create accounts by importing files below.
![]() Note:
There is a difference between importing accounts and importing transactions.
Importing accounts is for creating new accounts while importing transactions is for importing transactions into existing accounts.
Note:
There is a difference between importing accounts and importing transactions.
Importing accounts is for creating new accounts while importing transactions is for importing transactions into existing accounts.
What type of file to import?
You can import accounts from QIF, QMTF, QFX and OFX files. The type of file you should import will depend on the where the data is coming from.
• Importing from another finance program or website:
QIF or QMTF files are the best choice when importing data from another finance program or website. QIF and QMTF files can include all of the account and transaction information, including split transactions, as well as categories and security prices. The known weaknesses are that QIF and QMTF files do not have a specified date format, do not distinguish between transactions (no unique IDs), do not distinguish between transaction number or check number, and have only basic capabilities for listing investment information. Note that QMTF files that originated from Quicken® Mac don't contain investment account information.
• Importing from an institution:
QFX or OFX files are preferred when importing straight from an institution. QFX and OFX files have unique IDs to help prevent duplicates, use a standard date format, and can handle more complex transactions such as investments better than other file formats. QFX and OFX files do not contain category or split transaction information as they are usually only created by financial institutions. Note that OFX is actually the file format used in OFX Direct Connect downloads. QFX files are just OFX files with a Quicken® specific institution ID added to them. Sometimes OFX files are listed at institutions as the Microsoft Money® option and sometimes QFX files are listed as the Quicken® option or as the Web Connect option.
Importing accounts from a file
- Select "Import" → "Accounts" from the program's File menu.
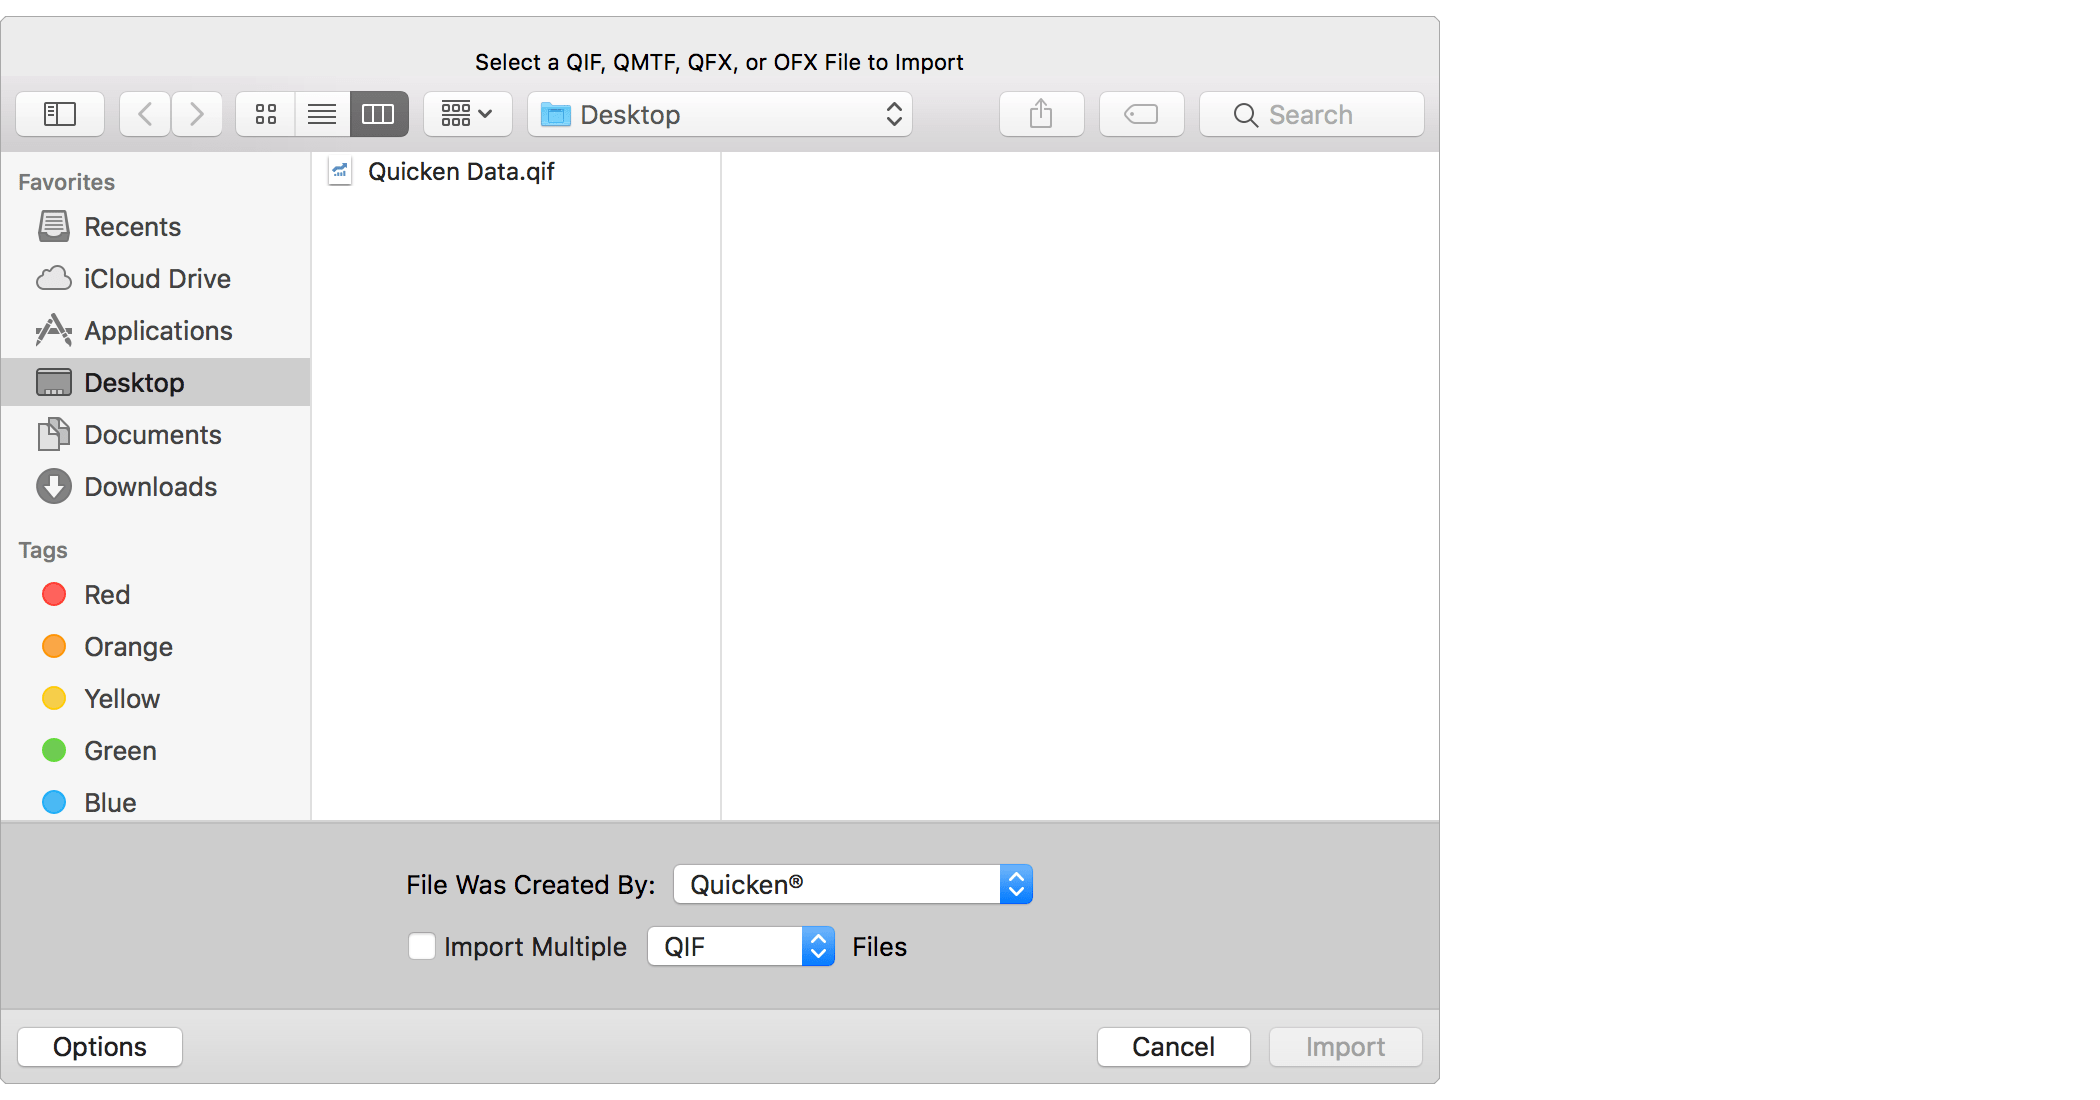
- Use the open file panel to select the QIF, QMTF, QFX or OFX file you'd like to import. On the bottom of the open file panel, set the "File Was Created By" option as appropriate for the file you are importing. You can also select the option to import multiple files at once.
- Click "Import" to continue and then follow the info below for the specific type of file you are importing.
![]() Note:
Make sure to set the "File Was Created By" option appropriately.
Doing so will have the program perform some additional verification of the data and check for known issues in the exports from other programs.
Note:
Make sure to set the "File Was Created By" option appropriately.
Doing so will have the program perform some additional verification of the data and check for known issues in the exports from other programs.
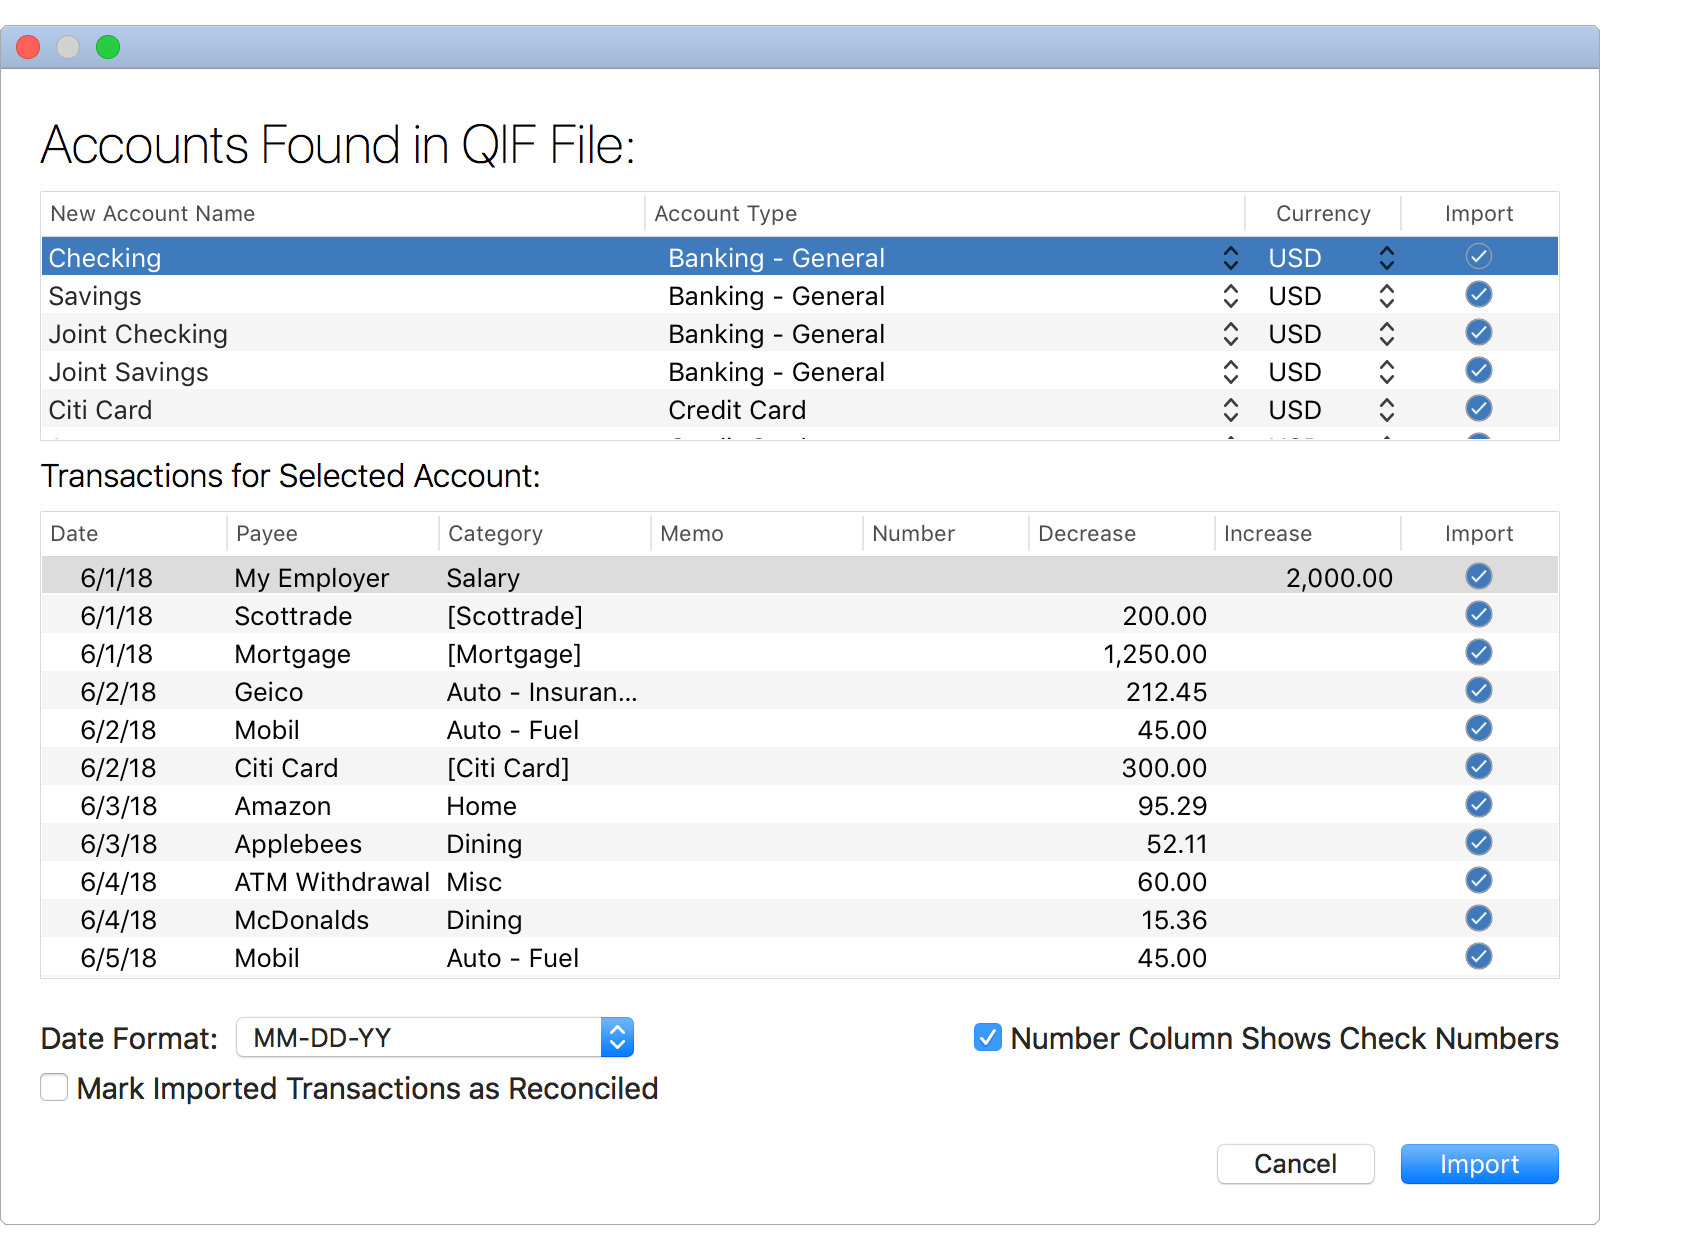
- Review the accounts and the transactions found in the QIF file. Uncheck the "Import" checkbox for any individual account(s) or transactions(s) you do not want to import.
- Check and adjust the account name, account type and currency for each account to import.
- Select the "Date Format" that most closely resembles the dates shown for transactions in the file.
- Check whether or not the "Number" column represents check numbers for transactions in the file.
- Check if you'd like all transactions to be marked as reconciled.
- Then click "Import" to import the selected accounts.
![]() Note:
Be sure to select the proper date format matching the dates shown in the file.
Select the "MM-DD-YY" option for dates such as "1/31/18" and select the "MM-DD-YYYY" option for dates such as "1/31/2018".
The "-" in date format options can take the place of various kinds of separators including slashes and spaces.
Note:
Be sure to select the proper date format matching the dates shown in the file.
Select the "MM-DD-YY" option for dates such as "1/31/18" and select the "MM-DD-YYYY" option for dates such as "1/31/2018".
The "-" in date format options can take the place of various kinds of separators including slashes and spaces.
![]() Tip:
Use the space bar to toggle the "Import" checkbox for the selected account or for the selected transaction(s).
Tip:
Use the space bar to toggle the "Import" checkbox for the selected account or for the selected transaction(s).

- Review the accounts and the transactions found in the QMTF file. Uncheck the "Import" checkbox for any individual account(s) or transactions(s) you do not want to import.
- Check and adjust the account name, account type and currency for each account to import.
- Select the "Date Format" that most closely resembles the dates shown for transactions in the file.
- Check whether or not the "Number" column represents check numbers for transactions in the file.
- Check if you'd like all transactions to be marked as reconciled.
- Then click "Import" to import the selected accounts.
![]() Note:
Be sure to select the proper date format matching the dates shown in the file.
Select the "MM-DD-YY" option for dates such as "1/31/18" and select the "MM-DD-YYYY" option for dates such as "1/31/2018".
The "-" in date format options can take the place of various kinds of separators including slashes and spaces.
Note:
Be sure to select the proper date format matching the dates shown in the file.
Select the "MM-DD-YY" option for dates such as "1/31/18" and select the "MM-DD-YYYY" option for dates such as "1/31/2018".
The "-" in date format options can take the place of various kinds of separators including slashes and spaces.
![]() Tip:
Use the space bar to toggle the "Import" checkbox for the selected account or for the selected transaction(s).
Tip:
Use the space bar to toggle the "Import" checkbox for the selected account or for the selected transaction(s).
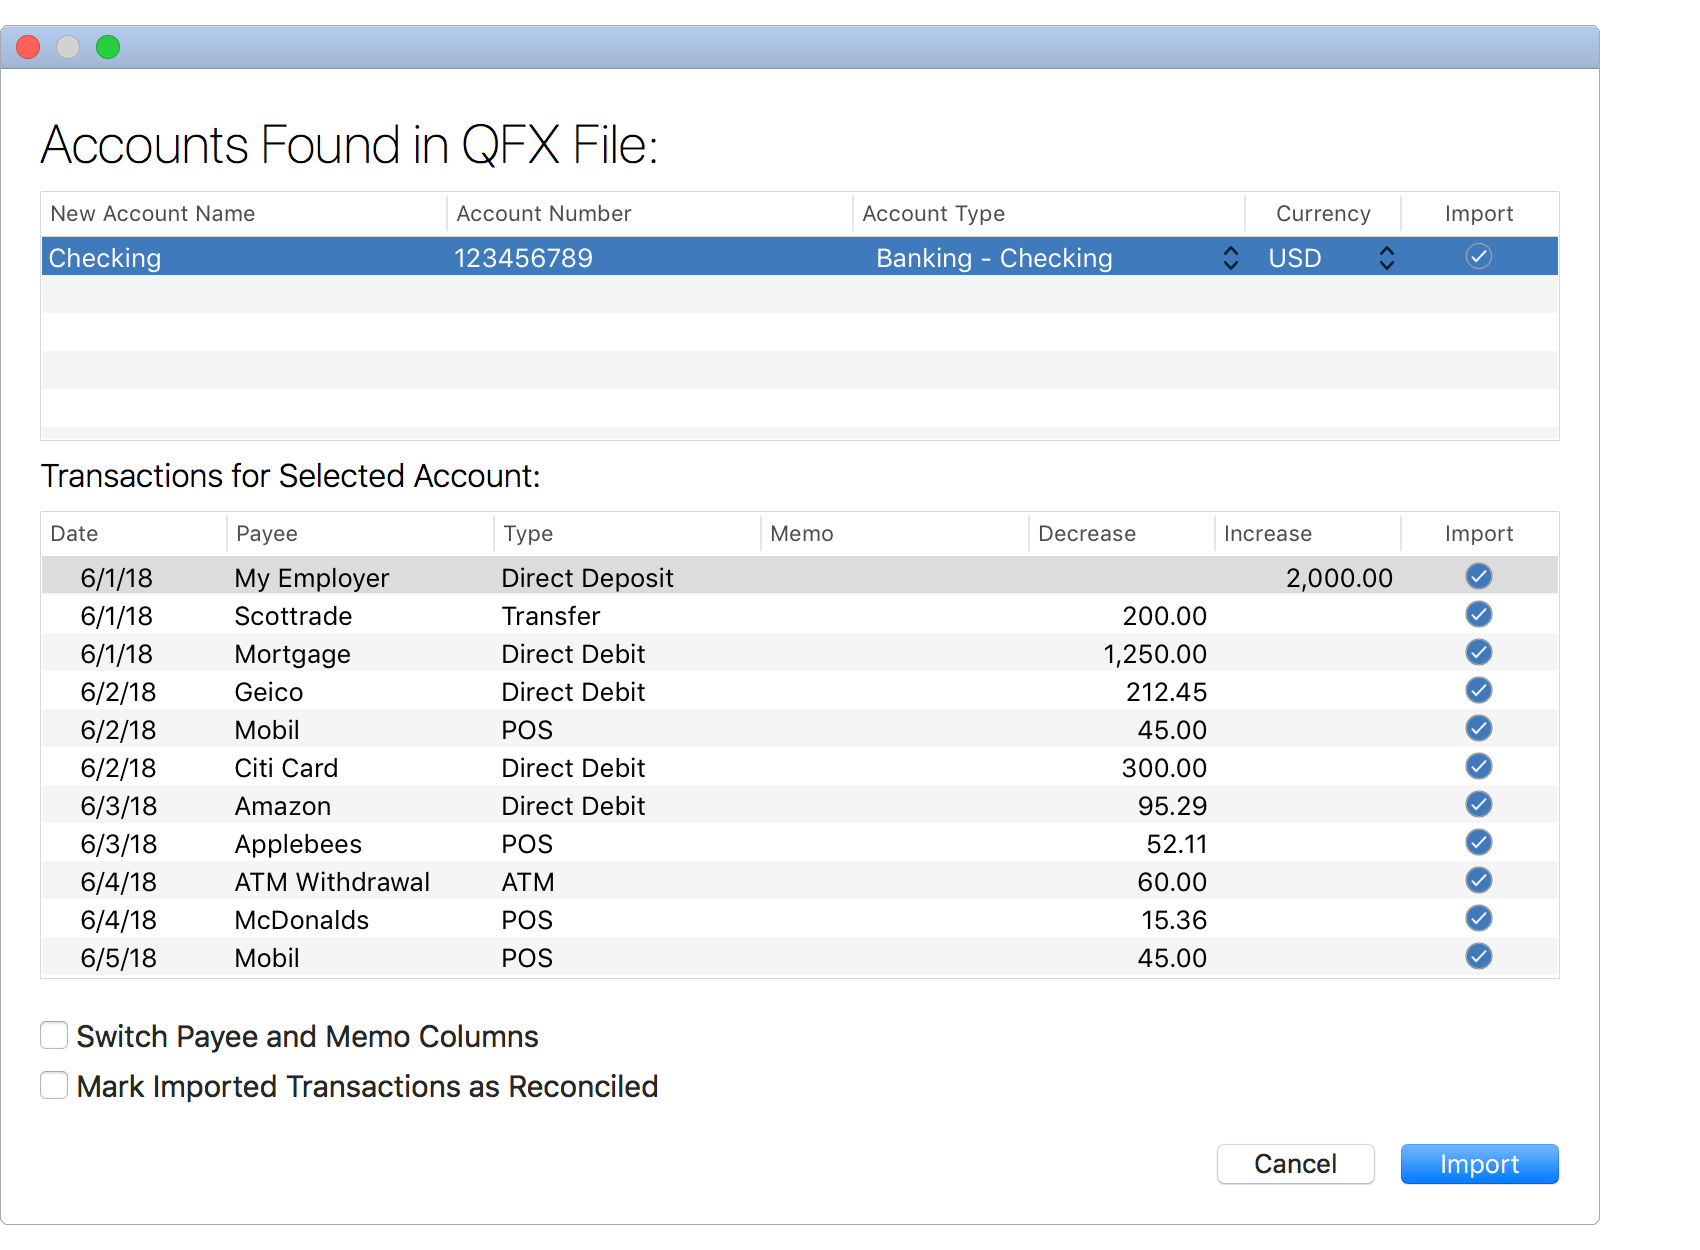
- Review the accounts and the transactions found in the QFX file. Uncheck the "Import" checkbox for any individual account(s) or transactions(s) you do not want to import.
- Check and adjust the account name, account type and currency for each account to import.
- If the information shown for transactions in the memo column is better suited for their payee, select the option to switch the payee and memo columns.
- Check if you'd like all transactions to be marked as reconciled.
- Then click "Import" to import the selected accounts.
![]() Tip:
Use the space bar to toggle the "Import" checkbox for the selected account or for the selected transaction(s).
Tip:
Use the space bar to toggle the "Import" checkbox for the selected account or for the selected transaction(s).

- Review the accounts and the transactions found in the OFX file. Uncheck the "Import" checkbox for any individual account(s) or transactions(s) you do not want to import.
- Check and adjust the account name, account type and currency for each account to import.
- If the information shown for transactions in the memo column is better suited for their payee, select the option to switch the payee and memo columns.
- Check if you'd like all transactions to be marked as reconciled.
- Then click "Import" to import the selected accounts.
![]() Tip:
Use the space bar to toggle the "Import" checkbox for the selected account or for the selected transaction(s).
Tip:
Use the space bar to toggle the "Import" checkbox for the selected account or for the selected transaction(s).
Begin updating your new account(s)
Categorize the transactions in your new account(s) to track your cash flow in detail. Customize settings for the account including account color and optional table columns.
![]() Note:
For investment accounts created by importing QFX or OFX files you will need to update any initial position adjustment transactions to have a Price of the cost basis per share of those shares.
This is due to the information from the institution not containing cost basis information for shares held prior to the transactions available in the file.
Note:
For investment accounts created by importing QFX or OFX files you will need to update any initial position adjustment transactions to have a Price of the cost basis per share of those shares.
This is due to the information from the institution not containing cost basis information for shares held prior to the transactions available in the file.