Reconciling your accounts is an important part of tracking your finances as it performs two important functions: making sure your accounts are balanced by comparing your records against the institution's records and for verifying the transactions are legitimate. Through the use of the different transaction status options, every transaction can evolve from "Pending" to "Recorded" to "Cleared" to "Reconciled" or through any combination of those. Periodically reconcile your accounts to verify your transaction records against the institution's and then mark the matching transactions as "Reconciled". You can reconcile accounts against official statements or simply against the transaction records available on the institution's website or app.
There's different options to reconcile accounts: reconcile in place where you reconcile accounts right in an account's Transactions section, the option to reconcile to a specific balance where you reconcile the account to a specific balance in a separate window, and the option to reconcile to a statement where you reconcile the account to an official statement in a separate window. Learn more below about how to reconcile an account using each of these options as well as how to track down discrepancies.
Reconcile in place
Mark transactions as reconciled right in the account's Transactions section. A simple option to reconcile accounts with lower activity which can be done at any time.
General layout info:
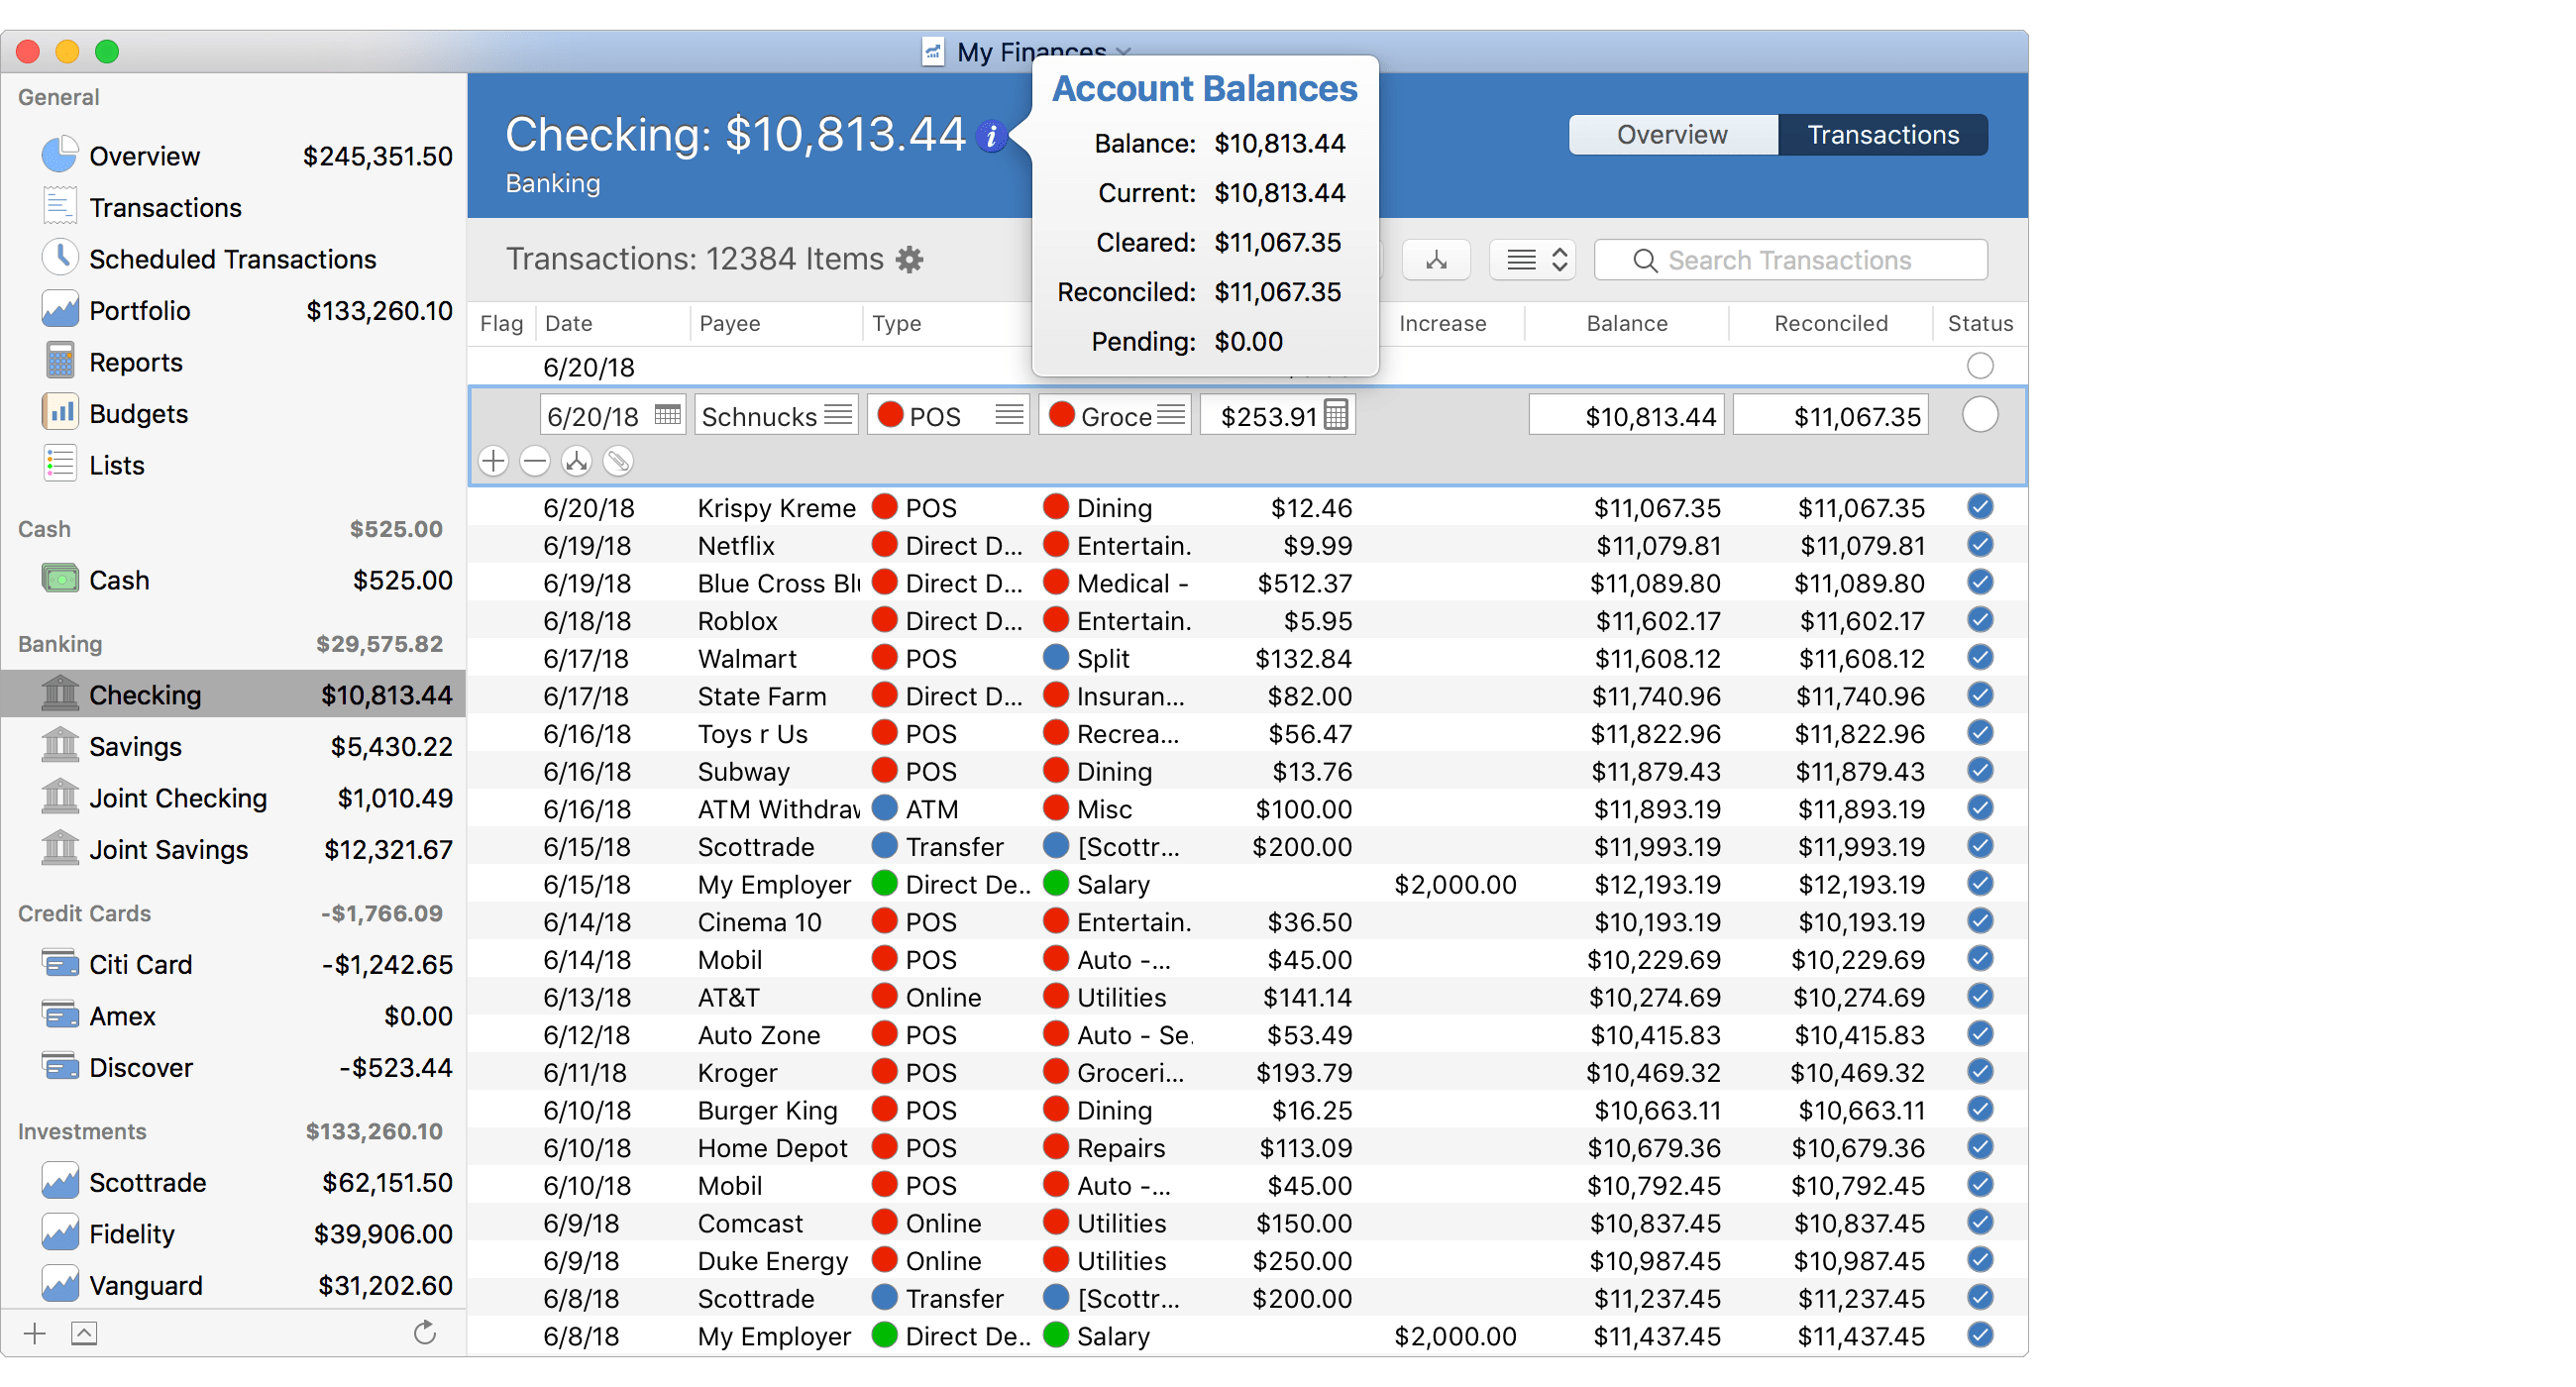
Reconciled balance locations:
- Info popover: View an account's "Reconciled" balance, and other additional account balance information, by placing the mouse cursor over the
 button on the right of the account's name and balance at the top.
 - Table column: View an account's running "Reconciled" balance for each transaction by adding the "Reconciled" balance optional column to the table of transactions. Adjust the optional columns for a table by using the program's View → Columns menu or by Control-clicking on an uneditable area of the table.
Although you can mark transactions as "Reconciled" at any time, it can be much easier to do so from oldest to newest when compared against the institution's records. The first task when reconciling an account is verifying you're not already starting with a discrepancy. If you are reconciling against an official statement, make sure the "Reconciled" balance in the program is the same as the statement's beginning balance. If you are reconciling against the transaction records on the institution's website or app, make sure the "Reconciled" balance in the program is the same as of where you left off reconciling against the transaction records at the institution. If there is already a discrepancy then you should track down the discrepancy by going back to a fresh starting point and reconcile the account from there before attempting to reconcile additional transactions. If your starting point is correct begin matching transactions from your records to those of the institution.
Match transaction records:
Go through each transaction as listed on the institution's statement or on the institution's website or app and do the following:
- Validate: Review the transaction for being an actual legitimate transaction. It is not uncommon for mistakes to be made such as being overcharged or incorrectly charged.
- Match: Find the matching transaction in the program. Be absolutely sure the transaction's amount matches and there isn't a discrepancy such as being over or under charged. If there isn't a match, you can add the matching transaction to your records. If you find what should be the match, but isn't recorded properly, you can edit an existing transaction that should be the matching transaction as appropriate.
- Reconcile or Flag: If you found a matching transaction in your records, mark it as reconciled by clicking the status and selecting "Reconciled", by selecting "Mark as Reconciled" from the program's Transactions menu, or by pressing Command-R and then save the transaction if needed. If you found a matching transaction that isn't legitimate, you can go ahead and mark it as reconciled or leave it as it is. Then you should flag the transaction as "Needs further review", or with your own custom flag, and contact the institution regarding the transaction.
Repeat these steps until you have reviewed all of the transactions listed by the institution. Ideally when you are done you will have matched and reconciled every transaction from the institution to ones in your records and the "Reconciled" balance for your records will match the ending balance you are reconciling against at the institution. If it doesn't, then you will need to track down the discrepancy.
![]() Tip:
It is an option to mark multiple transactions as reconciled at once.
If you can easily identify the ending balance you are trying to reconcile against at the institution matches the balance in the program, then you can review the transactions up to that point for being valid, and then mark them all as reconciled.
You can select any number of transactions and use the Transactions menu option for "Mark as Reconciled" or press Command-R to mark them as reconciled.
Tip:
It is an option to mark multiple transactions as reconciled at once.
If you can easily identify the ending balance you are trying to reconcile against at the institution matches the balance in the program, then you can review the transactions up to that point for being valid, and then mark them all as reconciled.
You can select any number of transactions and use the Transactions menu option for "Mark as Reconciled" or press Command-R to mark them as reconciled.
Reconcile to a specific balance
For reconciling an account to a specific balance as of a specific day. An option to reconcile an account that can be done at any time and handle any level of account activity.
Select to reconcile:
- With the account you want to reconcile selected in the main account list, select "Reconcile Account" from the Accounts menu or press Shift-Command-R.
Setup reconciling:
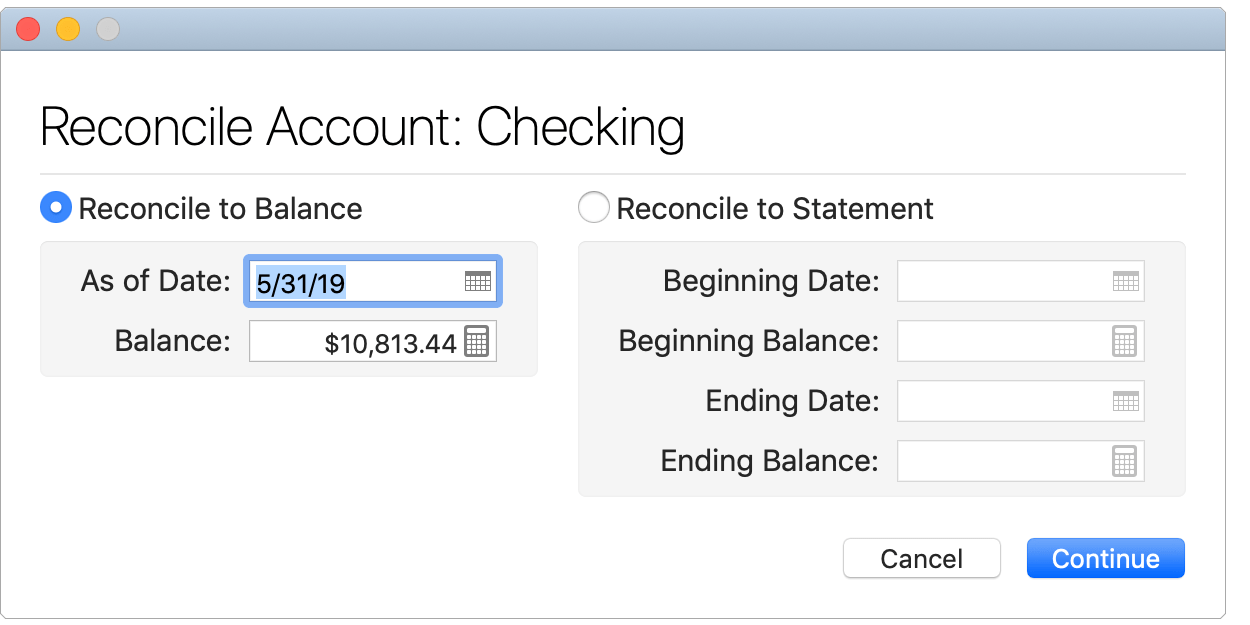
- Choose the option to "Reconcile to Balance" if not already selected.
- Enter the date of the balance you will be reconciling to.
- Enter the balance you will be reconciling to.
- Select "Continue" or press Return to begin reconciling.
Reconcile the transactions:
Next, you will be presented with the main reconciling window displaying the account's balance information on the upper left, the reconciling balance information on the upper right, and two lists showing all of the currently unreconciled transactions for the account. The deposit/increase transactions will be listed separately on the left and the expense/decrease transactions will be listed on the right. Note how the target balance you are reconciling to is listed on the upper right along with an icon indicating if this target balance equals the reconciled balance.
General layout info:
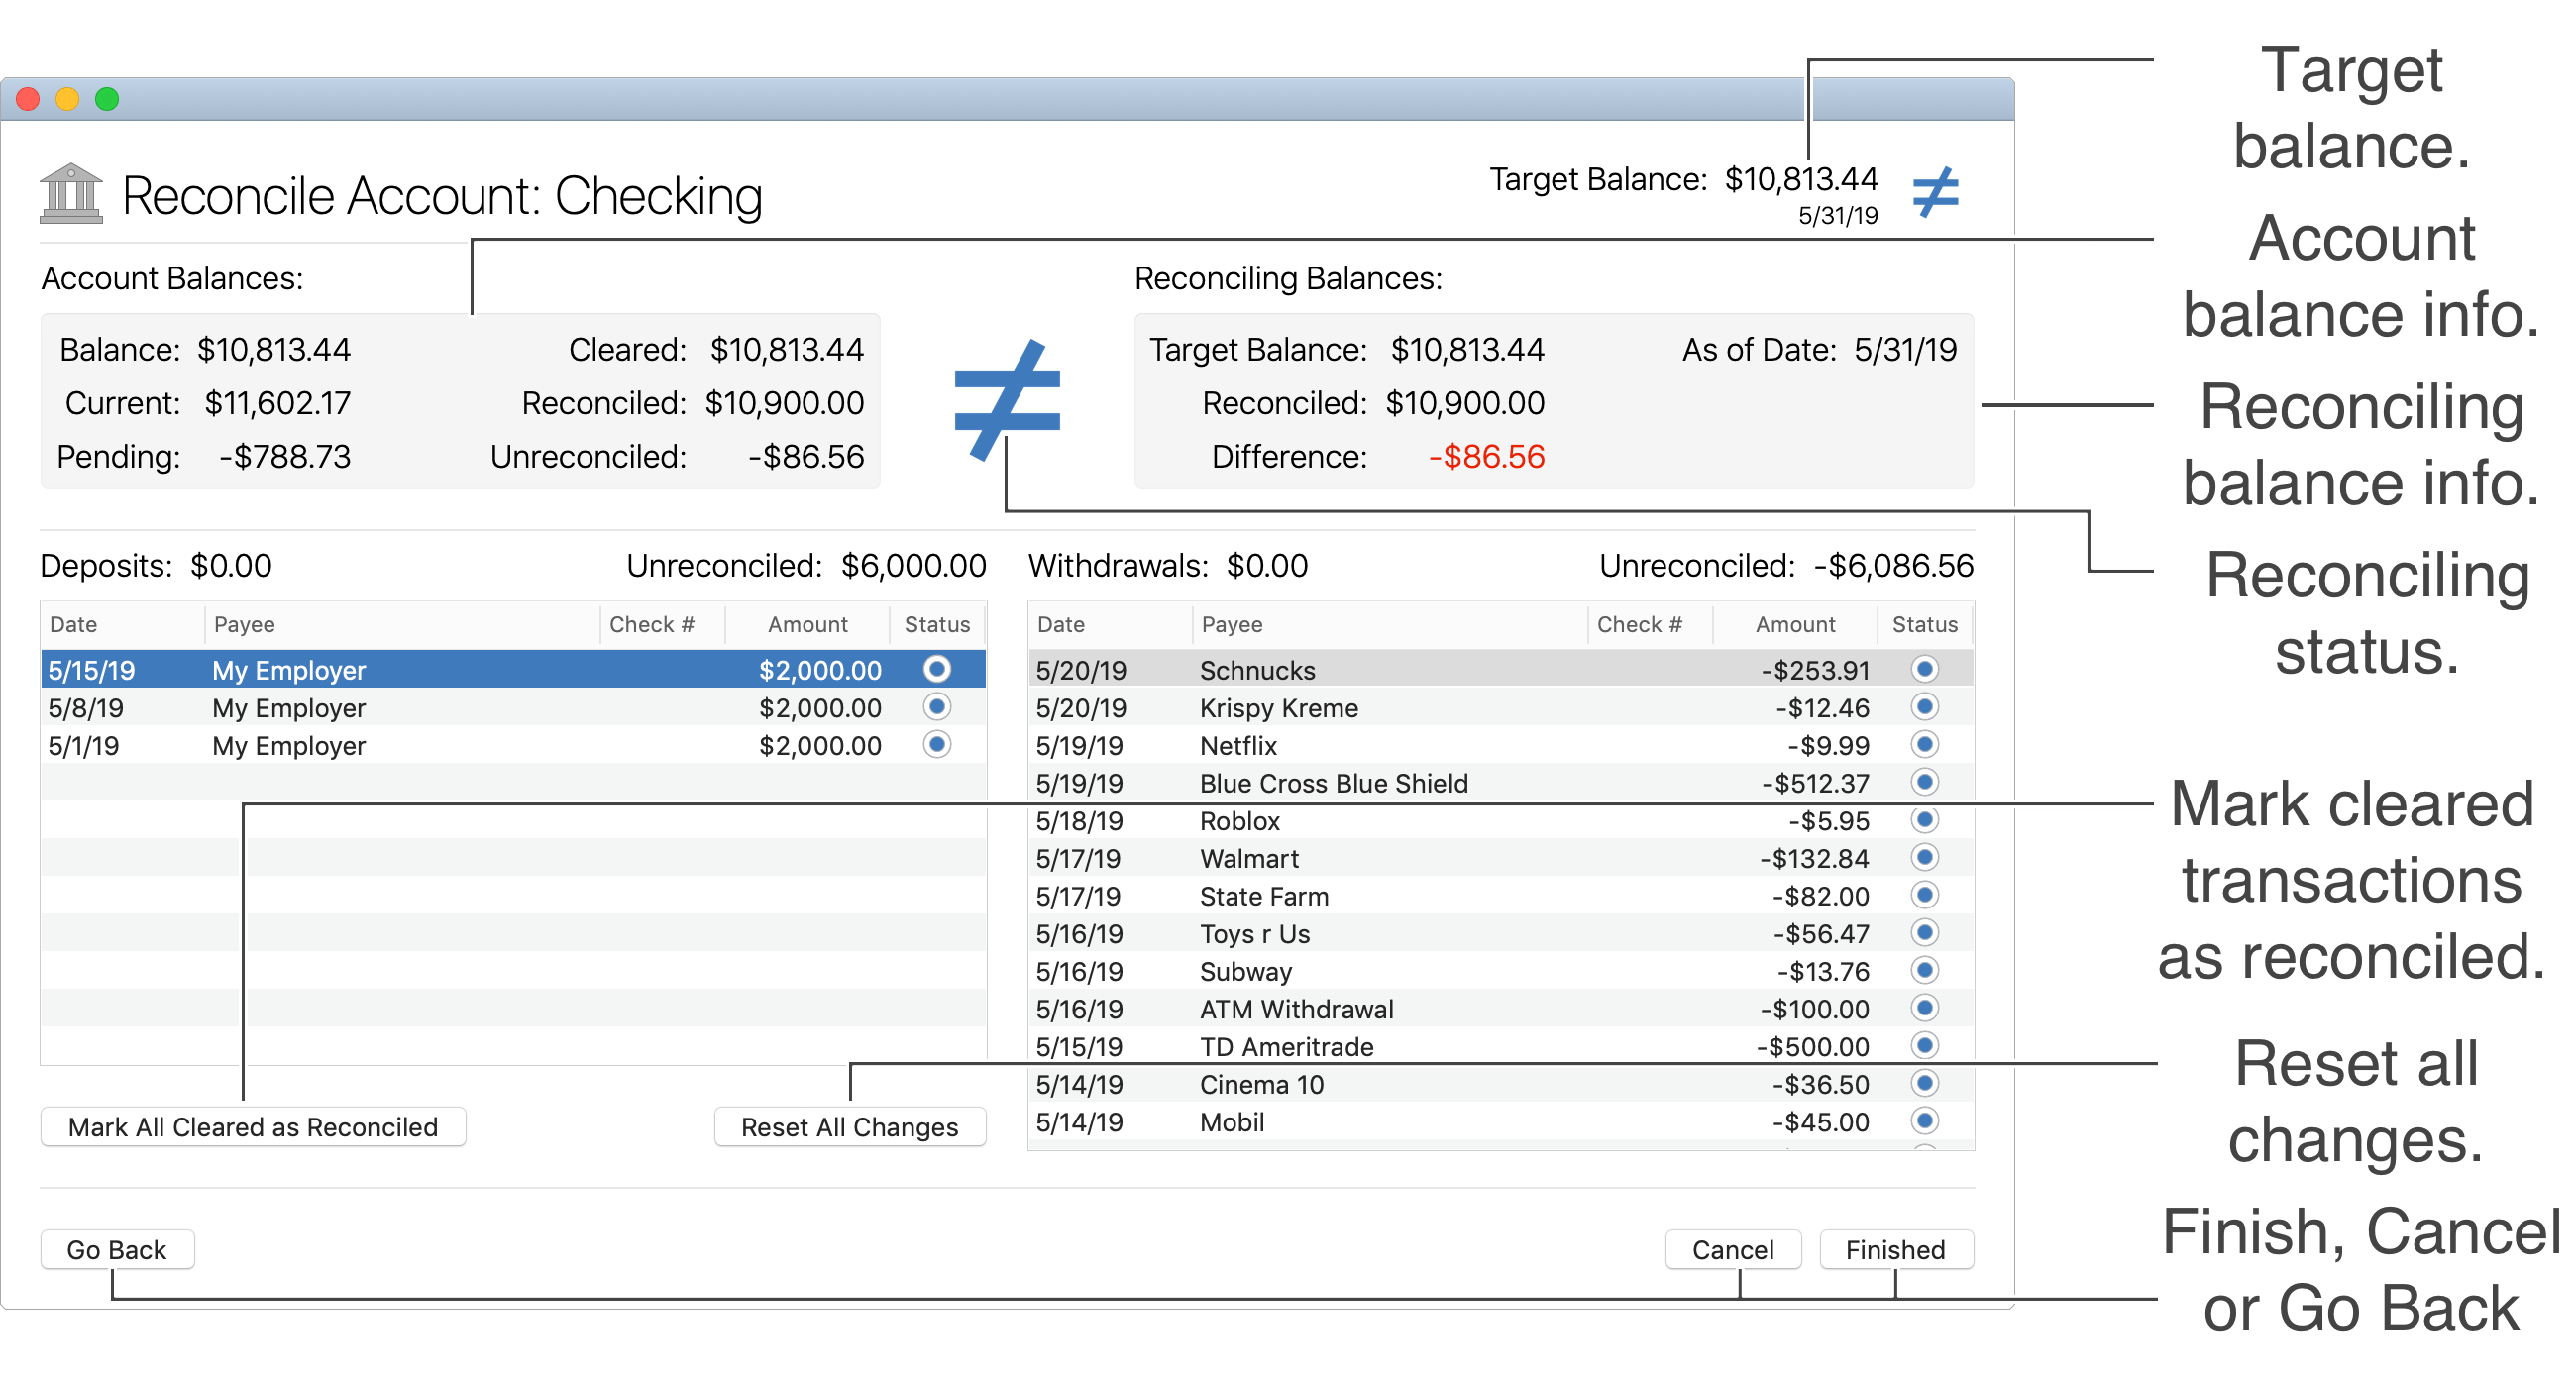
Reconciling information:
- Target Balance: The target balance you are reconciling to is listed on the upper right along with an icon indicating if this target balance equals the reconciled balance in this session.
This indicator icon will appear as
 when the reconciled balance is not equal to the target balance and it will appear as
  when the reconciled balance matches the target balance.
If the reconciled balance matches the target balance before there has been any changes made to the status of transactions then this indicator icon will appear as
when the reconciled balance matches the target balance.
If the reconciled balance matches the target balance before there has been any changes made to the status of transactions then this indicator icon will appear as  .
. - Account Balances: This is the information for the account's balance as of any changes in this current reconciling session.
- Balance: The sum of all transactions in the account as of today, but may or may not also include early posted transactions based on Accounts preferences. This is also the balance listed in the main account list and at the top of the account.
- Current: The sum of all transactions through today.
- Pending: The sum of all transactions marked as pending or that are after today.
- Cleared: The sum of all transactions marked as cleared or reconciled.
- Reconciled: The sum of all transactions marked as reconciled.
- Unreconciled: The sum of all transactions not marked as reconciled.
- Reconciling Status: Between the Account Balances and Reconciling Balances is an icon indicating whether or not the account's reconciled balance as of this reconciling session matches the target balance.
This indicator icon will indicate if the balances are either Equal To
 or Not Equal To .
 - Reconciling Balances: This is the information for the current reconciling session.
- Target Balance: The balance you are reconciling to.
- Reconciled: The sum of all transactions marked as reconciled.
- Difference: The difference between the Target Balance and the Reconciled Balance.
- As of Date: The date of the balance you are reconciling to.
- Deposits ("Payments" for credit cards): This section lists all transactions with positive amounts that were not previously marked as reconciled. Note the amounts listed above the transactions. The amount on the left indicates the sum of transactions marked as reconciled during this session. The amount on the right indicates the sum of transactions not marked as reconciled.
- Withdrawals ("Charges" for credit cards): This section lists all transactions with negative amounts that were not previously marked as reconciled. Note the amounts listed above the transactions. The amount on the left indicates the sum of transactions marked as reconciled during this session. The amount on the right indicates the sum of transactions not marked as reconciled.
Match transaction records:
Go through each transaction as listed on the institution's statement or on the institution's website or app and do the following:
- Validate: Review the transaction for being an actual legitimate transaction. It is not uncommon for mistakes to be made such as being overcharged or incorrectly charged.
- Match: Find the matching transaction in the program. Be absolutely sure the transaction's amount matches and there isn't a discrepancy such as being over or under charged. If there isn't a match, you can add the matching transaction to your records. If you find what should be the match, but isn't recorded properly, you can edit an existing transaction that should be the matching transaction as appropriate.
- Reconcile or Flag: If you found a matching transaction in your records, mark it as reconciled by clicking on the status of the selected transaction(s), by selecting "Mark as Reconciled" from the program's Transactions menu, or by pressing Command-R. If you found a matching transaction that isn't legitimate, you can go ahead and mark it as reconciled or leave it as it is. Then you should flag the transaction as "Needs further review", or with your own custom flag, and contact the institution regarding the transaction.
![]() Note:
No changes to the status of transactions will actually be saved until you select to be "Finished".
Note:
No changes to the status of transactions will actually be saved until you select to be "Finished".
![]() Tip:
It is an option to mark multiple transactions as reconciled at once.
You can select any number of transactions and click on their status to change their status to reconciled, press the spacebar to change the status to reconciled, use the Transactions menu option for "Mark as Reconciled", or press Command-R to mark them as reconciled.
Tip:
It is an option to mark multiple transactions as reconciled at once.
You can select any number of transactions and click on their status to change their status to reconciled, press the spacebar to change the status to reconciled, use the Transactions menu option for "Mark as Reconciled", or press Command-R to mark them as reconciled.
![]() Tip:
If you identify the target balance you are trying to reconcile against at the institution matches the "Cleared" balance listed in the reconcile window then you can use the option to "Mark All Cleared as Reconciled" to quickly reconcile the account and be done.
Tip:
If you identify the target balance you are trying to reconcile against at the institution matches the "Cleared" balance listed in the reconcile window then you can use the option to "Mark All Cleared as Reconciled" to quickly reconcile the account and be done.
![]() Tip:
Use the Batch Edit option in the Transactions menu to quickly make additional changes to the selected transaction(s) when reconciling.
You can also record, delete, and edit transactions as needed while in the middle of a reconciling session.
Any changes made will be reflected in the current reconciling session.
Tip:
Use the Batch Edit option in the Transactions menu to quickly make additional changes to the selected transaction(s) when reconciling.
You can also record, delete, and edit transactions as needed while in the middle of a reconciling session.
Any changes made will be reflected in the current reconciling session.
Finish up:
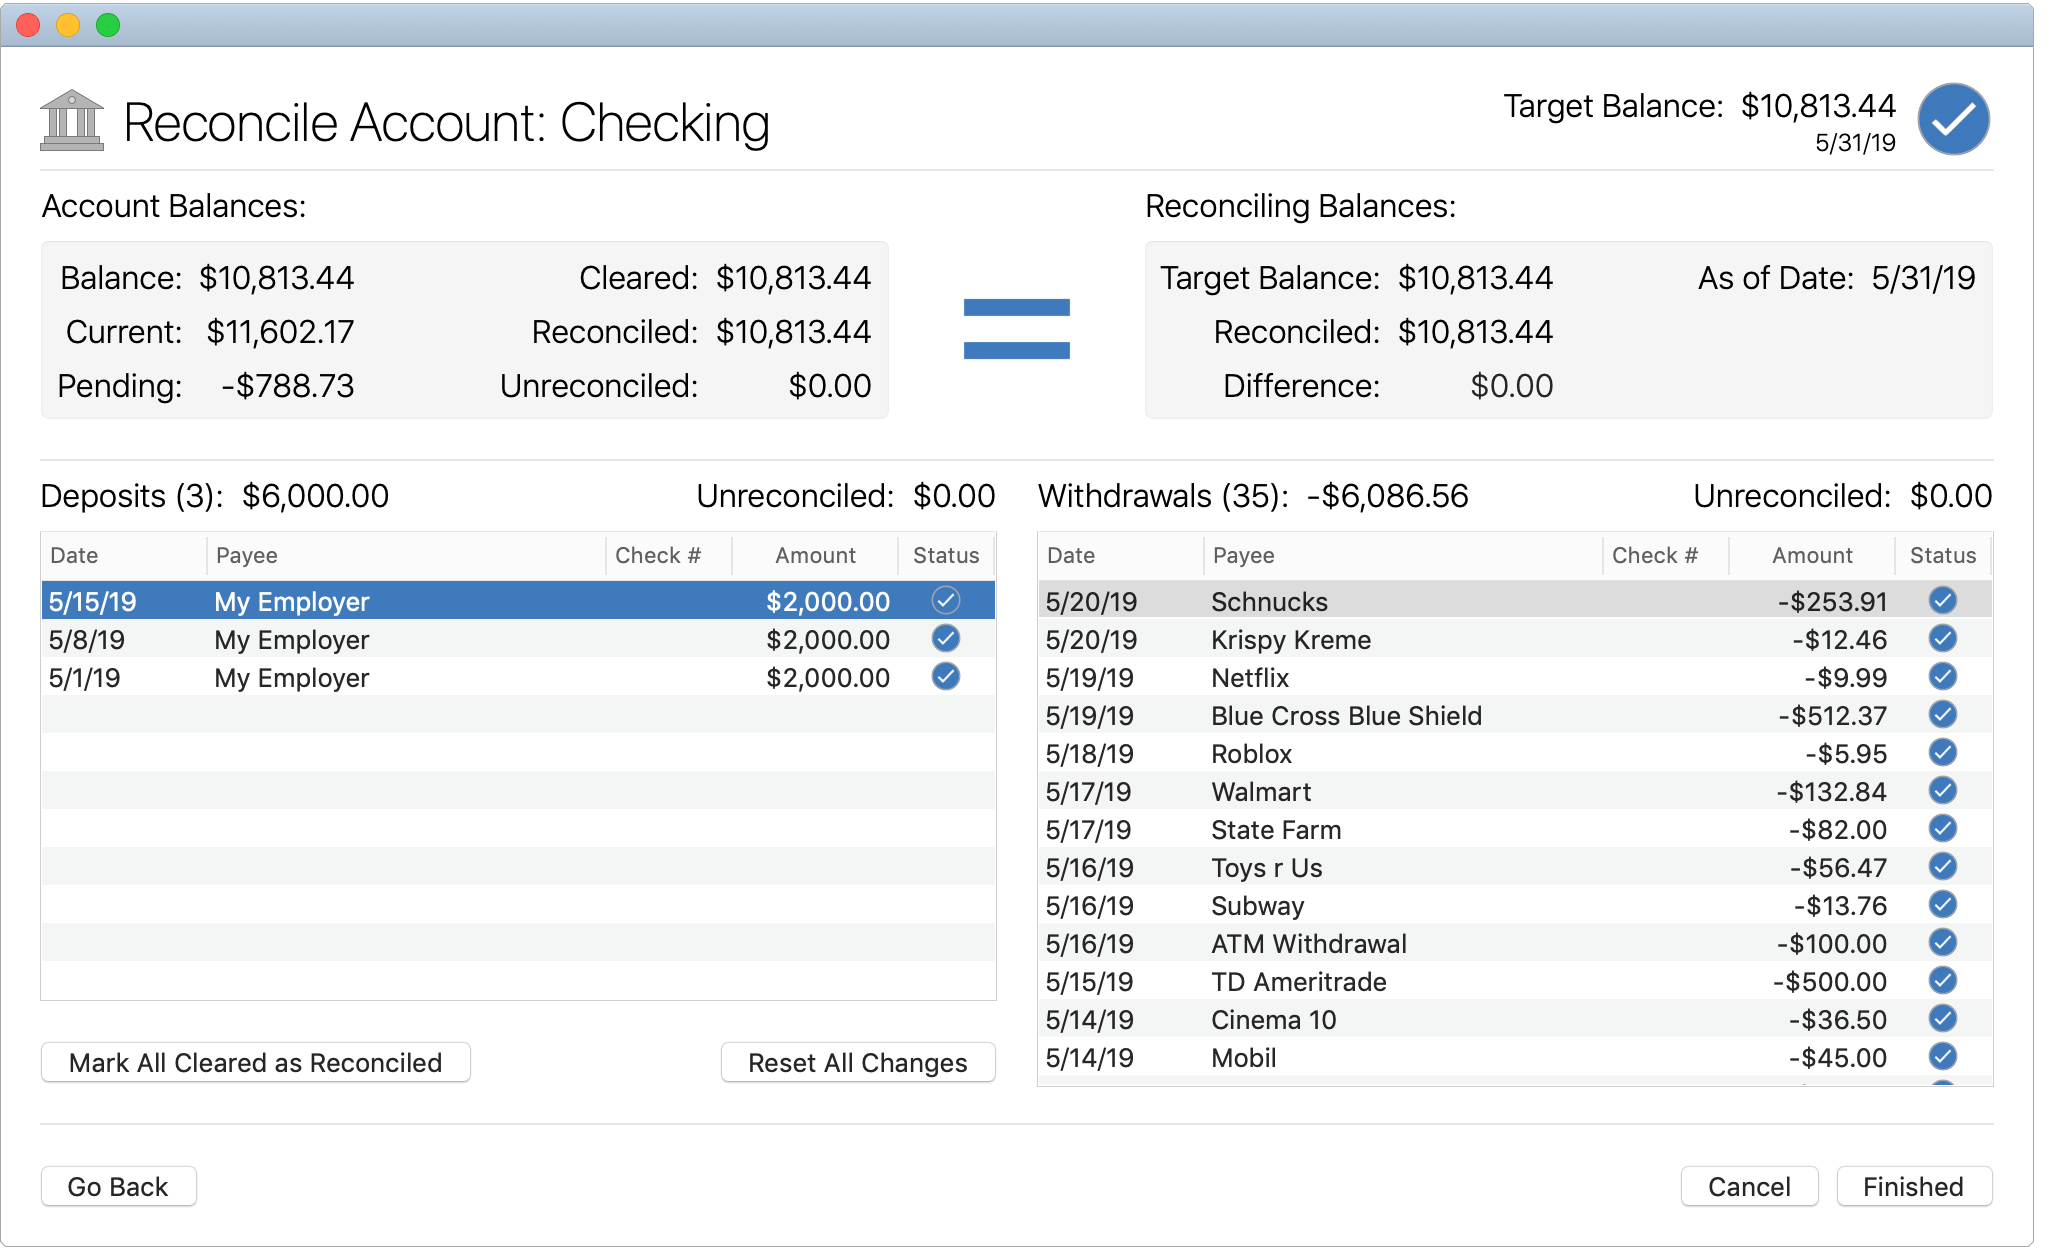
Repeat these steps until you have reviewed all of the transactions listed by the institution.
Ideally when you are done you will have matched and reconciled every transaction from the institution to ones in your records and the "Reconciled" balance for your records will match the ending balance you are reconciling against at the institution.
At that point the reconciling indicator icon on the upper right should show ![]() and the indicator icon between the Account Balances and Reconciling Balances should show
and the indicator icon between the Account Balances and Reconciling Balances should show ![]() .
If it does, then you can select "Finished" and you are done reconciling the account.
If it doesn't, then you will need to track down the discrepancy.
.
If it does, then you can select "Finished" and you are done reconciling the account.
If it doesn't, then you will need to track down the discrepancy.
Reconcile to statement
For reconciling an account to an official statement from an institution. An ideal option for reconciling accounts with a large amount of activity and/or for when you want to make sure your records match the records listed by the institution. This option can only be used when the reconciled balance for the account in the program currently matches the statement's beginning balance. If there is already a discrepancy then you will need to track down the discrepancy by going back to a fresh starting point and reconcile the account from there before attempting to reconcile additional transactions.
Select to reconcile:
- With the account you want to reconcile selected in the main account list, select "Reconcile Account" from the Accounts menu or press Shift-Command-R.
Setup reconciling:
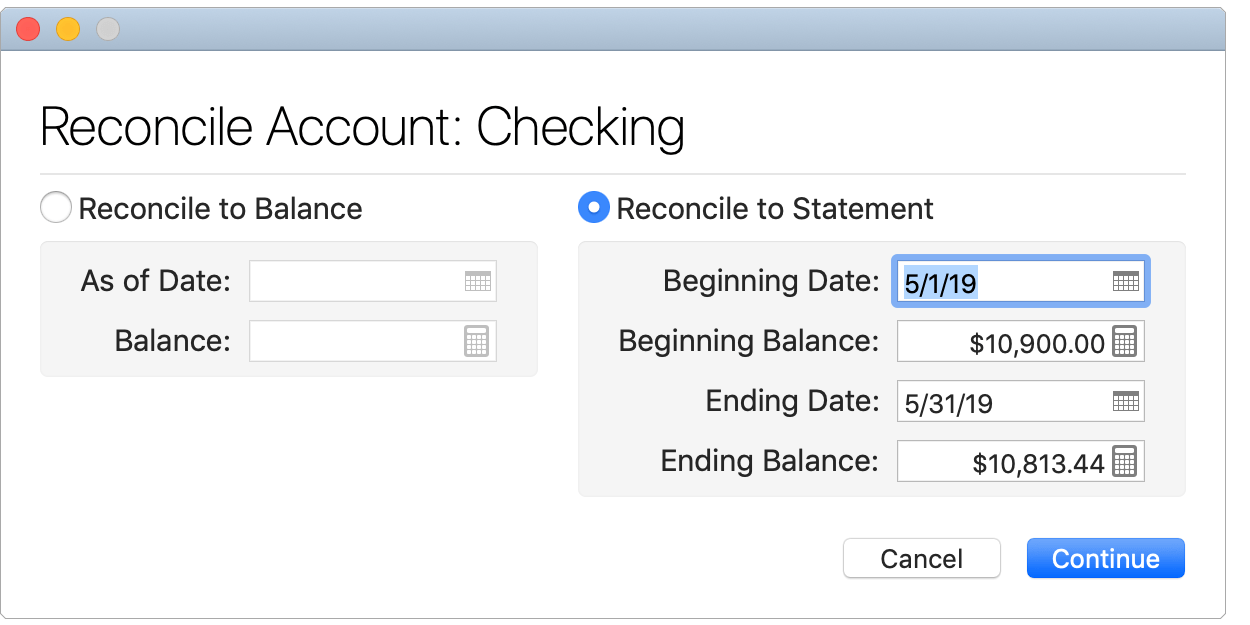
- Choose the option to "Reconcile to Statement" if not already selected.
- Enter the beginning date for the statement.
- Enter the beginning balance for the statement.
- Enter the ending date for the statement.
- Enter the ending balance for the statement.
- Select "Continue" or press Return to begin reconciling.
![]() Note:
You will be alerted if the current reconciled balance for the account does not match the entered beginning balance for the statement.
You will need to either track down the discrepancy by going back to a fresh starting point before you can reconcile the statement or you can select to record an adjustment transaction that will force the account's reconciled balance to match the beginning balance of the statement.
Recording balance adjustments such as this is considered the option of last resort as it is more preferable to identify and correct the discrepancy.
Note:
You will be alerted if the current reconciled balance for the account does not match the entered beginning balance for the statement.
You will need to either track down the discrepancy by going back to a fresh starting point before you can reconcile the statement or you can select to record an adjustment transaction that will force the account's reconciled balance to match the beginning balance of the statement.
Recording balance adjustments such as this is considered the option of last resort as it is more preferable to identify and correct the discrepancy.
Reconcile the transactions:
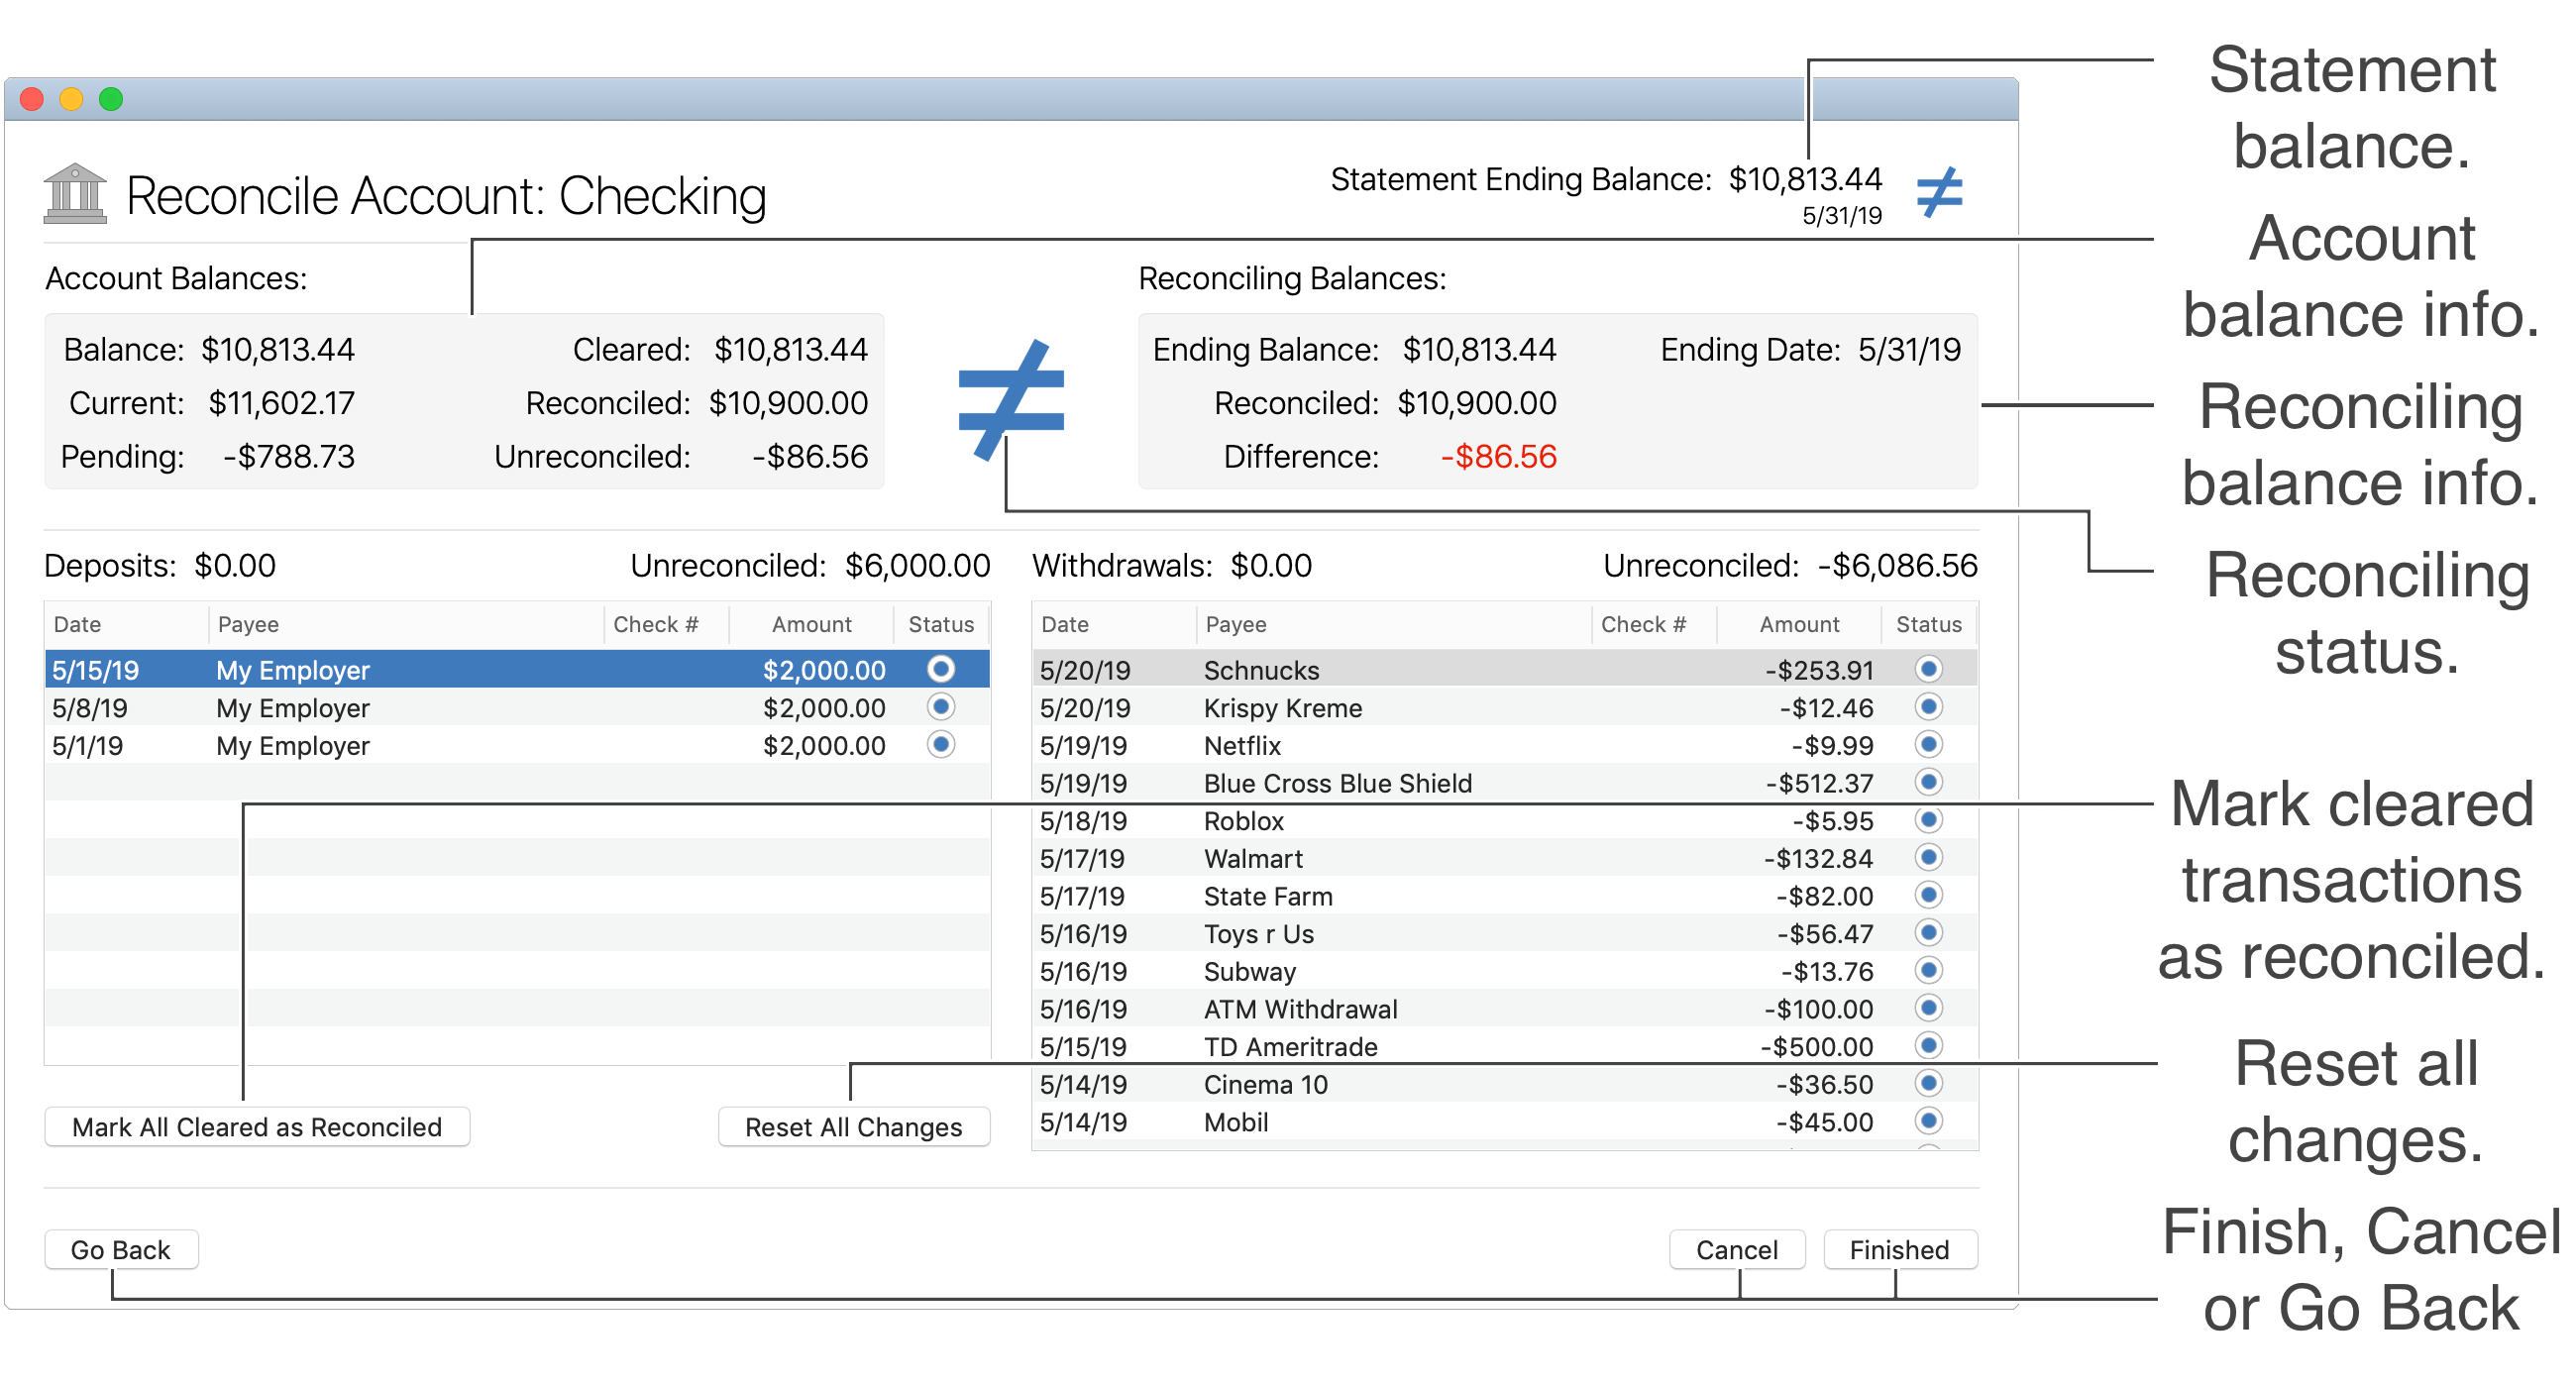
Next, you will be presented with the main reconciling window displaying the account's balance information on the upper left, the reconciling balance information on the upper right, and two lists showing all of the currently unreconciled transactions for the account. The deposit/increase transactions will be listed separately on the left and the expense/decrease transactions will be listed on the right. Note how the statement's ending balance you are reconciling to is listed on the upper right along with an icon indicating if this ending balance equals the reconciled balance.
General layout info:
Reconciling information:
- Statement Ending Balance: The statement's ending balance you are reconciling to is listed on the upper right along with an icon indicating if this ending balance equals the reconciled balance in this session.
This indicator icon will appear as when the reconciled balance is not equal to the statement's ending balance and it will appear as when the reconciled balance matches the statement's ending balance.
If the reconciled balance matches the statement's ending balance before there has been any changes made to the status of transactions then this indicator icon will appear as .
- Account Balances: This is the information for the account's balance as of any changes in this current reconciling session.
- Balance: The sum of all transactions in the account as of today, but may or may not also include early posted transactions based on Accounts preferences. This is also the balance listed in the main account list and at the top of the account.
- Current: The sum of all transactions through today.
- Pending: The sum of all transactions marked as pending or that are after today.
- Cleared: The sum of all transactions marked as cleared or reconciled.
- Reconciled: The sum of all transactions marked as reconciled.
- Unreconciled: The sum of all transactions not marked as reconciled.
- Reconciling Status: Between the Account Balances and Reconciling Balances is an icon indicating whether or not the account's reconciled balance as of this reconciling session matches the statement's ending balance.
This indicator icon will indicate if the balances are either Equal To or Not Equal To .
- Reconciling Balances: This is the information for the current reconciling session.
- Ending Balance: The statement's ending balance you are reconciling to.
- Reconciled: The sum of all transactions marked as reconciled.
- Difference: The difference between the Ending Balance and the Reconciled Balance.
- Ending Date: The ending date of the statement you are reconciling against.
- Deposits ("Payments" for credit cards): This section lists all transactions with positive amounts that were not previously marked as reconciled. Note the amounts listed above the transactions. The amount on the left indicates the sum of transactions marked as reconciled during this session. The amount on the right indicates the sum of transactions not marked as reconciled.
- Withdrawals ("Charges" for credit cards): This section lists all transactions with negative amounts that were not previously marked as reconciled. Note the amounts listed above the transactions. The amount on the left indicates the sum of transactions marked as reconciled during this session. The amount on the right indicates the sum of transactions not marked as reconciled.
Match transaction records:
Go through each transaction as listed on the institution's statement or on the institution's website or app and do the following:
- Validate: Review the transaction for being an actual legitimate transaction. It is not uncommon for mistakes to be made such as being overcharged or incorrectly charged.
- Match: Find the matching transaction in the program. Be absolutely sure the transaction's amount matches and there isn't a discrepancy such as being over or under charged. If there isn't a match, you can add the matching transaction to your records. If you find what should be the match, but isn't recorded properly, you can edit an existing transaction that should be the matching transaction as appropriate.
- Reconcile or Flag: If you found a matching transaction in your records, mark it as reconciled by clicking on the status of the selected transaction(s), by selecting "Mark as Reconciled" from the program's Transactions menu, or by pressing Command-R. If you found a matching transaction that isn't legitimate, you can go ahead and mark it as reconciled or leave it as it is. Then you should flag the transaction as "Needs further review", or with your own custom flag, and contact the institution regarding the transaction.
![]() Note:
No changes to the status of transactions will actually be saved until you select to be "Finished".
Note:
No changes to the status of transactions will actually be saved until you select to be "Finished".
![]() Tip:
It is an option to mark multiple transactions as reconciled at once.
You can select any number of transactions and click on their status to change their status to reconciled, press the spacebar to change the status to reconciled, use the Transactions menu option for "Mark as Reconciled", or press Command-R to mark them as reconciled.
Tip:
It is an option to mark multiple transactions as reconciled at once.
You can select any number of transactions and click on their status to change their status to reconciled, press the spacebar to change the status to reconciled, use the Transactions menu option for "Mark as Reconciled", or press Command-R to mark them as reconciled.
![]() Tip:
If you identify the statement's ending balance you are trying to reconcile against at the institution matches the "Cleared" balance listed in the reconcile window then you can use the option to "Mark All Cleared as Reconciled" to quickly reconcile the account and be done.
Tip:
If you identify the statement's ending balance you are trying to reconcile against at the institution matches the "Cleared" balance listed in the reconcile window then you can use the option to "Mark All Cleared as Reconciled" to quickly reconcile the account and be done.
![]() Tip:
Use the Batch Edit option in the Transactions menu to quickly make additional changes to the selected transaction(s) when reconciling.
You can also record, delete, and edit transactions as needed while in the middle of a reconciling session.
Any changes made will be reflected in the current reconciling session.
Tip:
Use the Batch Edit option in the Transactions menu to quickly make additional changes to the selected transaction(s) when reconciling.
You can also record, delete, and edit transactions as needed while in the middle of a reconciling session.
Any changes made will be reflected in the current reconciling session.
Finish up:
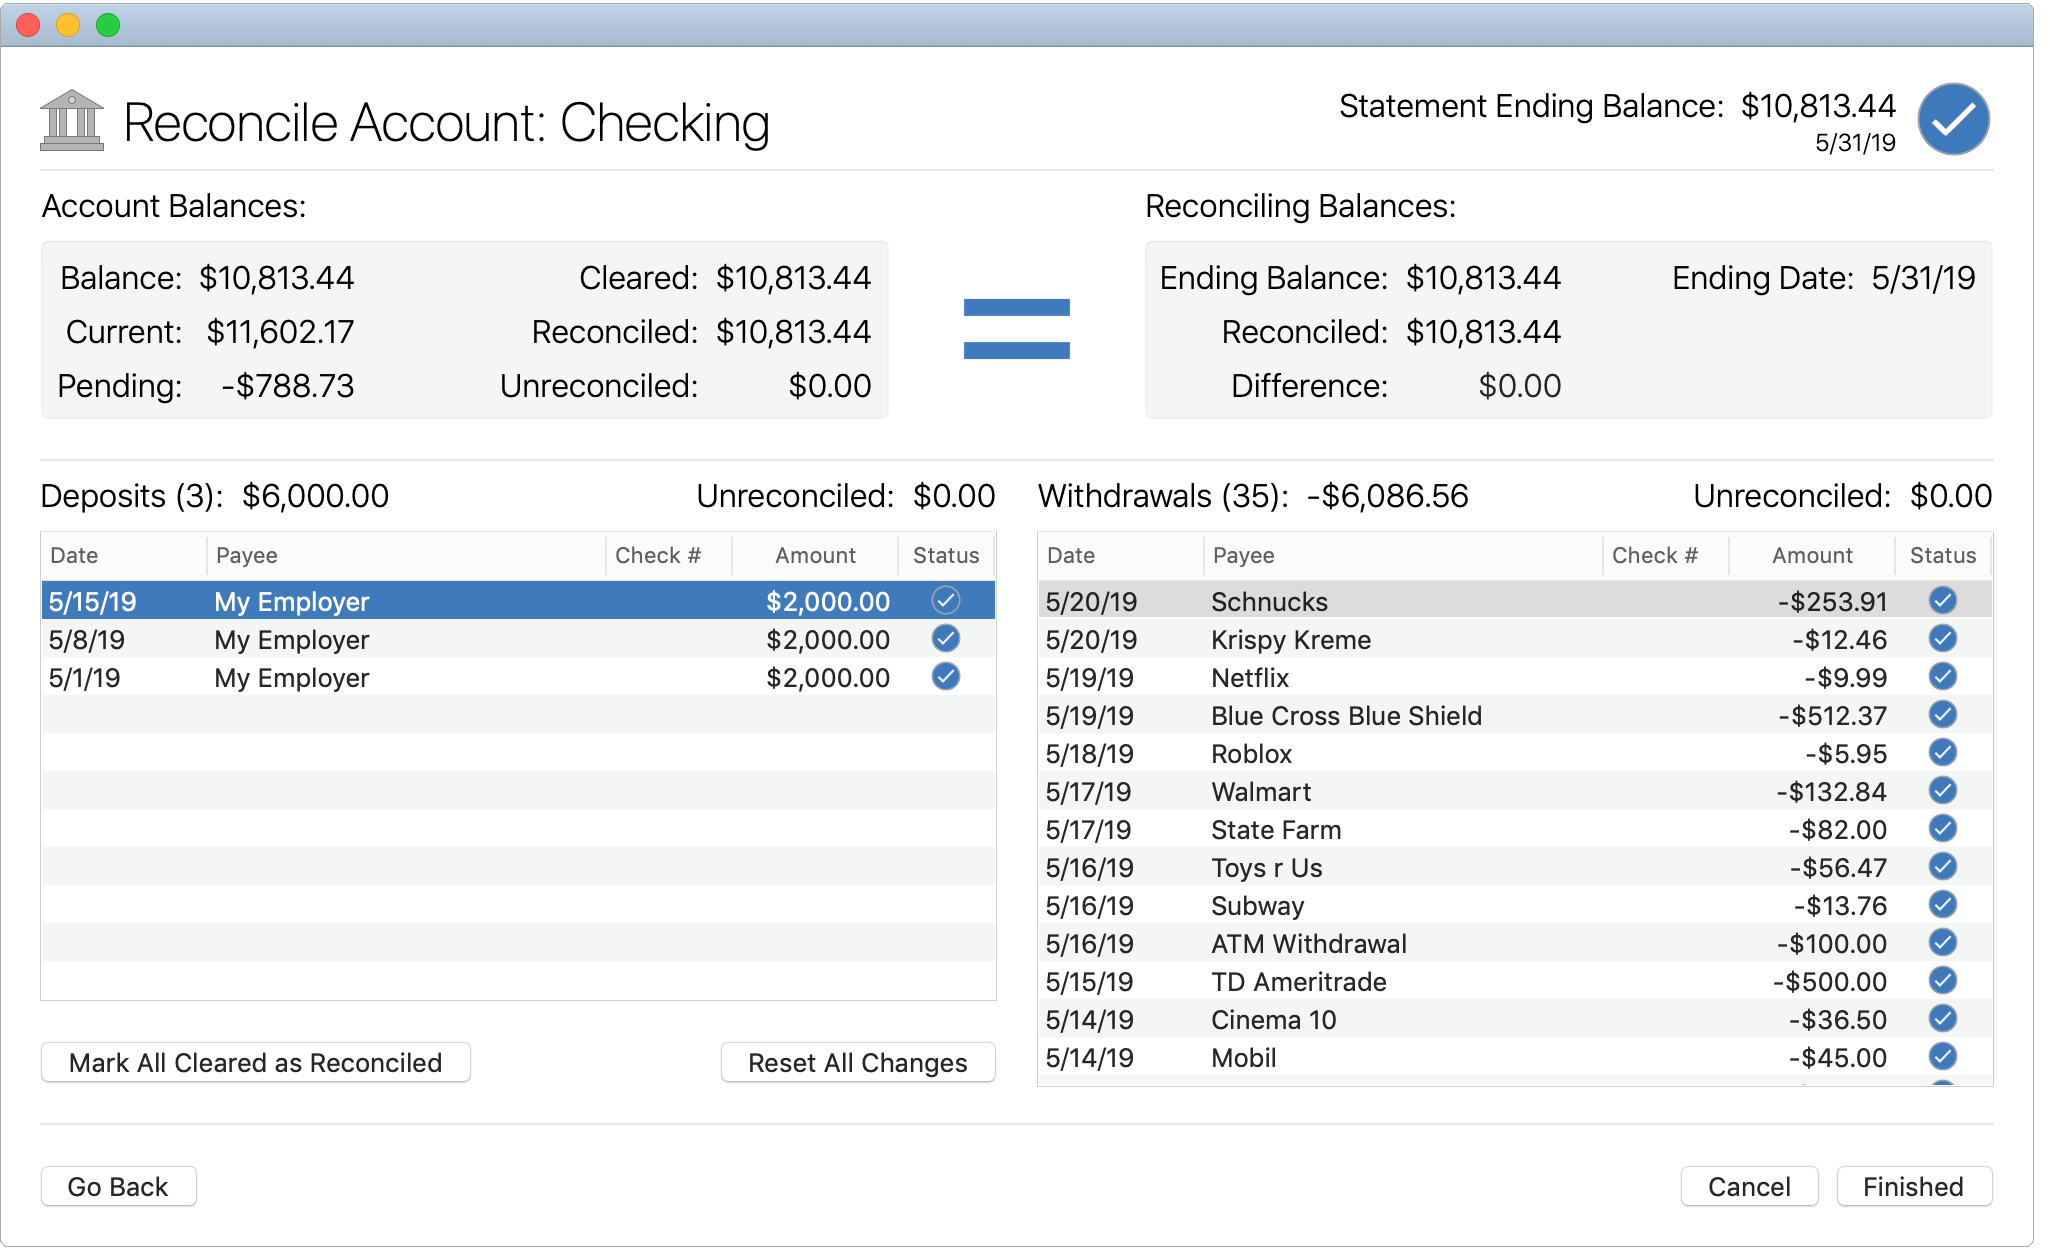
Repeat these steps until you have reviewed all of the transactions listed by the institution.
Ideally when you are done you will have matched and reconciled every transaction from the institution to ones in your records and the "Reconciled" balance for your records will match the ending balance you are reconciling against at the institution.
At that point the reconciling indicator icon on the upper right should show ![]() and the indicator icon between the Account Balances and Reconciling Balances should show
and the indicator icon between the Account Balances and Reconciling Balances should show ![]() .
If it does, then you can select "Finished" and you are done reconciling the account.
If it doesn't, then you will need to track down the discrepancy.
.
If it does, then you can select "Finished" and you are done reconciling the account.
If it doesn't, then you will need to track down the discrepancy.
Tracking down discrepancies:
After comparing your transaction records to the institution's transaction records the "Reconciled" balance for the account in the program should match the ending balance at the institution for the period you are reconciling against. If there's a discrepancy it should be one of the following: (1) one or more missing transactions in your records, (2) one or more transactions in your records not marked as "Reconciled", or (3) a transaction was marked as reconciled inappropriately such as one marked as reconciled, but it had the incorrect amount. Finding the discrepancy can be difficult at times and requires paying close attention to the details of each transaction, especially their amounts. First, check for any transaction(s) in your records that are not yet marked as reconciled as those can be easily identified. Next, go back through the institution's records and make sure you didn't miss recording any of them in your records. If you still have a discrepancy then you will need to get back to a fresh starting point that you can reconcile the account from where the reconciled balance in the program matches the balance at the institution.