Import your finances from other personal finance apps or websites into SEE Finance by exporting your data to one or more QIF, QMTF, QFX, OFX or CSV file(s) and then import the file(s) into SEE Finance. Follow the information below for the specific type of file you will be exporting and importing to learn how to make the switch.
What type of file to import?
You can import from QIF, QMTF, QFX, OFX or CSV files. The file type to import will most likely depend on which exporting option(s) your current personal finance app or website makes available.
• QIF & QMTF files:
QIF or QMTF files are the best choice when importing data from another finance program or website. QIF and QMTF files can include all of the account and transaction information, including split transactions, as well as categories and security prices. The known weaknesses are that QIF and QMTF files do not have a specified date format, do not distinguish between transactions (no unique IDs), do not distinguish between transaction number or check number, and have only basic capabilities for listing investment information. Note that QMTF files that originated from Quicken® Mac don't contain investment account information.
• QFX & OFX files:
QFX or OFX files are preferred when importing straight from an institution. QFX and OFX files have unique IDs to help prevent duplicates, use a standard date format, and can handle more complex transactions such as investments better than other file formats. QFX and OFX files do not contain category or split transaction information as they are usually only created by financial institutions. Note that OFX is actually the file format used in OFX Direct Connect downloads. QFX files are just OFX files with a Quicken® specific institution ID added to them. Sometimes OFX files are listed at institutions as the Microsoft Money® option and sometimes QFX files are listed as the Quicken® option or as the Web Connect option.
• CSV files as a last resort:
CSV files are the file type of last resort as they are not a specific financial file type and are rather just plain text spreadsheet files that can contain anything. That makes importing CSV files more complicated and error prone. Importing CSV files can also only be done one account at a time and it is required that the account is already setup in the program prior to being able to import transactions from a CSV file. Note that split transactions cannot be imported from CSV files.
Export a QIF file:
Refer to the support information available for how to export a QIF file from the personal financial app or website you are currently using. Many times the export options for macOS and Windows® programs are available in the program's File menu.
Import into SEE Finance 2:
With your data exported to a QIF file, you can create a new file in SEE Finance and set it up the contents of the QIF file. It is also an option to import accounts from the QIF file into an existing file for SEE Finance 2.
- Install SEE Finance 2 if you have not done so already.
- Open SEE Finance 2. When you first open the program, after any license and registration prompts, you will be shown the "Welcome to SEE Finance" window which is the first step in creating a file. At any time you can select "New File" from the program's File menu to begin creating a new file. Select to "Get Started".

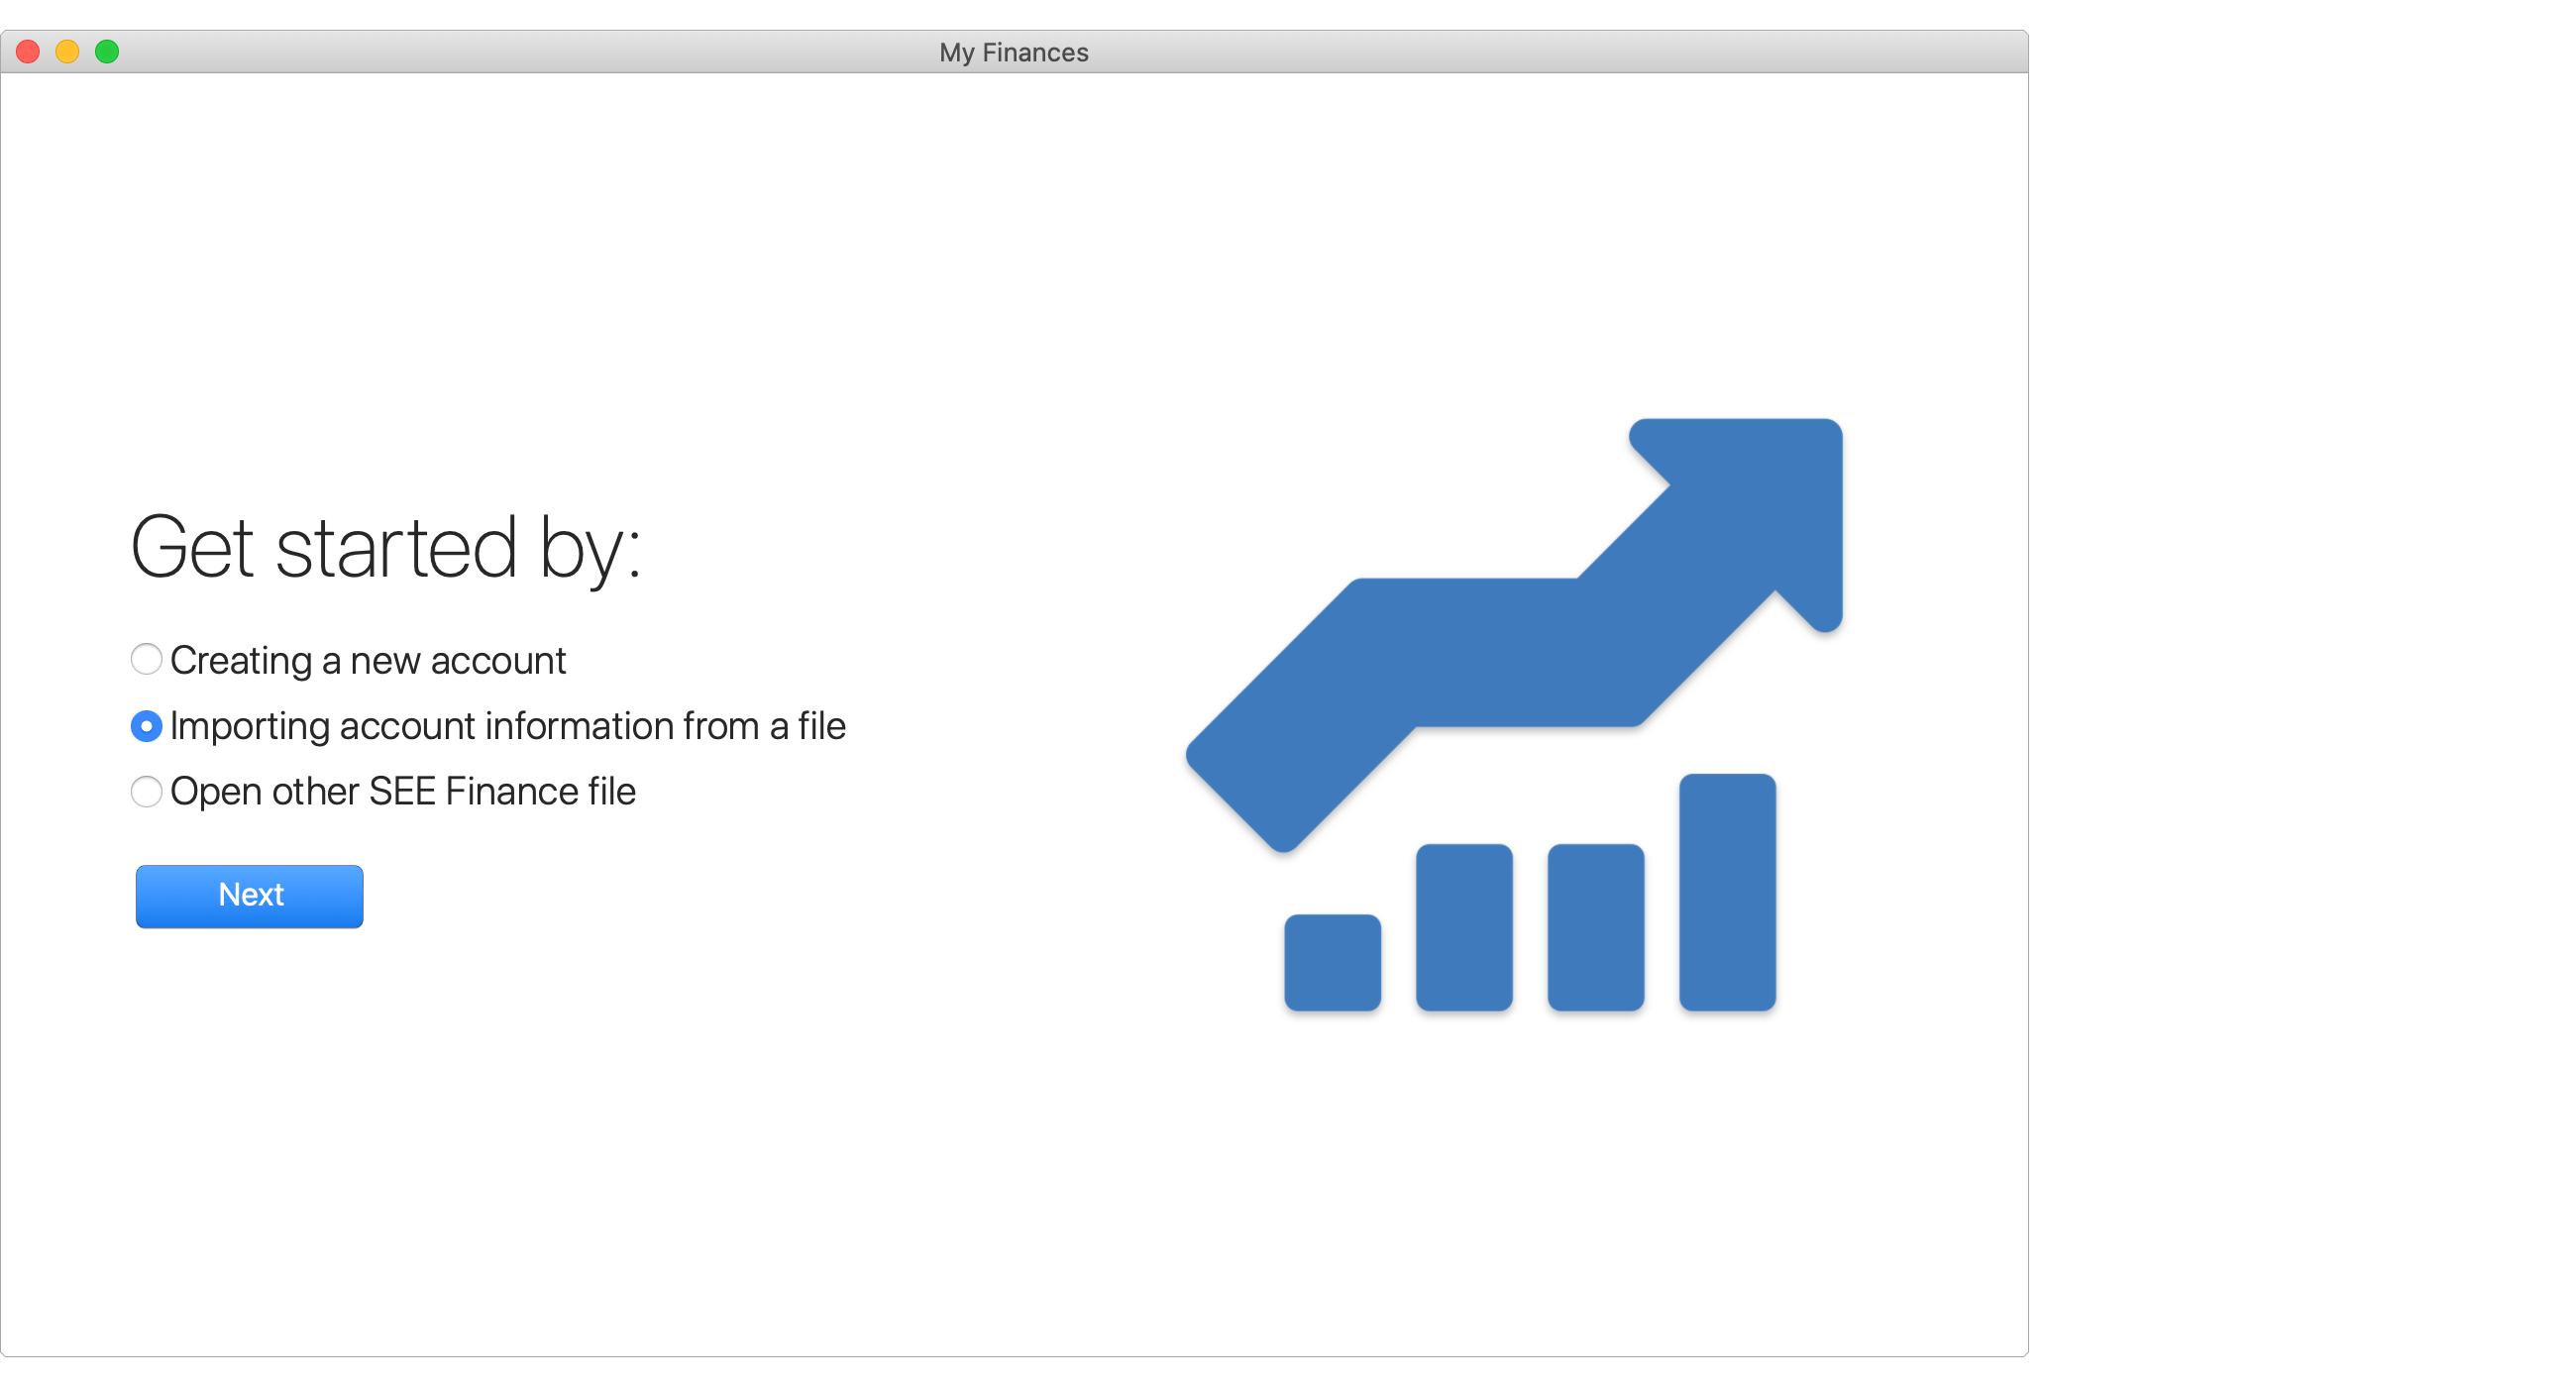
- Select the option to get started by "Importing account information from a file". Then click "Next".
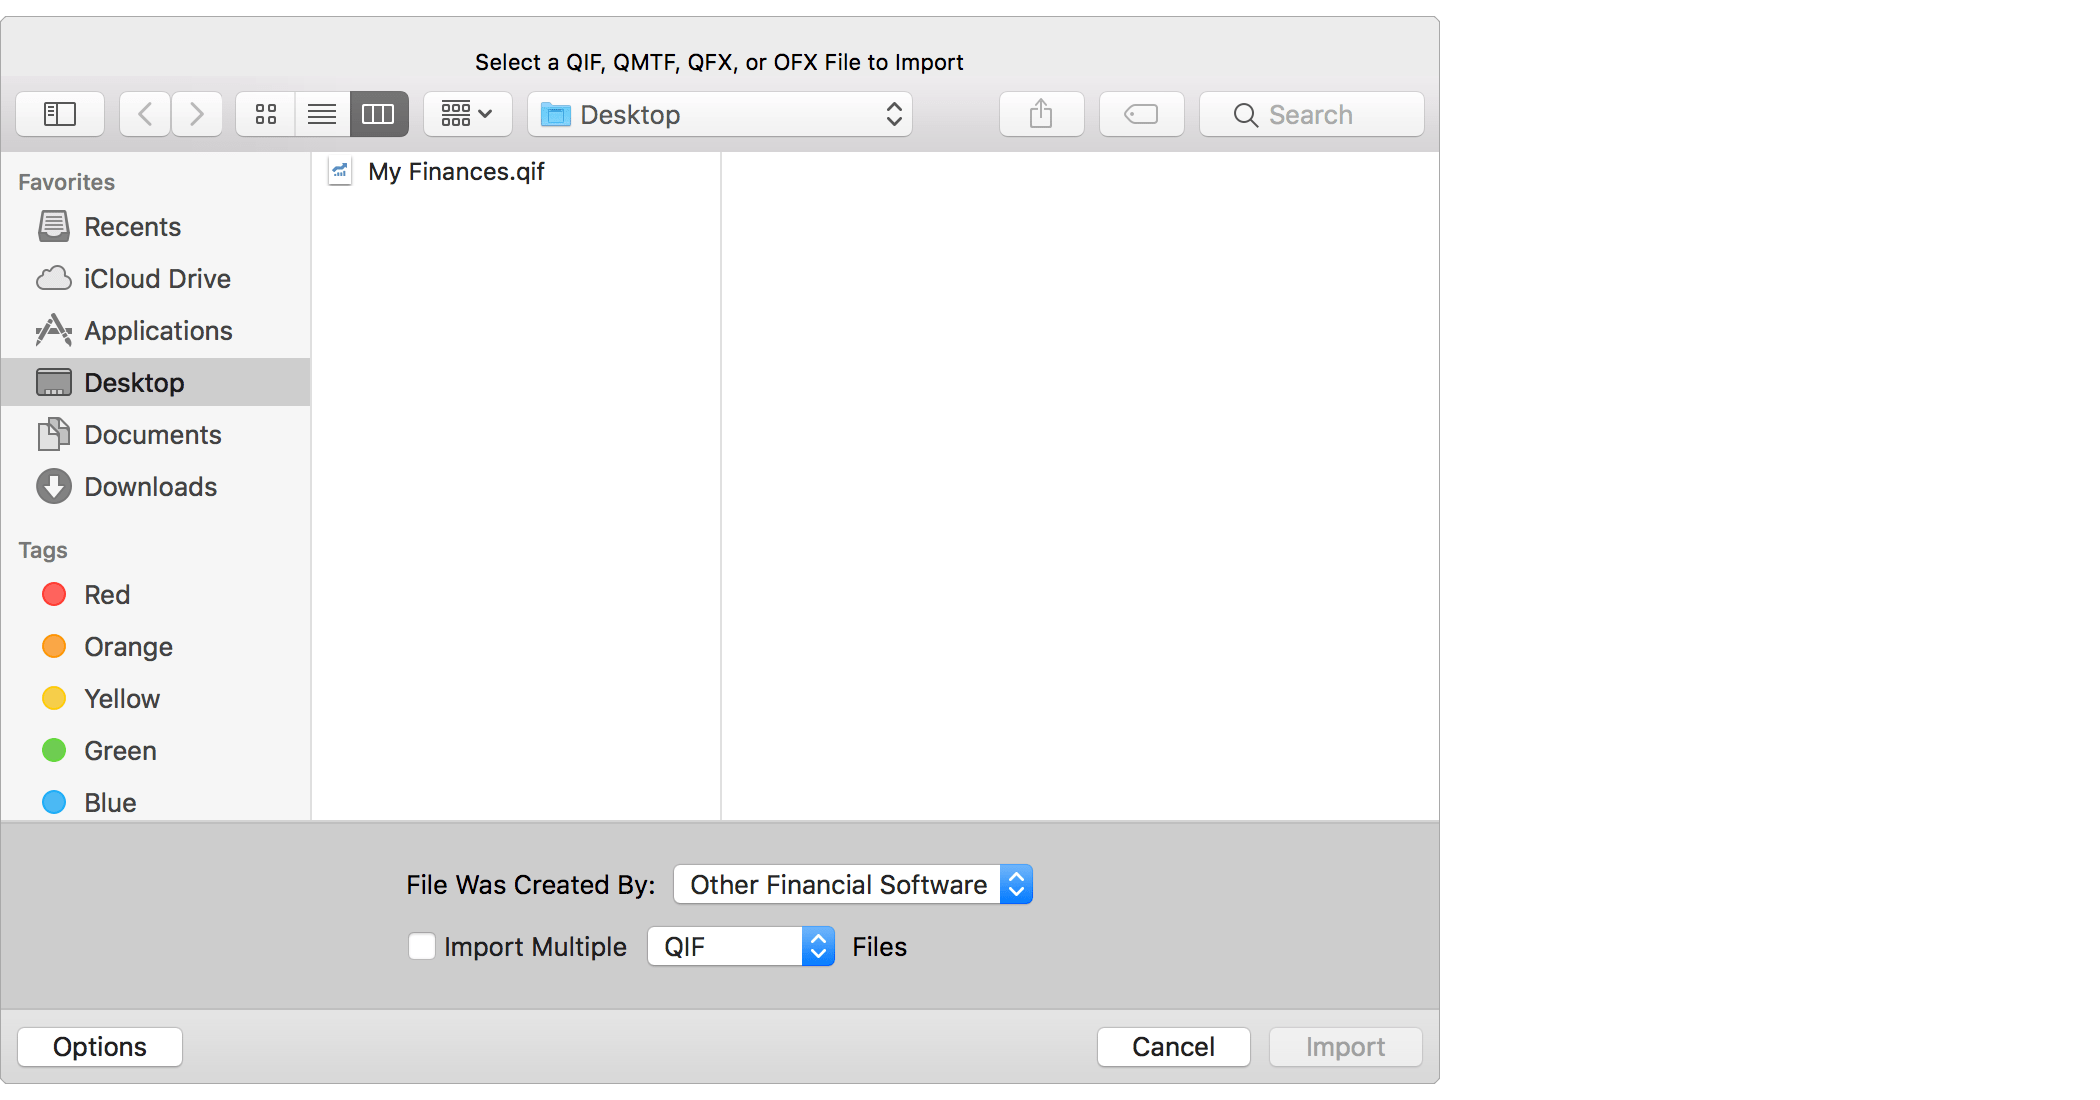
- Use the open file panel to select the QIF file you exported. On the bottom of the open file panel, set the "File Was Created By" option to "Other Financial Software" or "Other Financial Website". Then click "Import".
![]() Note:
Make sure to set the "File Was Created By" option to "Other Financial Software" or "Other Financial Website".
Doing so will have the program perform additional verification of the data and check for known issues in the exports from other programs.
Note:
Make sure to set the "File Was Created By" option to "Other Financial Software" or "Other Financial Website".
Doing so will have the program perform additional verification of the data and check for known issues in the exports from other programs.
- Review the accounts and the transactions found in the QIF file.
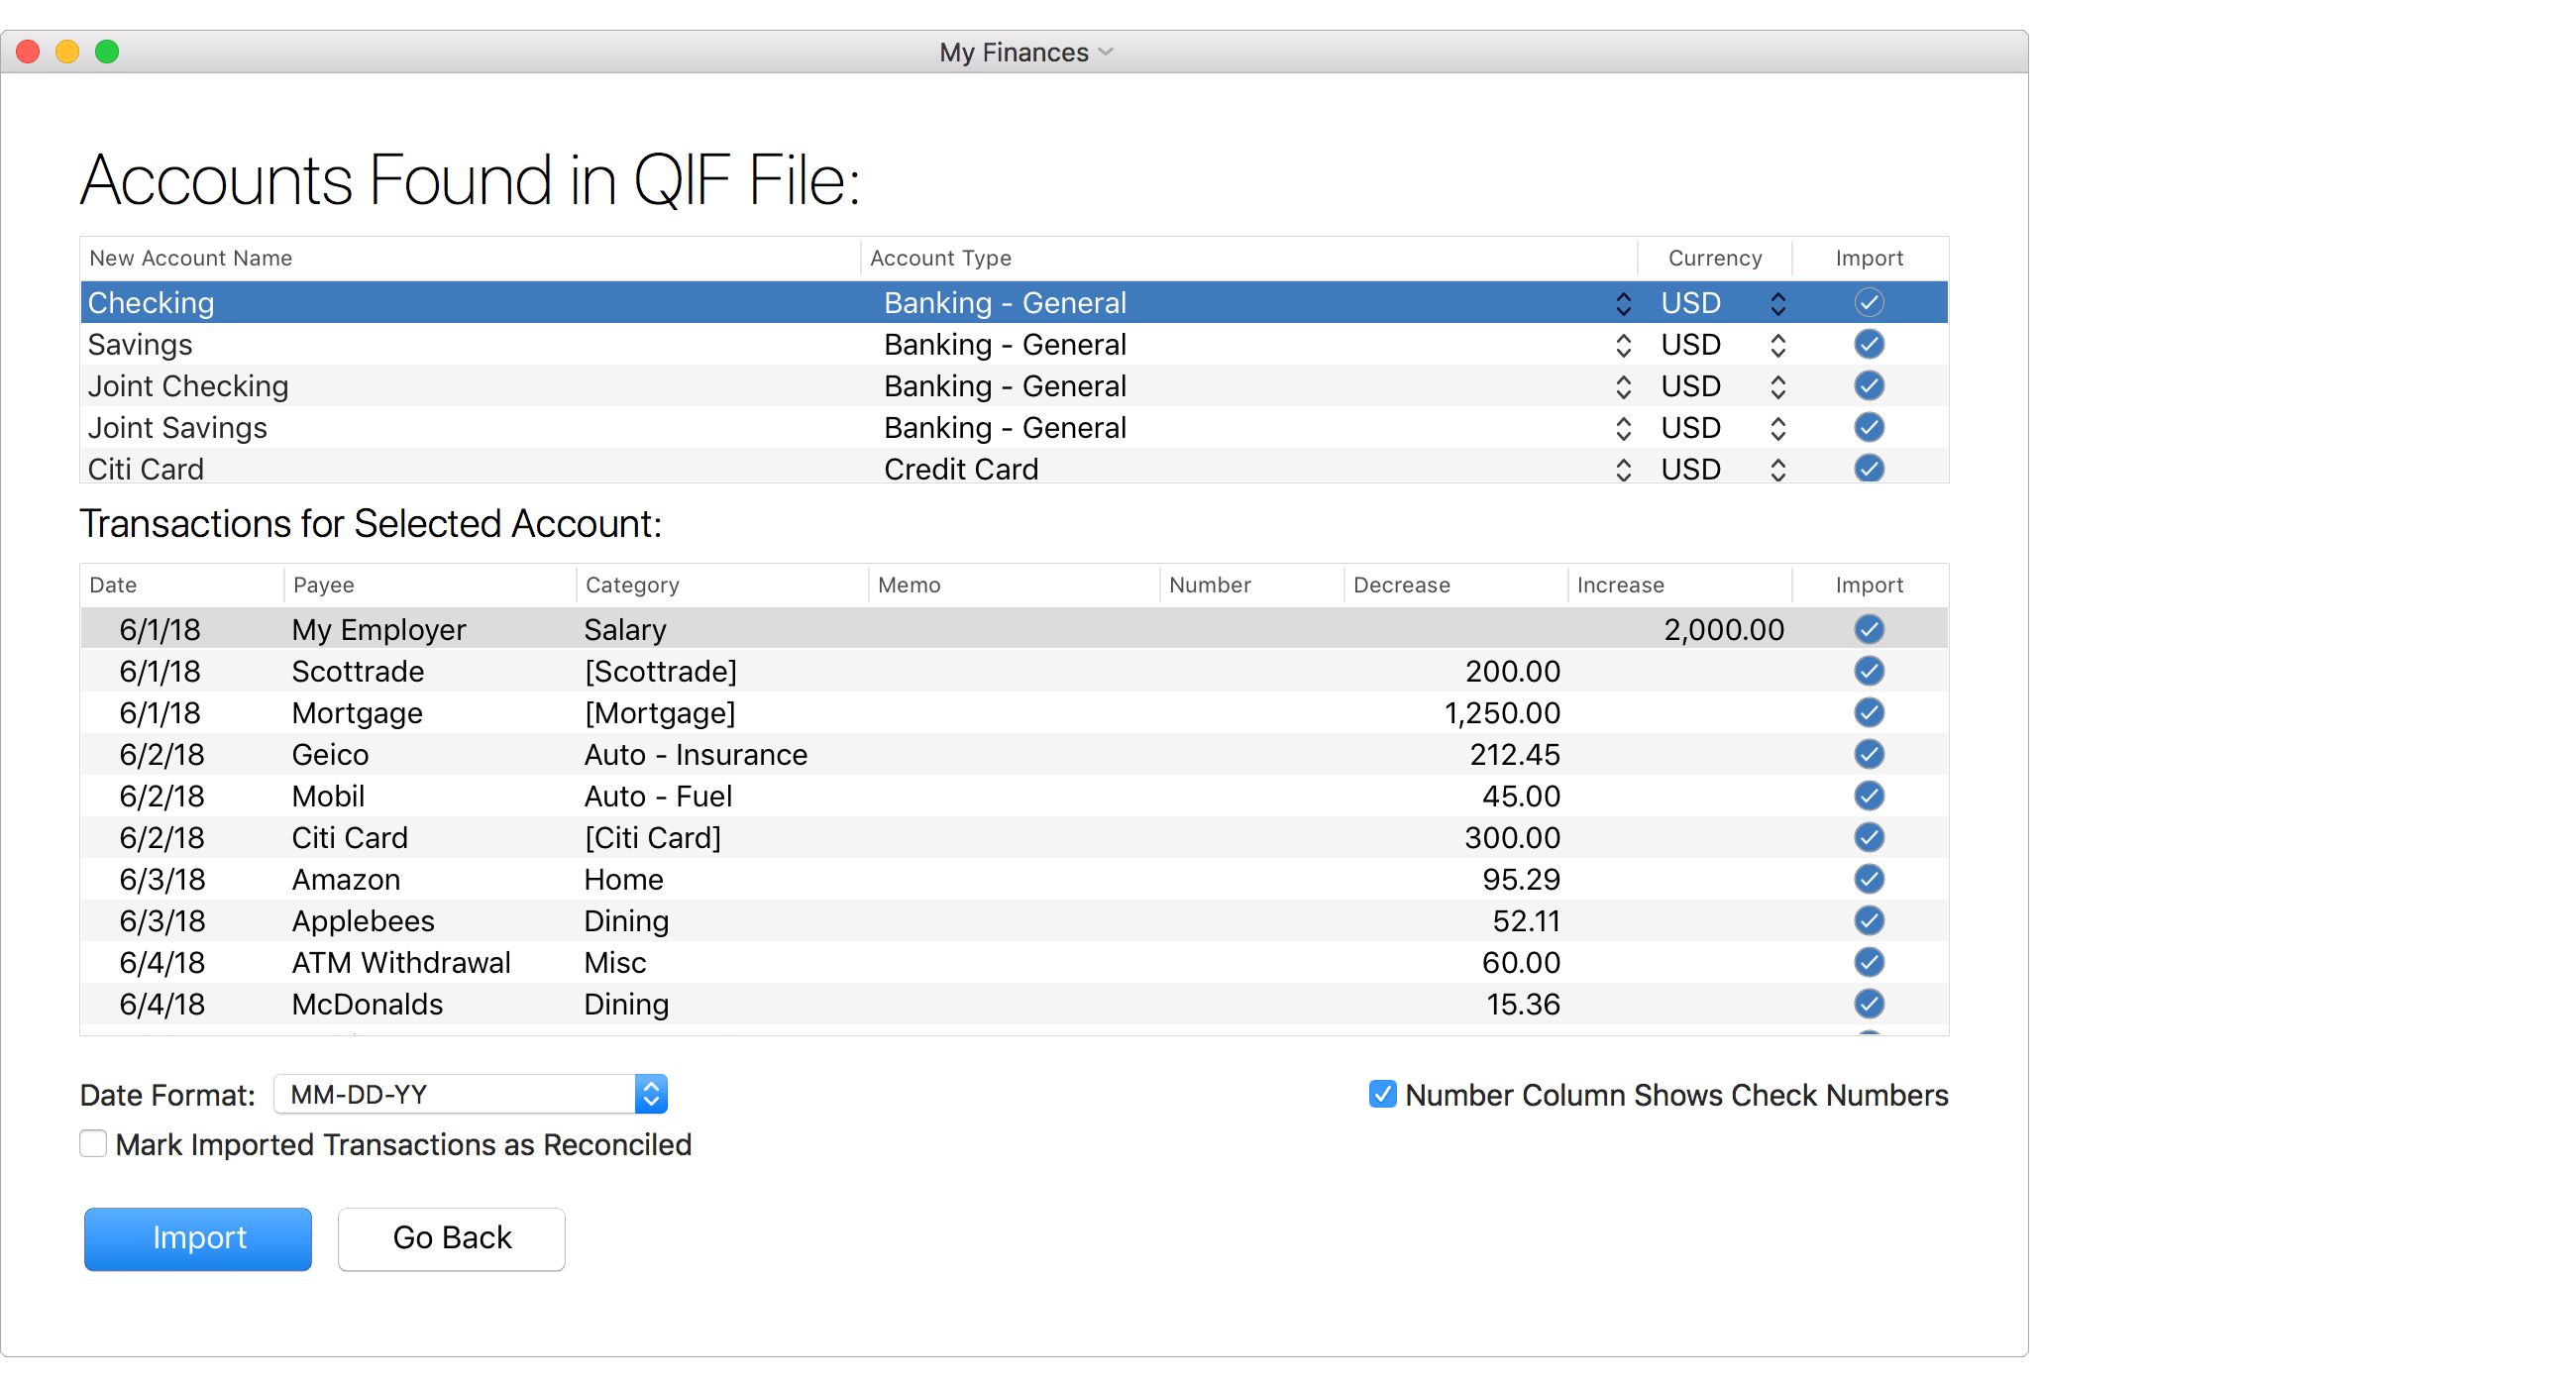
- Check and adjust the account name, account type and currency for each account to import.
- Uncheck the "Import" checkbox for any individual account(s) or transactions(s) you do not want to import.
- Select the "Date Format" that most closely resembles the dates shown for transactions in the file.
- Check whether or not the "Number" column represents check numbers for transactions in the file.
- Then click "Import" to import the selected accounts.
![]() Note:
Be sure to select the proper date format matching the dates shown in the file.
Select the "MM-DD-YY" option for dates such as "1/31/18" and select the "MM-DD-YYYY" option for dates such as "1/31/2018".
The "-" in date format options can take the place of various kinds of separators including slashes and spaces.
Note:
Be sure to select the proper date format matching the dates shown in the file.
Select the "MM-DD-YY" option for dates such as "1/31/18" and select the "MM-DD-YYYY" option for dates such as "1/31/2018".
The "-" in date format options can take the place of various kinds of separators including slashes and spaces.
![]() Tip:
Use the space bar to toggle the "Import" checkbox for the selected account or for the selected transaction(s).
Tip:
Use the space bar to toggle the "Import" checkbox for the selected account or for the selected transaction(s).
- After importing your accounts, you will be shown a summary. Click "Finished" to complete setting up the new file.

- Finally, you will be prompted to save your file to the location of your choice. Selecting to save the file to the "SEE Finance" folder within your "iCloud Drive" folder is the recommended location if you'd like to sync your file to all of your Mac and iOS devices. Within the macOS program, the "SEE Finance" folder within your "iCloud Drive" folder will sometimes be listed as the "SEE Finance - iCloud" option.
Review the accounts for accuracy
Review the imported information for accuracy when compared to the other personal finance app or website you have been using. Our file importing feature is widely regarded as one of the best there is, but it can only as good as the information available in the QIF file. Although we try to accommodate for as many of the errors in the exports of other programs as we can, many of them simply export information incorrectly or incompletely. If there are any discrepancies, we recommend to check the more complex items such as investment accounts first. Not all programs export security prices to QIF files and the QIF file format is limited with regard to tracking investments. If desired, security prices can be set manually to match the exact prices in the other personal finance app or website you have been using for the comparison between the two. If you realize the import didn't include all of your information, such as the date range or accounts to export was not set correctly during the export, then it would be best to start over and redo the export and import it into a new file.
Export a QMTF file:
Refer to the support information available for how to export a QMTF file from the personal financial app or website you are currently using. Many times the export options for macOS and Windows® programs are available in the program's File menu.
Import into SEE Finance 2:
With your data exported to a QMTF file, you can create a new file in SEE Finance and set it up the contents of the QMTF file. It is also an option to import accounts from the QMTF file into an existing file for SEE Finance 2.
- Install SEE Finance 2 if you have not done so already.
- Open SEE Finance 2. When you first open the program, after any license and registration prompts, you will be shown the "Welcome to SEE Finance" window which is the first step in creating a file. At any time you can select "New File" from the program's File menu to begin creating a new file. Select to "Get Started".

- Select the option to get started by "Importing account information from a file". Then click "Next".

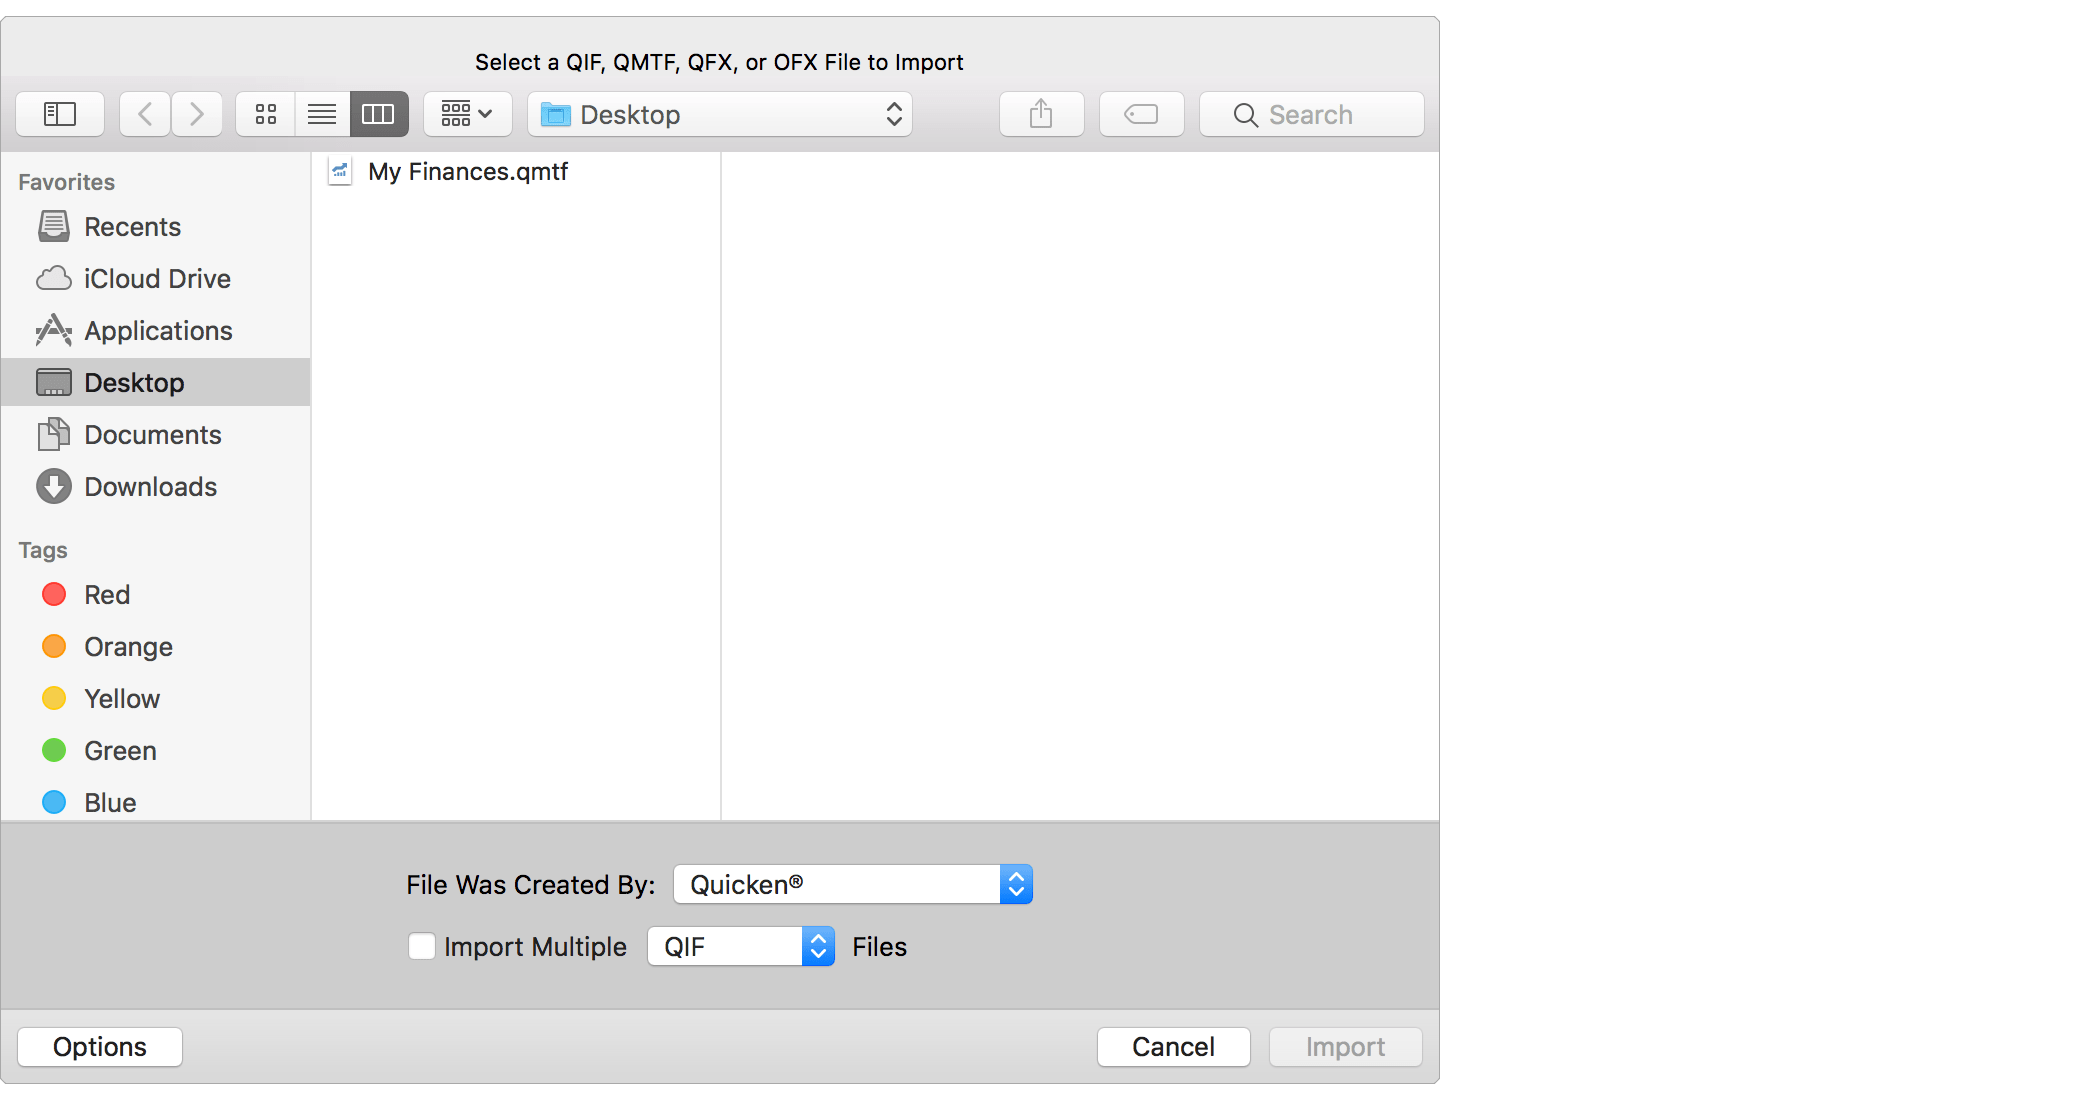
- Use the open file panel to select the QMTF file you exported. On the bottom of the open file panel, set the "File Was Created By" option to "Other Financial Software" or "Other Financial Website". Then click "Import".
![]() Note:
Make sure to set the "File Was Created By" option to "Other Financial Software" or "Other Financial Website".
Doing so will have the program perform additional verification of the data and check for known issues in the exports from other programs.
Note:
Make sure to set the "File Was Created By" option to "Other Financial Software" or "Other Financial Website".
Doing so will have the program perform additional verification of the data and check for known issues in the exports from other programs.
- Review the accounts and the transactions found in the QMTF file.
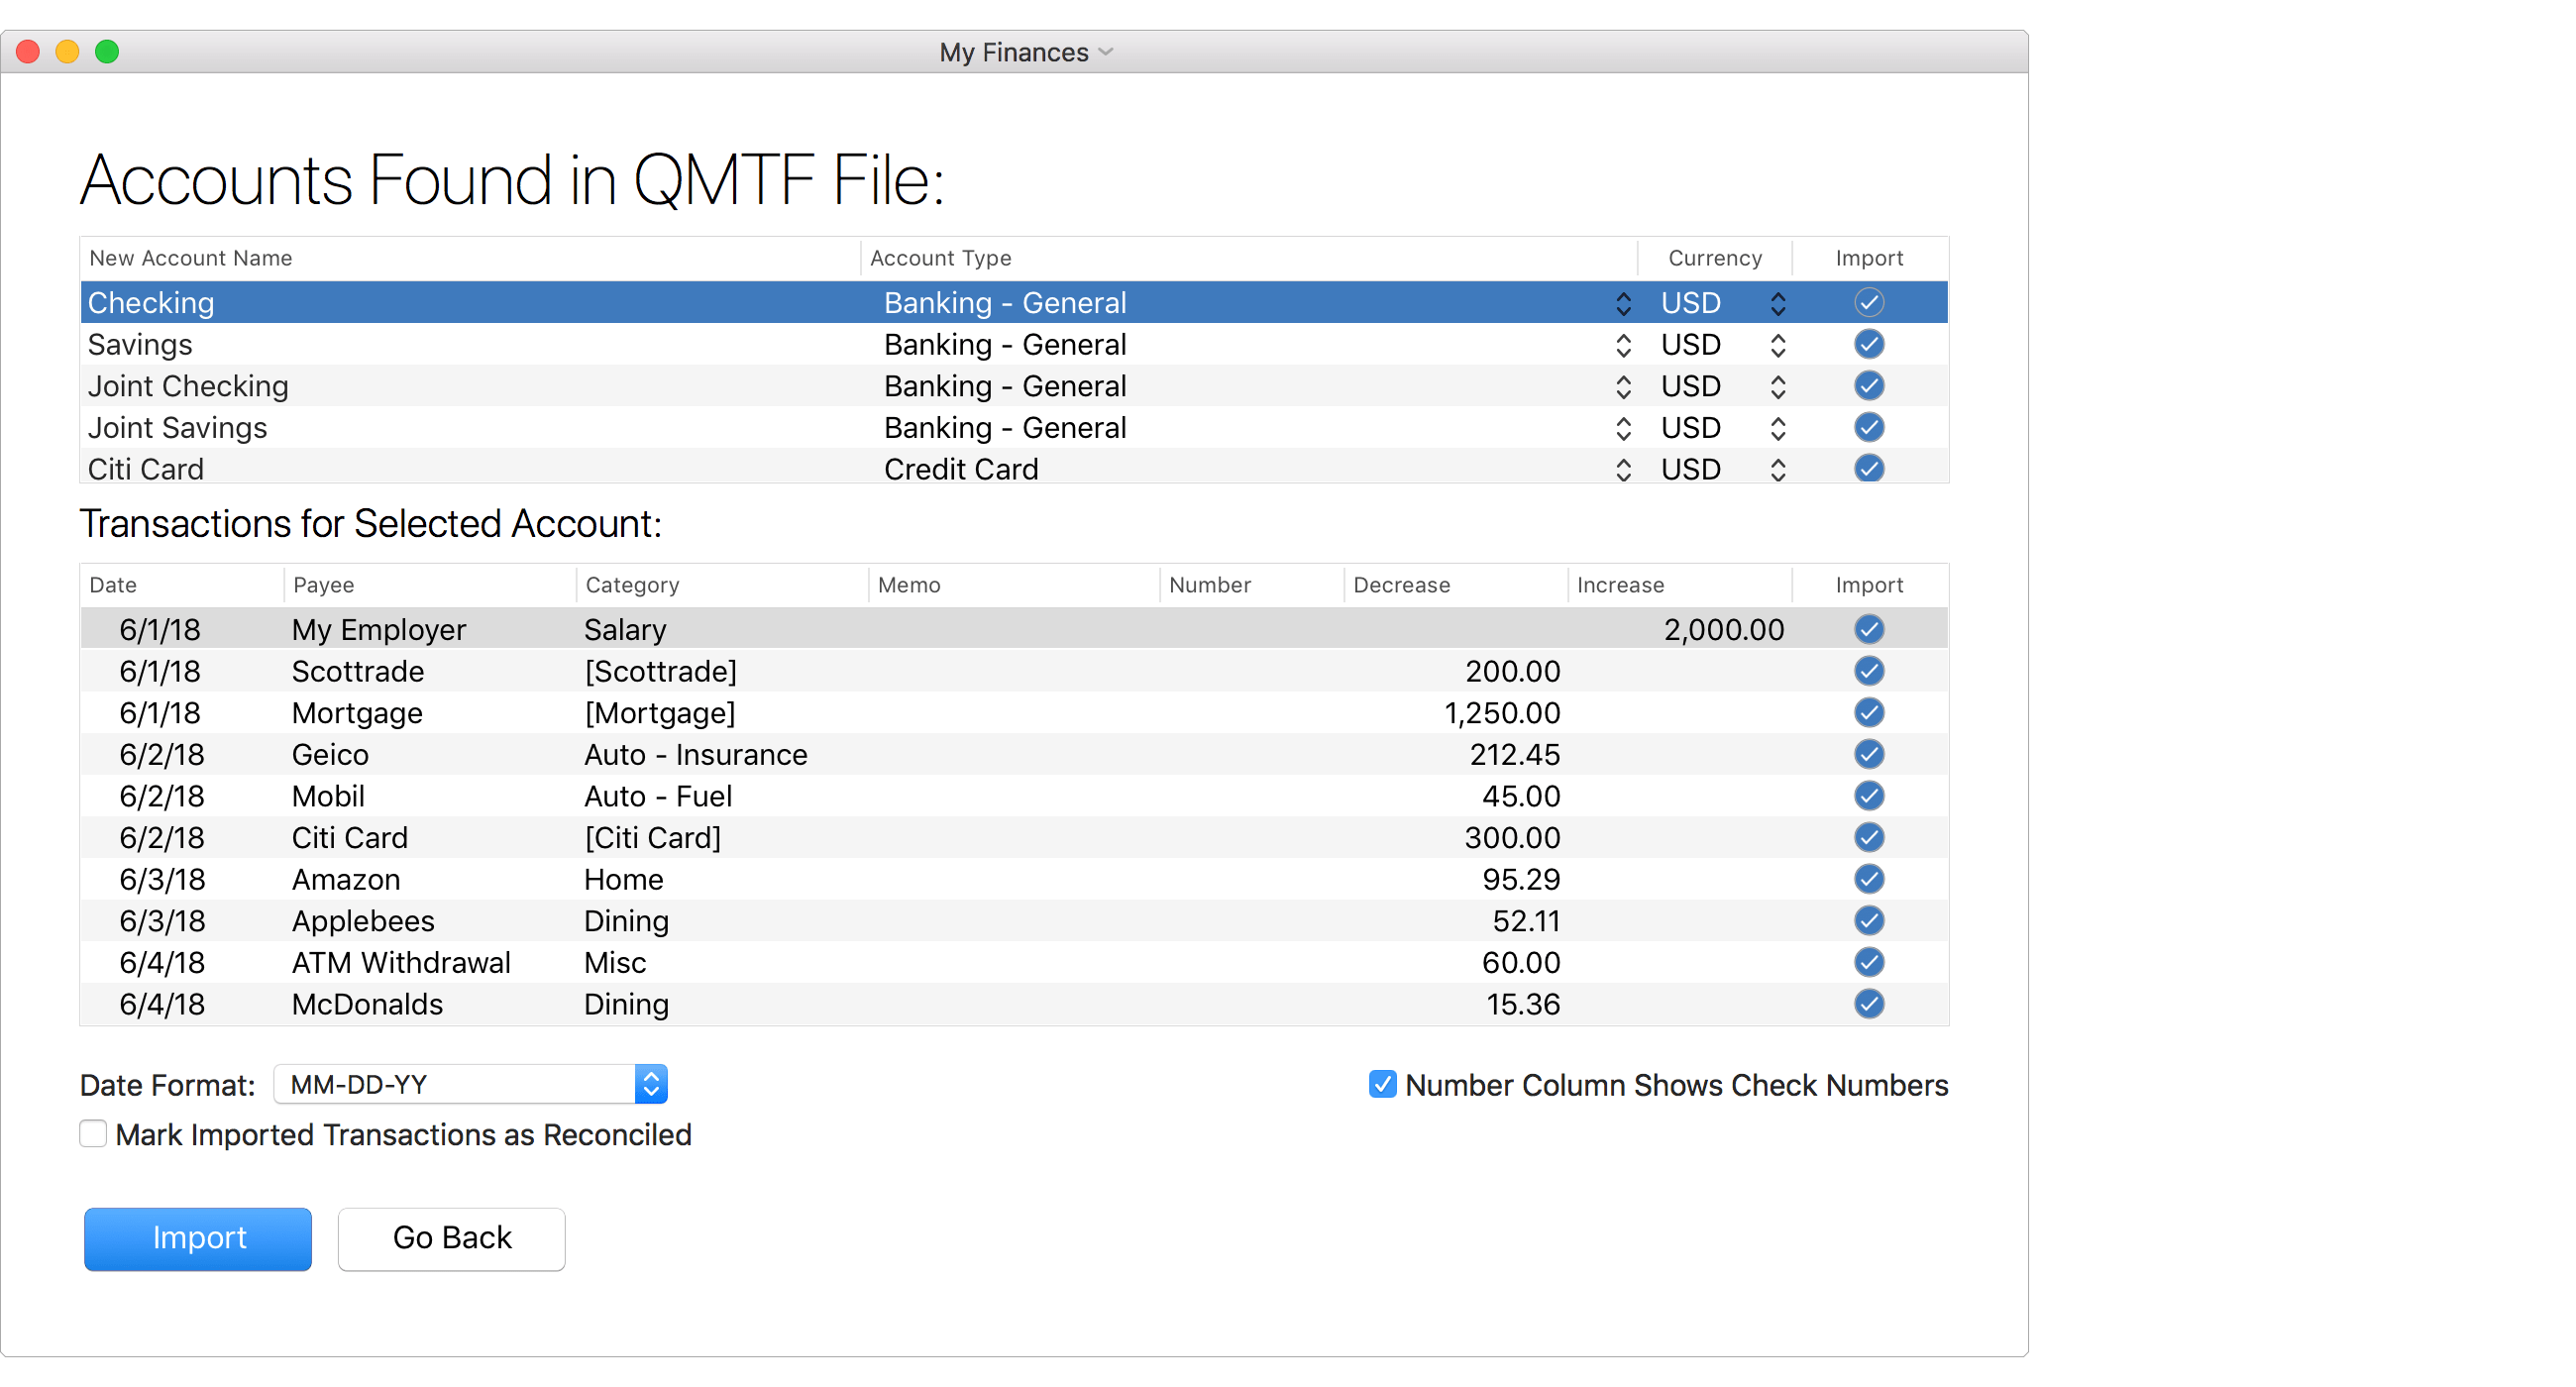
- Check and adjust the account name, account type and currency for each account to import.
- Uncheck the "Import" checkbox for any individual account(s) or transactions(s) you do not want to import.
- Select the "Date Format" that most closely resembles the dates shown for transactions in the file.
- Check whether or not the "Number" column represents check numbers for transactions in the file.
- Then click "Import" to import the selected accounts.
![]() Note:
Be sure to select the proper date format matching the dates shown in the file.
Select the "MM-DD-YY" option for dates such as "1/31/18" and select the "MM-DD-YYYY" option for dates such as "1/31/2018".
The "-" in date format options can take the place of various kinds of separators including slashes and spaces.
Note:
Be sure to select the proper date format matching the dates shown in the file.
Select the "MM-DD-YY" option for dates such as "1/31/18" and select the "MM-DD-YYYY" option for dates such as "1/31/2018".
The "-" in date format options can take the place of various kinds of separators including slashes and spaces.
![]() Tip:
Use the space bar to toggle the "Import" checkbox for the selected account or for the selected transaction(s).
Tip:
Use the space bar to toggle the "Import" checkbox for the selected account or for the selected transaction(s).
- After importing your accounts, you will be shown a summary. Click "Finished" to complete setting up the new file.

- Finally, you will be prompted to save your file to the location of your choice. Selecting to save the file to the "SEE Finance" folder within your "iCloud Drive" folder is the recommended location if you'd like to sync your file to all of your Mac and iOS devices. Within the macOS program, the "SEE Finance" folder within your "iCloud Drive" folder will sometimes be listed as the "SEE Finance - iCloud" option.
Review the accounts for accuracy
Review the imported information for accuracy when compared to the other personal finance app or website you have been using. Our file importing feature is widely regarded as one of the best there is, but it can only as good as the information available in the QMTF file. Although we try to accommodate for as many of the errors in the exports of other programs as we can, many of them simply export information incorrectly or incompletely. If there are any discrepancies, we recommend to check the more complex items such as investment accounts first. Not all programs export security prices to QMTF files and the QMTF file format is limited with regard to tracking investments. If desired, security prices can be set manually to match the exact prices in the other personal finance app or website you have been using for the comparison between the two. If you realize the import didn't include all of your information, such as the date range or accounts to export was not set correctly during the export, then it would be best to start over and redo the export and import it into a new file.
Export a QFX file:
Refer to the support information available for how to export a QFX file from the personal financial app or website you are currently using. Many times the export options for macOS and Windows® programs are available in the program's File menu.
Import into SEE Finance 2:
With your data exported to a QFX file, you can create a new file in SEE Finance and set it up the contents of the QFX file. It is also an option to import accounts from the QFX file into an existing file for SEE Finance 2.
- Install SEE Finance 2 if you have not done so already.
- Open SEE Finance 2. When you first open the program, after any license and registration prompts, you will be shown the "Welcome to SEE Finance" window which is the first step in creating a file. At any time you can select "New File" from the program's File menu to begin creating a new file. Select to "Get Started".

- Select the option to get started by "Importing account information from a file". Then click "Next".

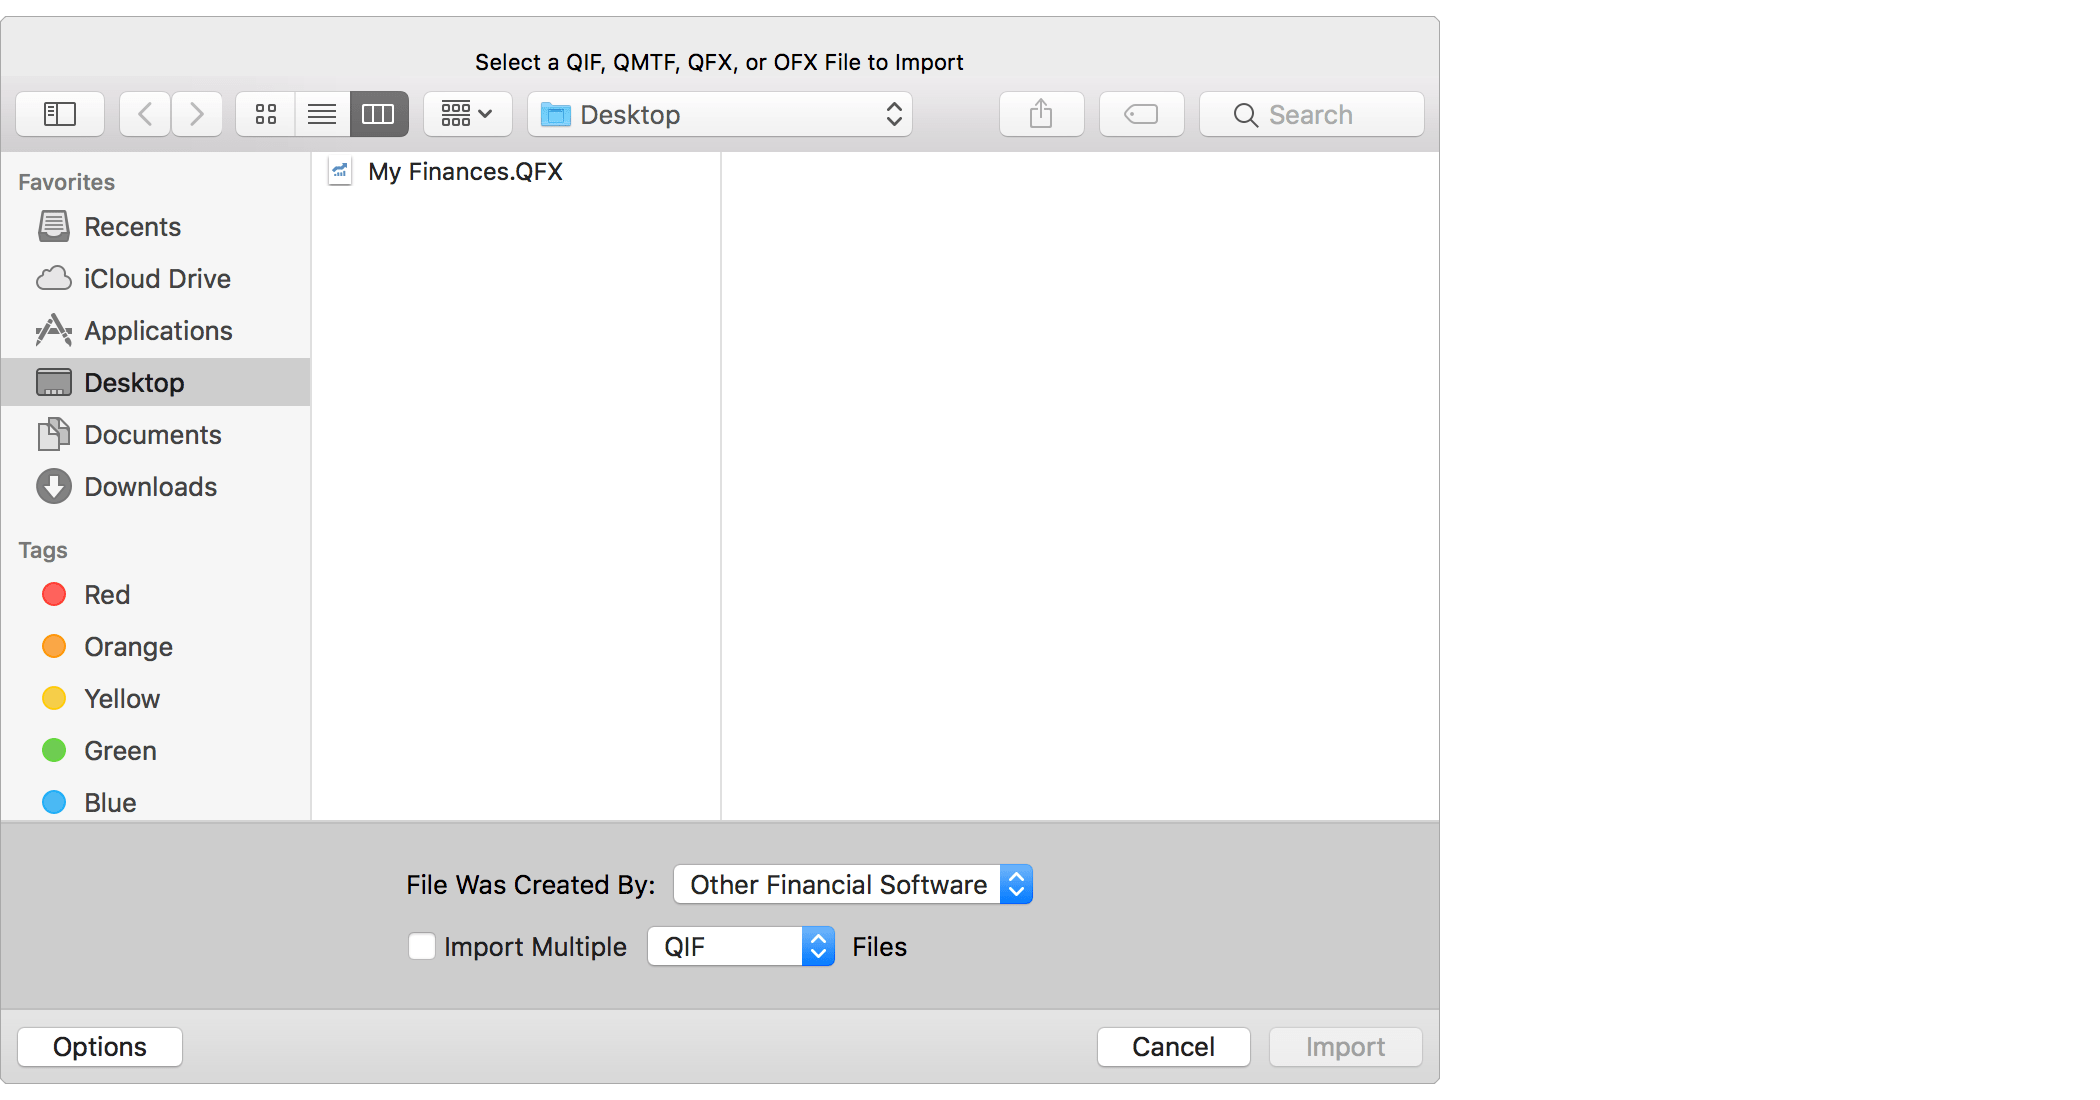
- Use the open file panel to select the QFX file you exported. On the bottom of the open file panel, set the "File Was Created By" option to "Other Financial Software" or "Other Financial Website". Then click "Import".
![]() Note:
Make sure to set the "File Was Created By" option to "Other Financial Software" or "Other Financial Website".
Doing so will have the program perform additional verification of the data and check for known issues in the exports from other programs.
Note:
Make sure to set the "File Was Created By" option to "Other Financial Software" or "Other Financial Website".
Doing so will have the program perform additional verification of the data and check for known issues in the exports from other programs.
- Review the accounts and the transactions found in the QFX file.
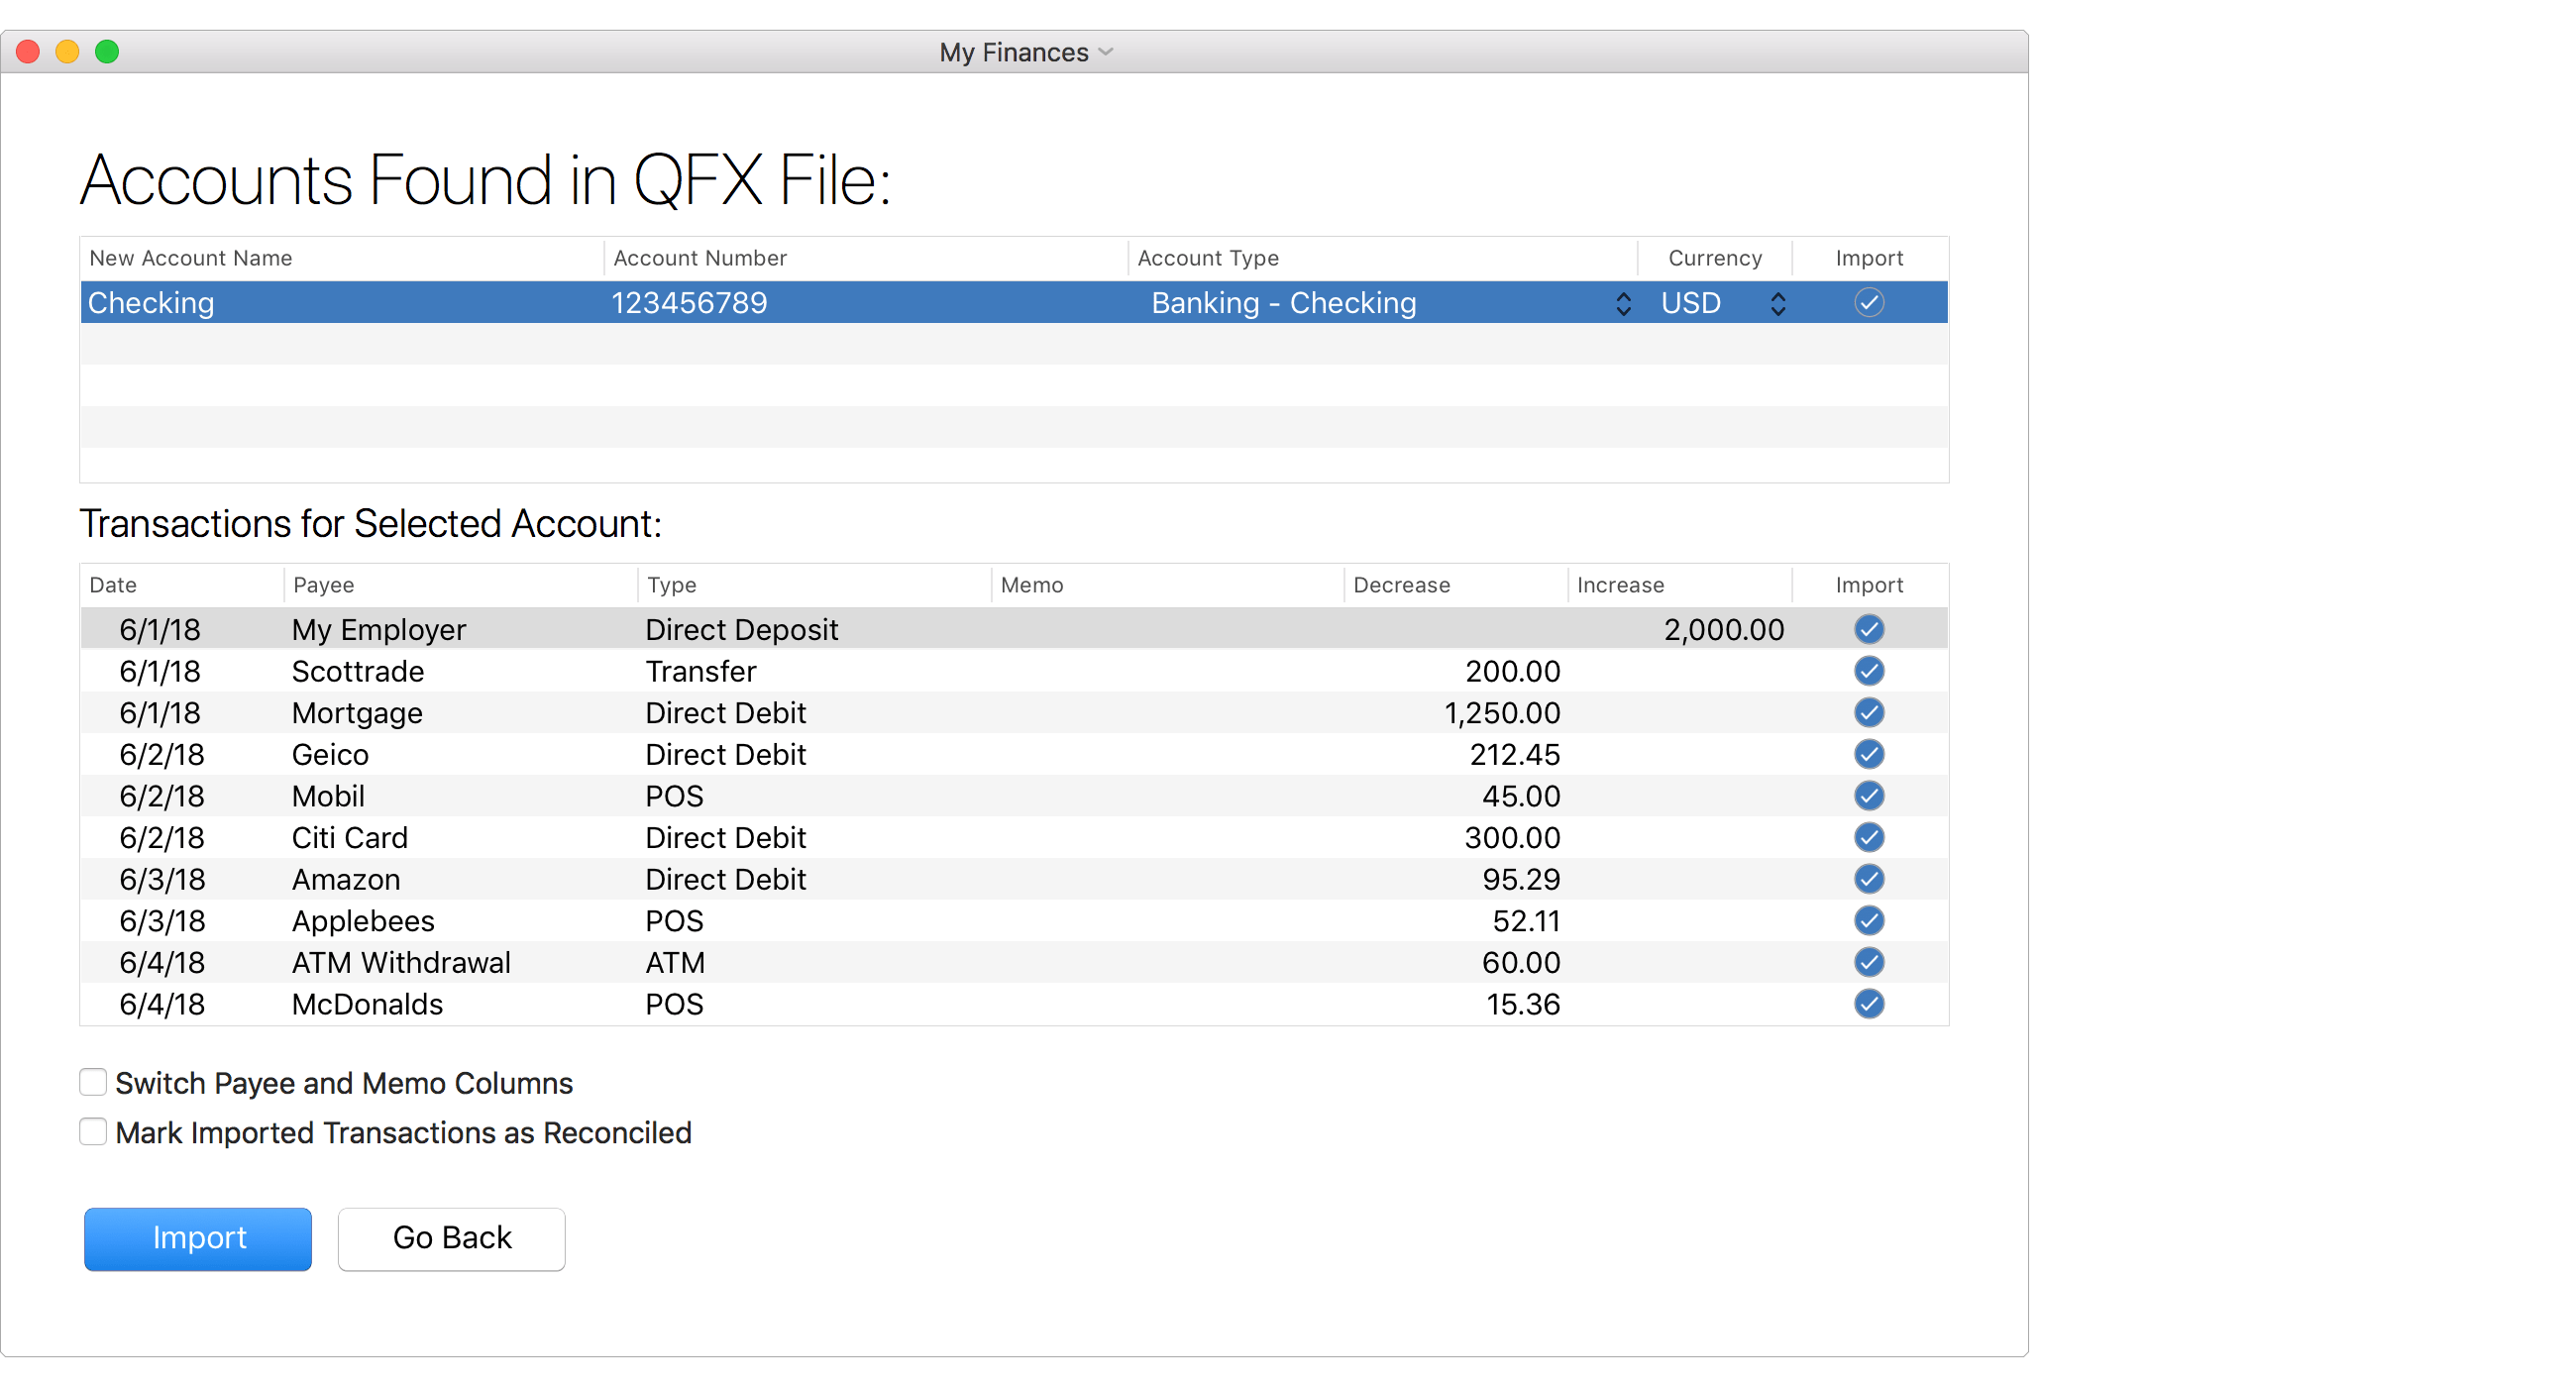
- Check and adjust the account name, account type and currency for each account to import.
- Uncheck the "Import" checkbox for any individual account(s) or transactions(s) you do not want to import.
- If the information shown for transactions in the memo column is better suited for their payee, select the option to switch the payee and memo columns.
- Check if you'd like all transactions to be marked as reconciled.
- Then click "Import" to import the selected accounts.
![]() Tip:
Use the space bar to toggle the "Import" checkbox for the selected account or for the selected transaction(s).
Tip:
Use the space bar to toggle the "Import" checkbox for the selected account or for the selected transaction(s).
- After importing your accounts, you will be shown a summary. Click "Finished" to complete setting up the new file.

- Finally, you will be prompted to save your file to the location of your choice. Selecting to save the file to the "SEE Finance" folder within your "iCloud Drive" folder is the recommended location if you'd like to sync your file to all of your Mac and iOS devices. Within the macOS program, the "SEE Finance" folder within your "iCloud Drive" folder will sometimes be listed as the "SEE Finance - iCloud" option.
Review the accounts for accuracy
Review the imported information for accuracy when compared to the other personal finance app or website you have been using. Our file importing feature is widely regarded as one of the best there is, but it can only as good as the information available in the QFX file. Although we try to accommodate for as many of the errors in the exports of other programs as we can, many of them simply export information incorrectly or incompletely. If there are any discrepancies, we recommend to check the more complex items such as investment accounts first. Not all programs export security prices to QFX files. If desired, security prices can be set manually to match the exact prices in the other personal finance app or website you have been using for the comparison between the two. If you realize the import didn't include all of your information, such as the date range or accounts to export was not set correctly during the export, then it would be best to start over and redo the export and import it into a new file.
Export a OFX file:
Refer to the support information available for how to export a OFX file from the personal financial app or website you are currently using. Many times the export options for macOS and Windows® programs are available in the program's File menu.
Import into SEE Finance 2:
With your data exported to a OFX file, you can create a new file in SEE Finance and set it up the contents of the OFX file. It is also an option to import accounts from the OFX file into an existing file for SEE Finance 2.
- Install SEE Finance 2 if you have not done so already.
- Open SEE Finance 2. When you first open the program, after any license and registration prompts, you will be shown the "Welcome to SEE Finance" window which is the first step in creating a file. At any time you can select "New File" from the program's File menu to begin creating a new file. Select to "Get Started".

- Select the option to get started by "Importing account information from a file". Then click "Next".

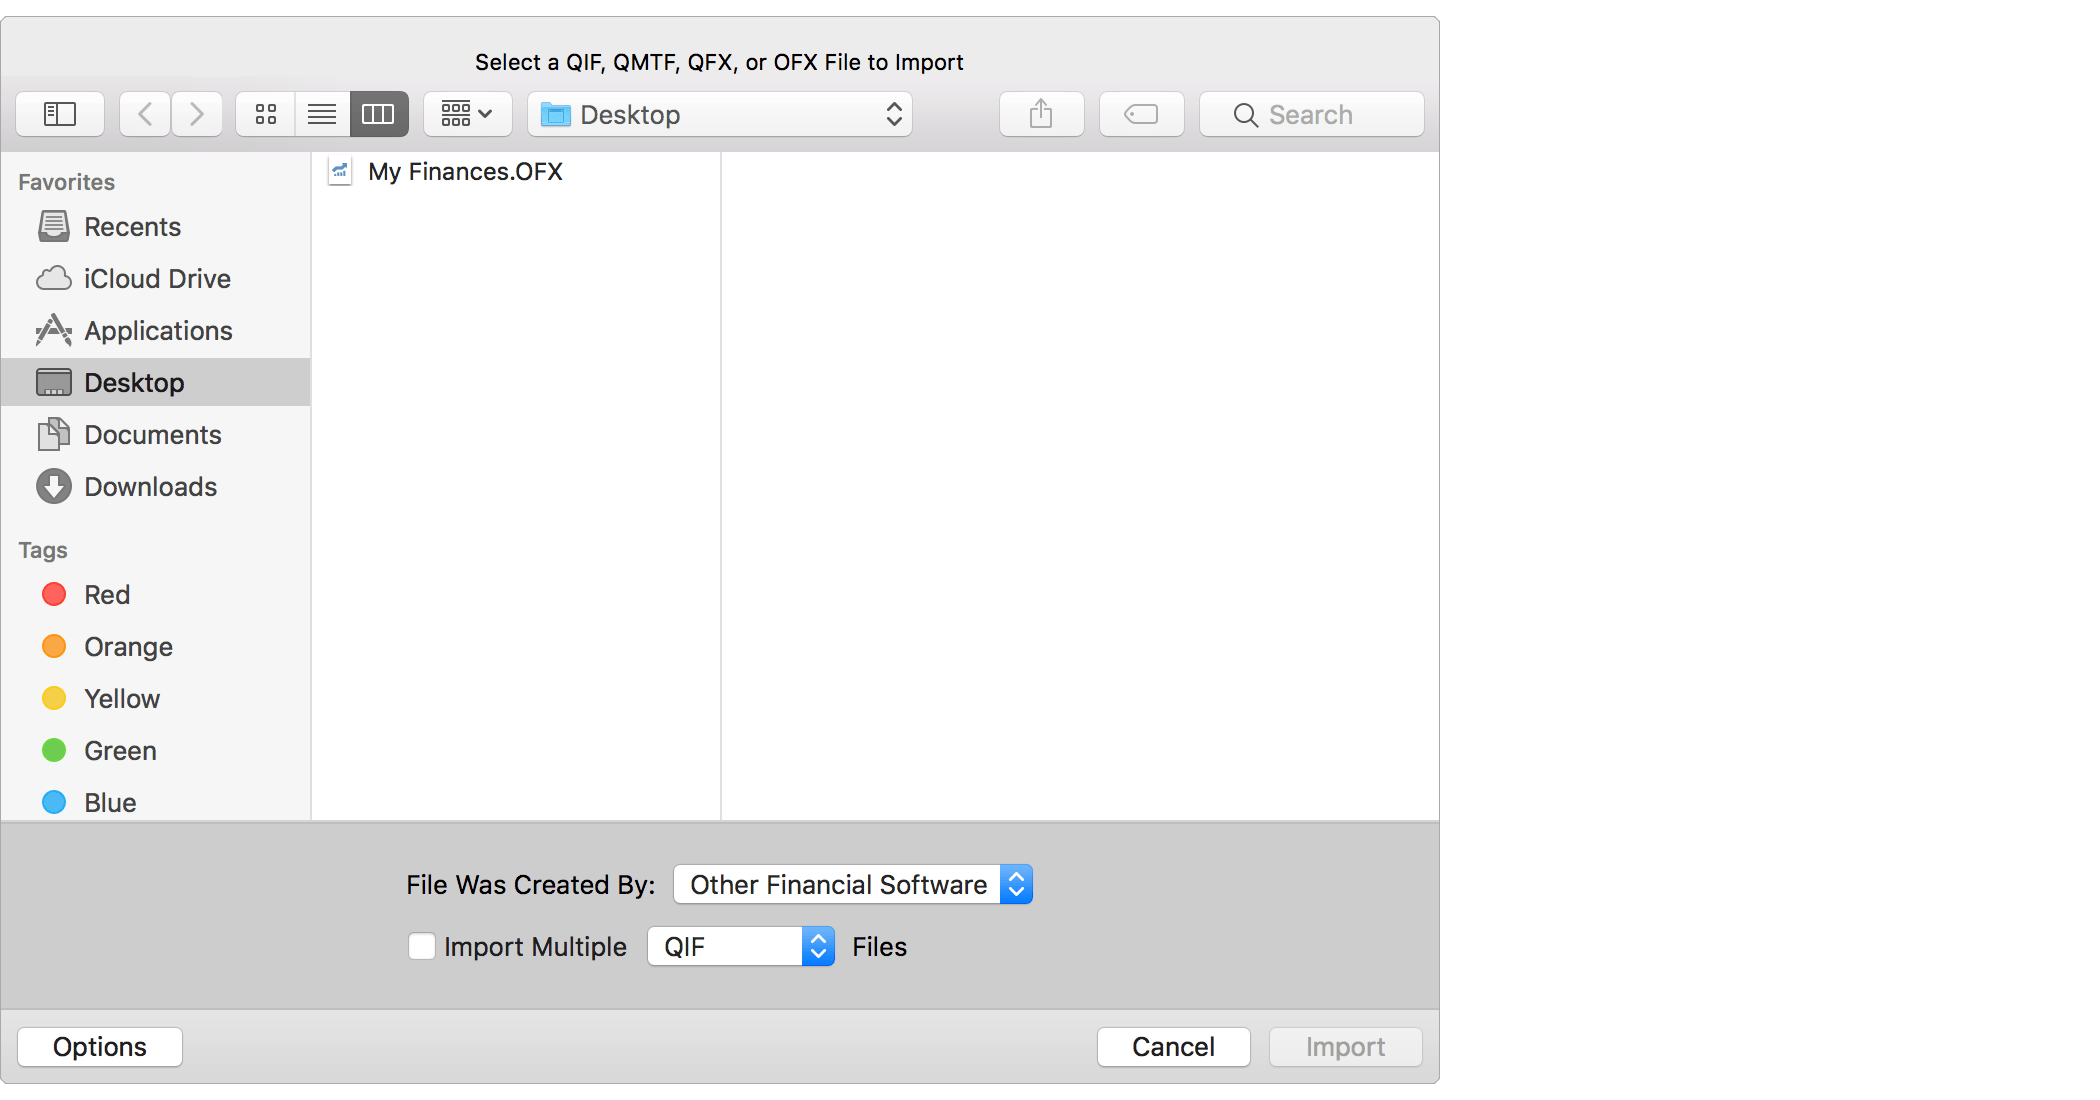
- Use the open file panel to select the OFX file you exported. On the bottom of the open file panel, set the "File Was Created By" option to "Other Financial Software" or "Other Financial Website". Then click "Import".
![]() Note:
Make sure to set the "File Was Created By" option to "Other Financial Software" or "Other Financial Website".
Doing so will have the program perform additional verification of the data and check for known issues in the exports from other programs.
Note:
Make sure to set the "File Was Created By" option to "Other Financial Software" or "Other Financial Website".
Doing so will have the program perform additional verification of the data and check for known issues in the exports from other programs.
- Review the accounts and the transactions found in the OFX file.
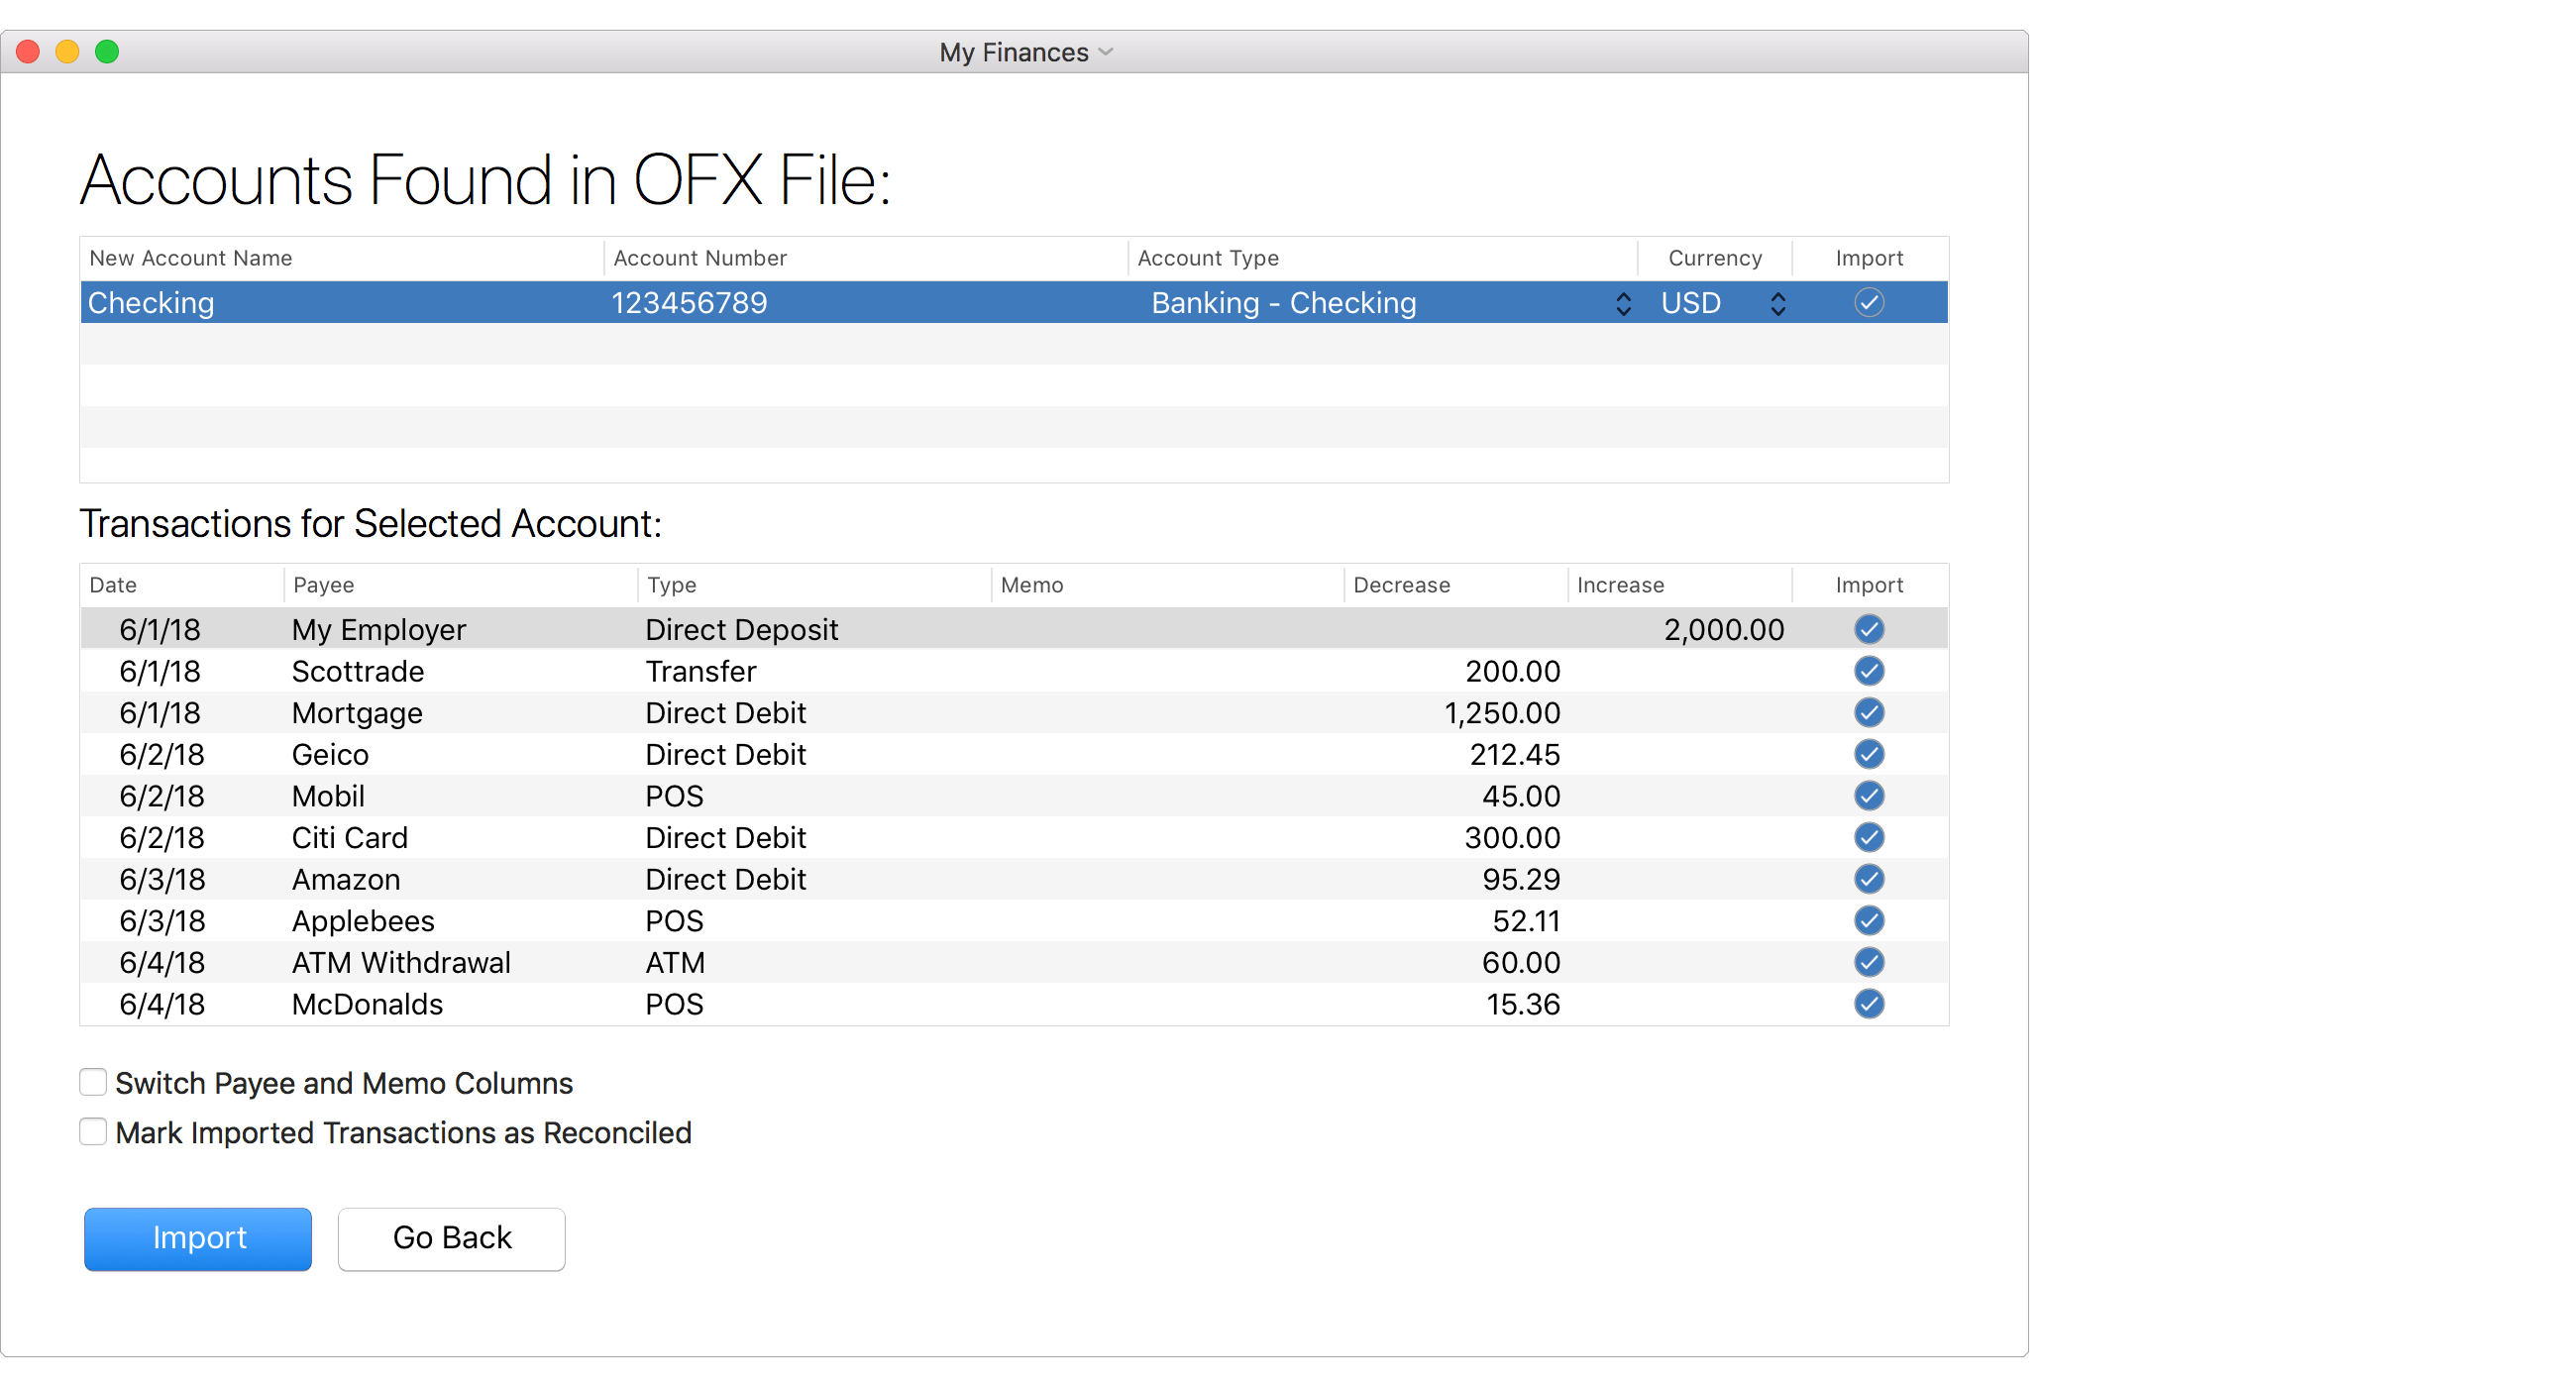
- Check and adjust the account name, account type and currency for each account to import.
- Uncheck the "Import" checkbox for any individual account(s) or transactions(s) you do not want to import.
- If the information shown for transactions in the memo column is better suited for their payee, select the option to switch the payee and memo columns.
- Check if you'd like all transactions to be marked as reconciled.
- Then click "Import" to import the selected accounts.
![]() Tip:
Use the space bar to toggle the "Import" checkbox for the selected account or for the selected transaction(s).
Tip:
Use the space bar to toggle the "Import" checkbox for the selected account or for the selected transaction(s).
- After importing your accounts, you will be shown a summary. Click "Finished" to complete setting up the new file.

- Finally, you will be prompted to save your file to the location of your choice. Selecting to save the file to the "SEE Finance" folder within your "iCloud Drive" folder is the recommended location if you'd like to sync your file to all of your Mac and iOS devices. Within the macOS program, the "SEE Finance" folder within your "iCloud Drive" folder will sometimes be listed as the "SEE Finance - iCloud" option.
Review the accounts for accuracy
Review the imported information for accuracy when compared to the other personal finance app or website you have been using. Our file importing feature is widely regarded as one of the best there is, but it can only as good as the information available in the OFX file. Although we try to accommodate for as many of the errors in the exports of other programs as we can, many of them simply export information incorrectly or incompletely. If there are any discrepancies, we recommend to check the more complex items such as investment accounts first. Not all programs export security prices to OFX files. If desired, security prices can be set manually to match the exact prices in the other personal finance app or website you have been using for the comparison between the two. If you realize the import didn't include all of your information, such as the date range or accounts to export was not set correctly during the export, then it would be best to start over and redo the export and import it into a new file.
Export a CSV file for each account:
Refer to the support information available for how to export a CSV file from the personal financial app or website you are currently using. Many times the export options for macOS and Windows® programs are available in the program's File menu. You will need to export a separate CSV file of transactions for each account in the personal financial app or website you have been using. Then you can setup the same accounts in SEE Finance and then import the CSV file that was exported for each account.
Setup a SEE Finance 2 file:
With your accounts exported to CSV files, you will want to setup a new file in SEE Finance with those same accounts and then you will be able to import the transactions into those accounts.
- Install SEE Finance 2 if you have not done so already.
- Open SEE Finance 2. When you first open the program, after any license and registration prompts, you will be shown the "Welcome to SEE Finance" window which is the first step in creating a file. At any time you can select "New File" from the program's File menu to begin creating a new file. Select to "Get Started".

- Select the option to get started by "Creating a new account". Then click "Next".

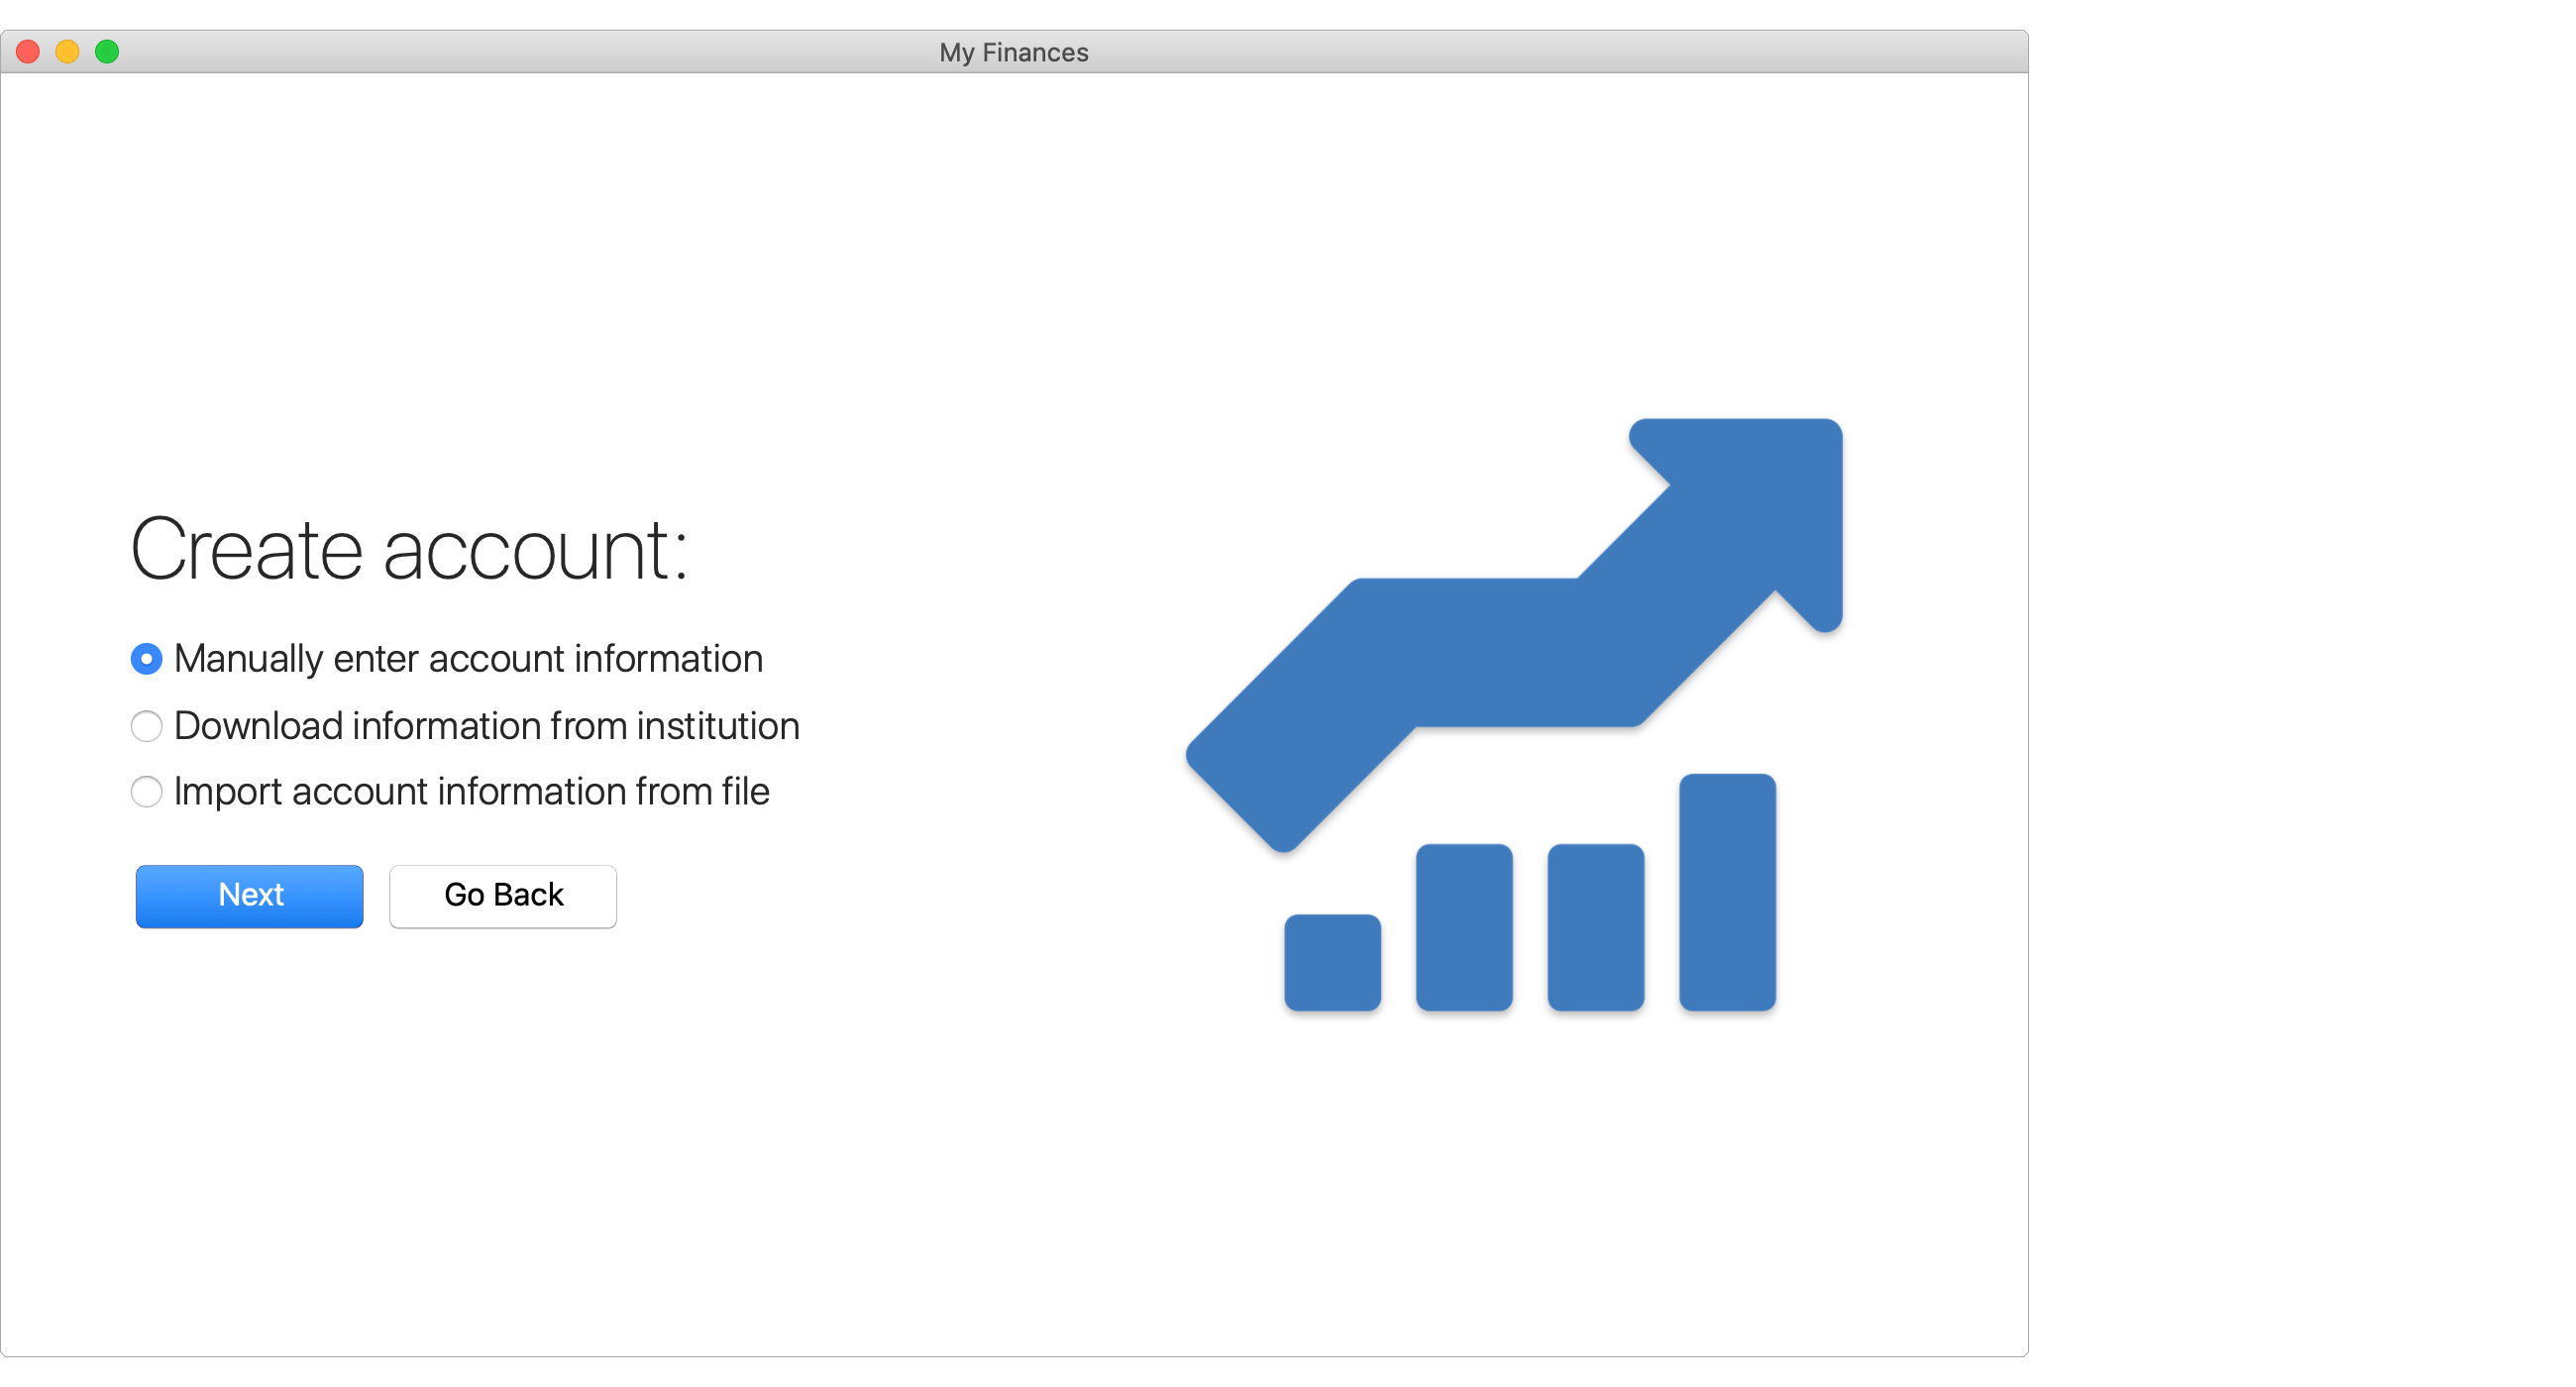
- Select the option to "Manually enter account information". Then click "Next".
- Enter in the details for the account.
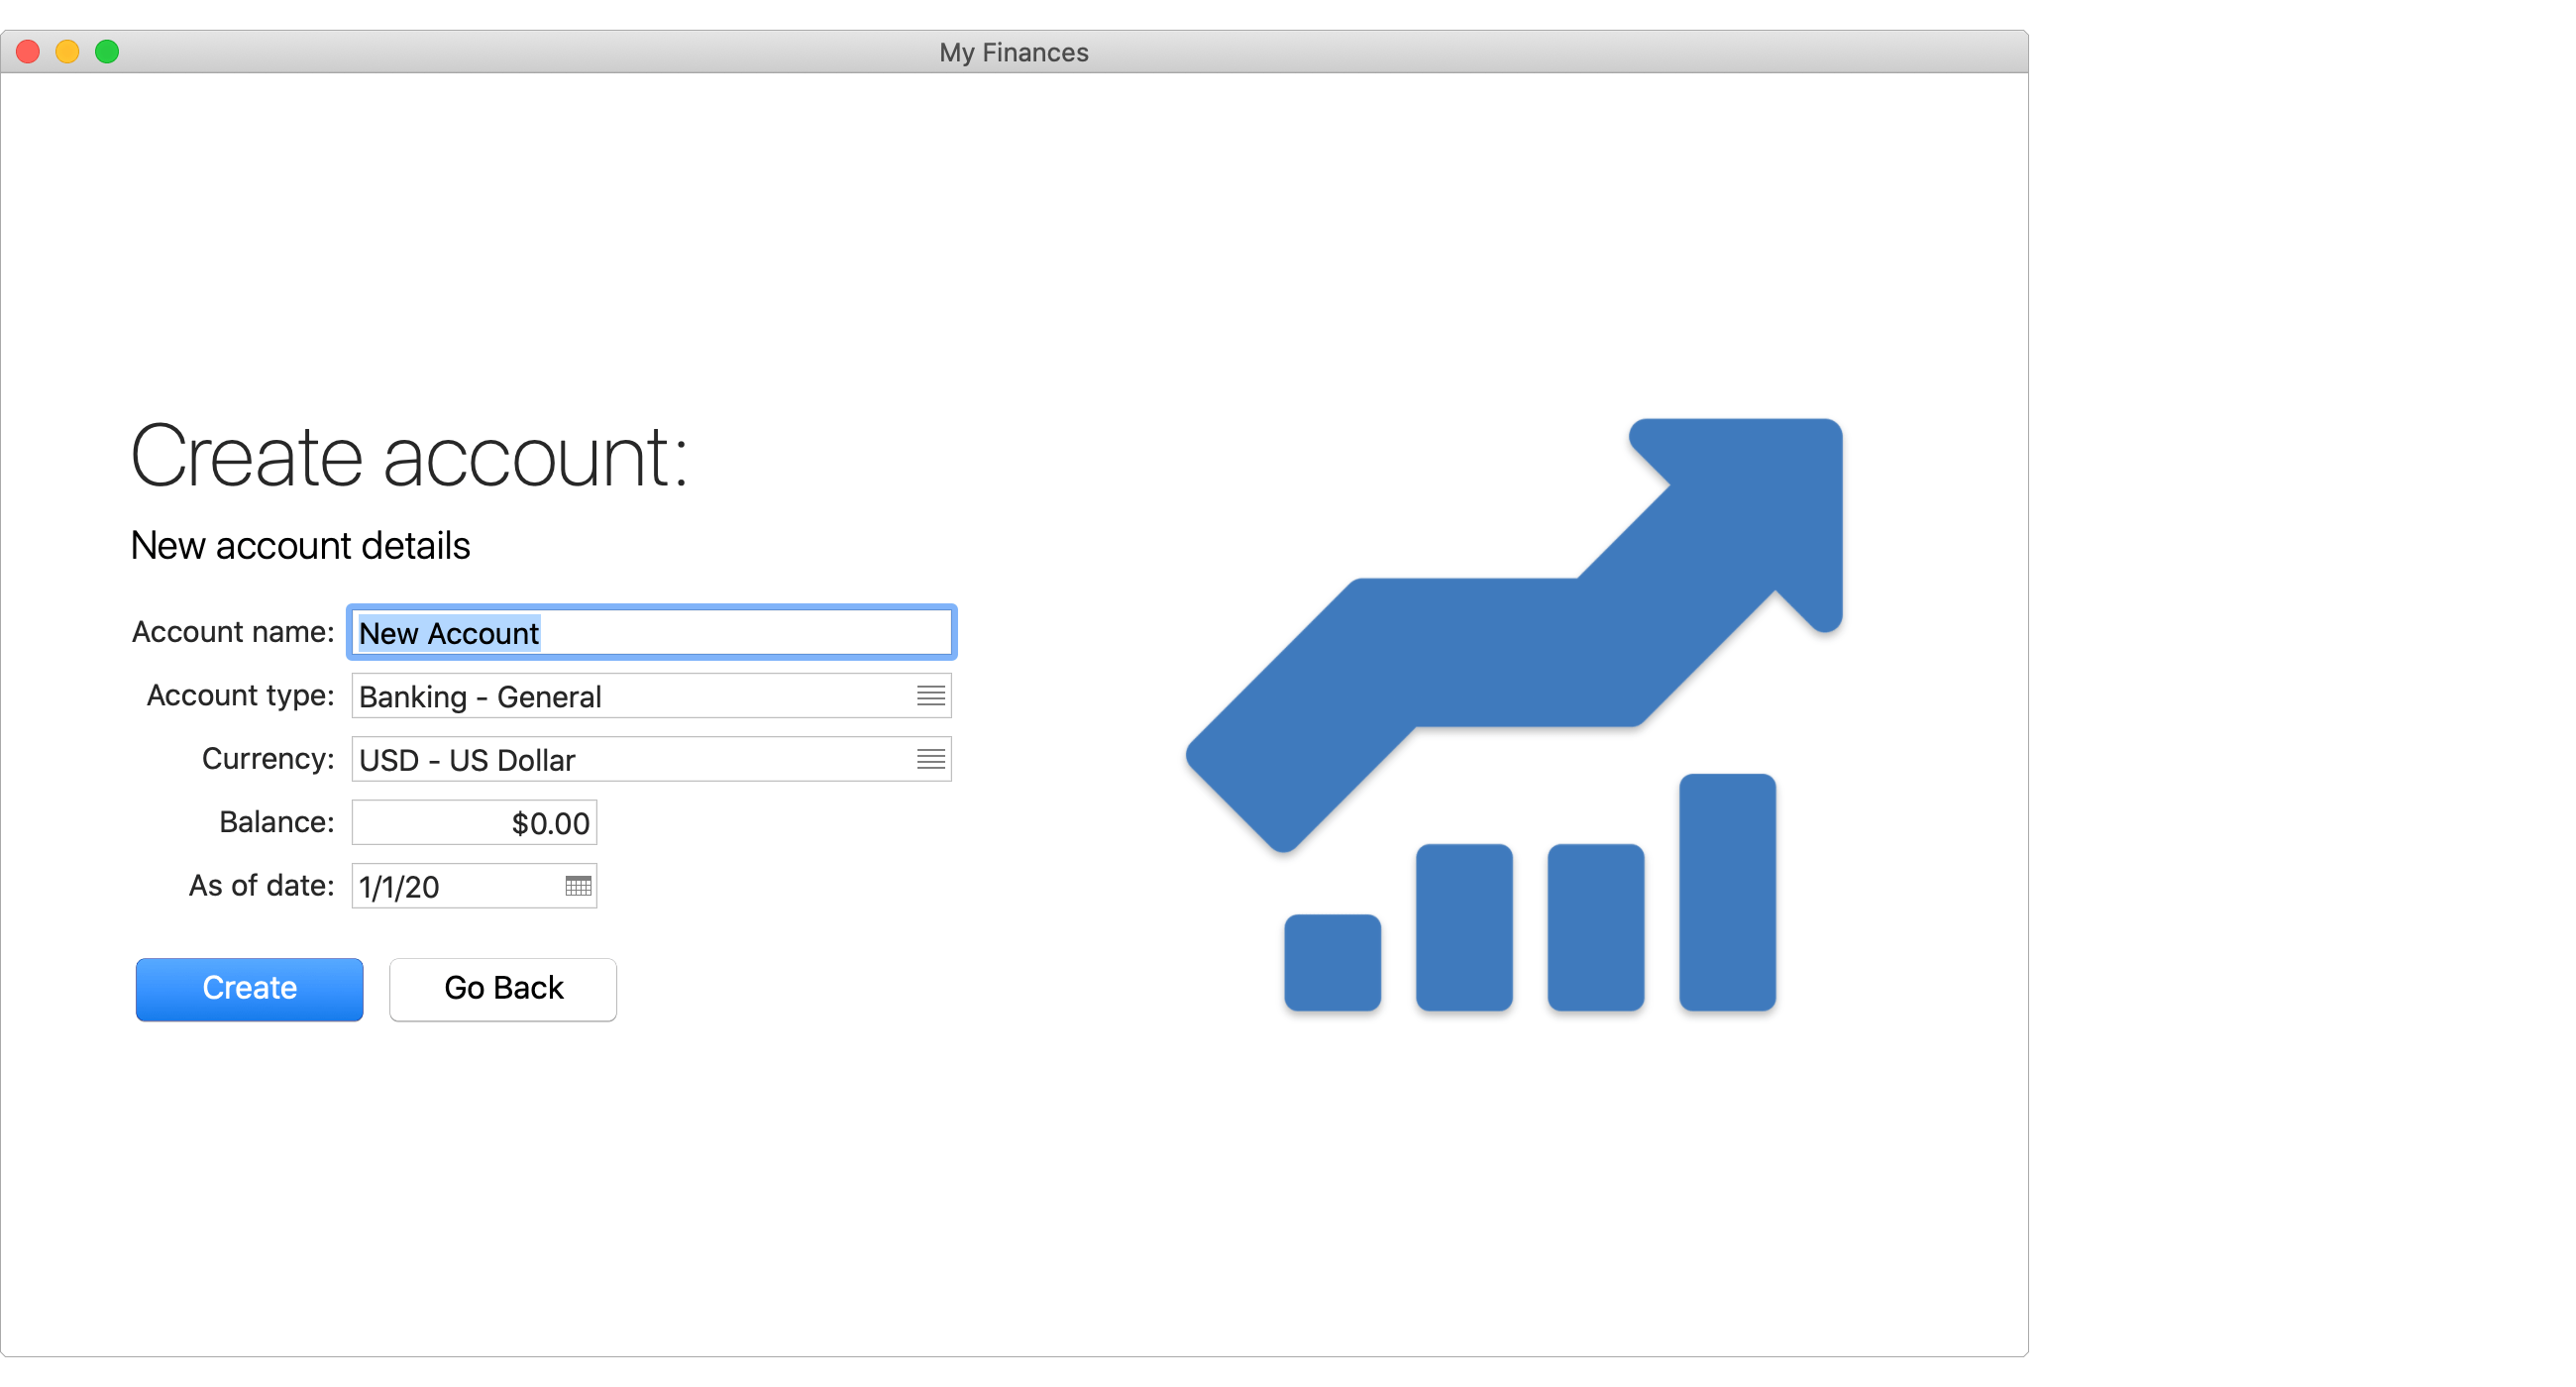
Enter the name for an account from the other personal financial app or website you have been using that you will be importing a CSV file of transactions into. Select the account type for the account. Select the currency for the account. Leave the balance set to zero for the account to prevent a starting balance transaction from being created. For credit card accounts, set the credit limit. Then click "Create" to create the account.
- After creating an account, you will be shown a summary. Keep selecting to "Create Another" when shown the summary of accounts created to create any additional accounts that you will be importing a CSV file of transactions into. When done creating accounts, click "Finished" to complete setting up the new file.

- Next, you will be prompted to save your file to the location of your choice. Selecting to save the file to the "SEE Finance" folder within your "iCloud Drive" folder is the recommended location if you'd like to sync your file to all of your Mac and iOS devices. Within the macOS program, the "SEE Finance" folder within your "iCloud Drive" folder will sometimes be listed as the "SEE Finance - iCloud" option.
Import into SEE Finance 2:
Now with the same accounts setup in your SEE Finance file as you had in the other personal financial app or website you have been using you can import the CSV files into each account.
- Select the account that will receive the import from the main account list.
- Select "Import" → "Transactions" from the program's File menu.
- Use the open file panel to select the CSV file you exported. On the bottom of the open file panel, set the "File Was Created By" option to "Other Financial Software" or "Other Financial Website". Then click "Import".

![]() Note:
Make sure to set the "File Was Created By" option to "Other Financial Software" or "Other Financial Website".
Doing so will have the program perform additional verification of the data and check for known issues in the exports from other programs.
Note:
Make sure to set the "File Was Created By" option to "Other Financial Software" or "Other Financial Website".
Doing so will have the program perform additional verification of the data and check for known issues in the exports from other programs.
- Review the transactions found in the CSV file.

- Set the "Start Row" to be the row of the first transaction you want to import.
- Set the "End Row" to be the row of the last transaction you want to import or just leave as a large number to import if the last row of the CSV file is the last transaction to import and there's not other information the bottom of the file.
- Make sure the "Decimal Separator" option is set correctly for the transactions shown in the file (a period or a comma).
- Next, specify what value each column represents in the CSV file such as "Column 1" having the "Date" values and "Column 4" having the "Category" values. If there's a single amount column set that column for both the "Credit Amount" and "Debit Amount". For investment transactions, make sure to also match both the "General Info Columns" and the "Security Info Columns". If the Action column is not set for investment transactions it will use the Type column choice for the action. If a particular value is not listed in the CSV file, then set that value to "NA" (not available). It is required to at least set the columns for the "Date", "Credit Amount" and "Debit Amount" values.
- Select the "Date Format" that most closely resembles the dates shown for transactions in the file.
- Check if you'd like all transactions to be marked as reconciled.
- Then click "Import" to import the selected transactions.
![]() Note:
Be sure to select the proper date format matching the dates shown in the file.
Select the "MM-DD-YY" option for dates such as "1/31/18" and select the "MM-DD-YYYY" option for dates such as "1/31/2018".
The "-" in date format options can take the place of various kinds of separators including slashes and spaces.
Note:
Be sure to select the proper date format matching the dates shown in the file.
Select the "MM-DD-YY" option for dates such as "1/31/18" and select the "MM-DD-YYYY" option for dates such as "1/31/2018".
The "-" in date format options can take the place of various kinds of separators including slashes and spaces.
![]() Tip:
Use the space bar to toggle the "Import" checkbox for the selected account or for the selected transaction(s).
Tip:
Use the space bar to toggle the "Import" checkbox for the selected account or for the selected transaction(s).
- Repeat for each account you need to import.
Review the accounts for accuracy
Review the imported information for accuracy when compared to the other personal financial app or website you have been using. Our file importing feature is widely regarded as very good, but importing information from CSV files is never ideal. CSV files are the file type of last resort as they are not a specific financial file type and are rather just plain text spreadsheet files that can contain anything. That makes importing CSV files more complicated and error prone. If there are any discrepancies, we recommend to check the more complex items such as investment accounts first. If desired, security prices can be set manually to match the exact prices in the other personal financial app or website you have been using for the comparison between the two. If you realize the import didn't include all of your information from the other personal financial app or website you have been using, such as the date range of transactions was not set correctly during the export, then it would be best to delete all of the imported transactions in the account and redo the export and import it into the account.
Begin using SEE Finance 2
With you data now imported into SEE Finance 2, keep updating your finances in the program to stay on track and get ahead. After setting up your accounts you can establish account download connections to institutions. Setup scheduled transactions to keep up on your upcoming financial activity. Categorize your transactions to track your cash flow in detail. Create budgets to track your spending and save for the future. You can setup various types of reports to monitor your finances. Plus there's many options that allow you to tailor fit the program just for you to assist you in staying on top of your finances.