Setup scheduled transaction to automatically generate expected transactions in the Scheduled Transactions - Setup section. Scheduled transactions will generate transactions based on their set schedule information and transaction details. Scheduled transactions can be used as a type of reminder by having the transactions generated from them set with the "Pending" status (the default). Easily determine if there's any pending transactions by checking for a badge number in the next to the Scheduled Transactions listing in the main account list. All pending transactions, regardless of how they were set with that status, can be found in the Scheduled Transactions - Pending section. You can also have the generated transactions marked with a different status if you don't expect the need to review them.
Setup scheduled transactions
General layout info:

![]() Tip:
You can control the fields shown for scheduled transactions by adjusting the optional columns.
For example, you can add the "End Date" or "Status" columns in order to view and edit the end date and status for scheduled transactions.
Adjust the optional columns for a table by using the program's View → Columns menu or by Control-clicking on an uneditable area of the table.
Tip:
You can control the fields shown for scheduled transactions by adjusting the optional columns.
For example, you can add the "End Date" or "Status" columns in order to view and edit the end date and status for scheduled transactions.
Adjust the optional columns for a table by using the program's View → Columns menu or by Control-clicking on an uneditable area of the table.
Editing layout info:
Setup a scheduled transaction:
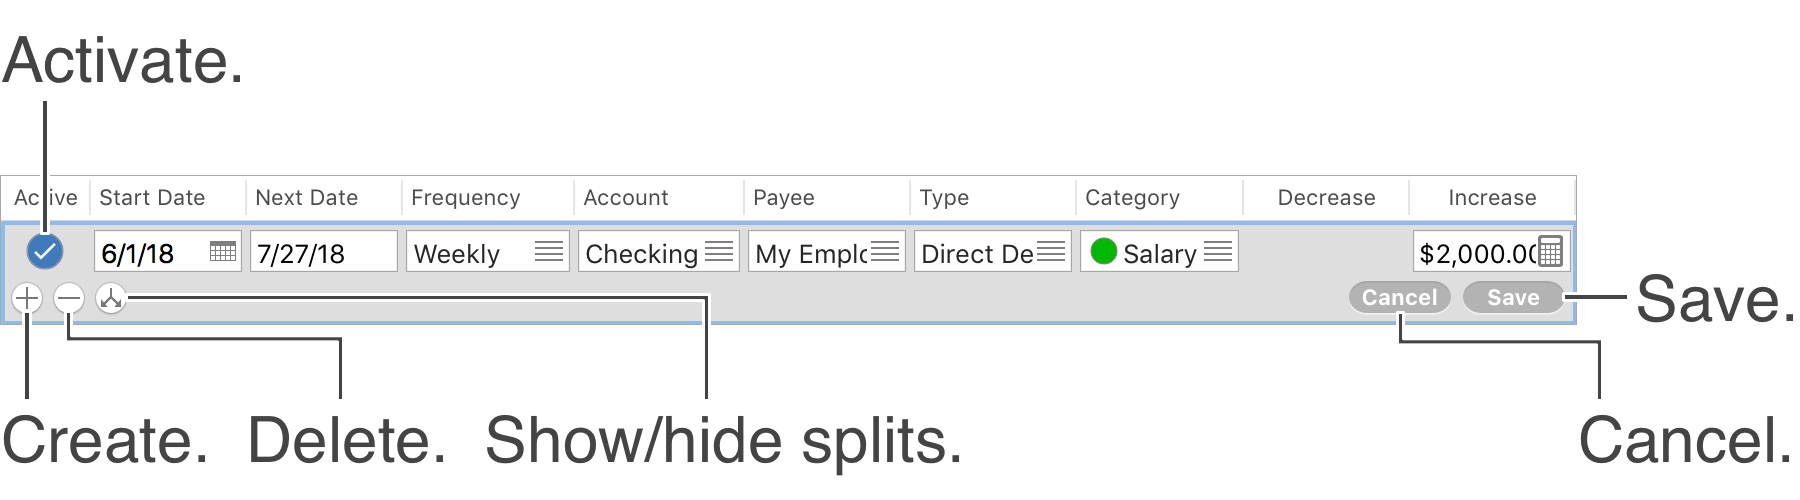
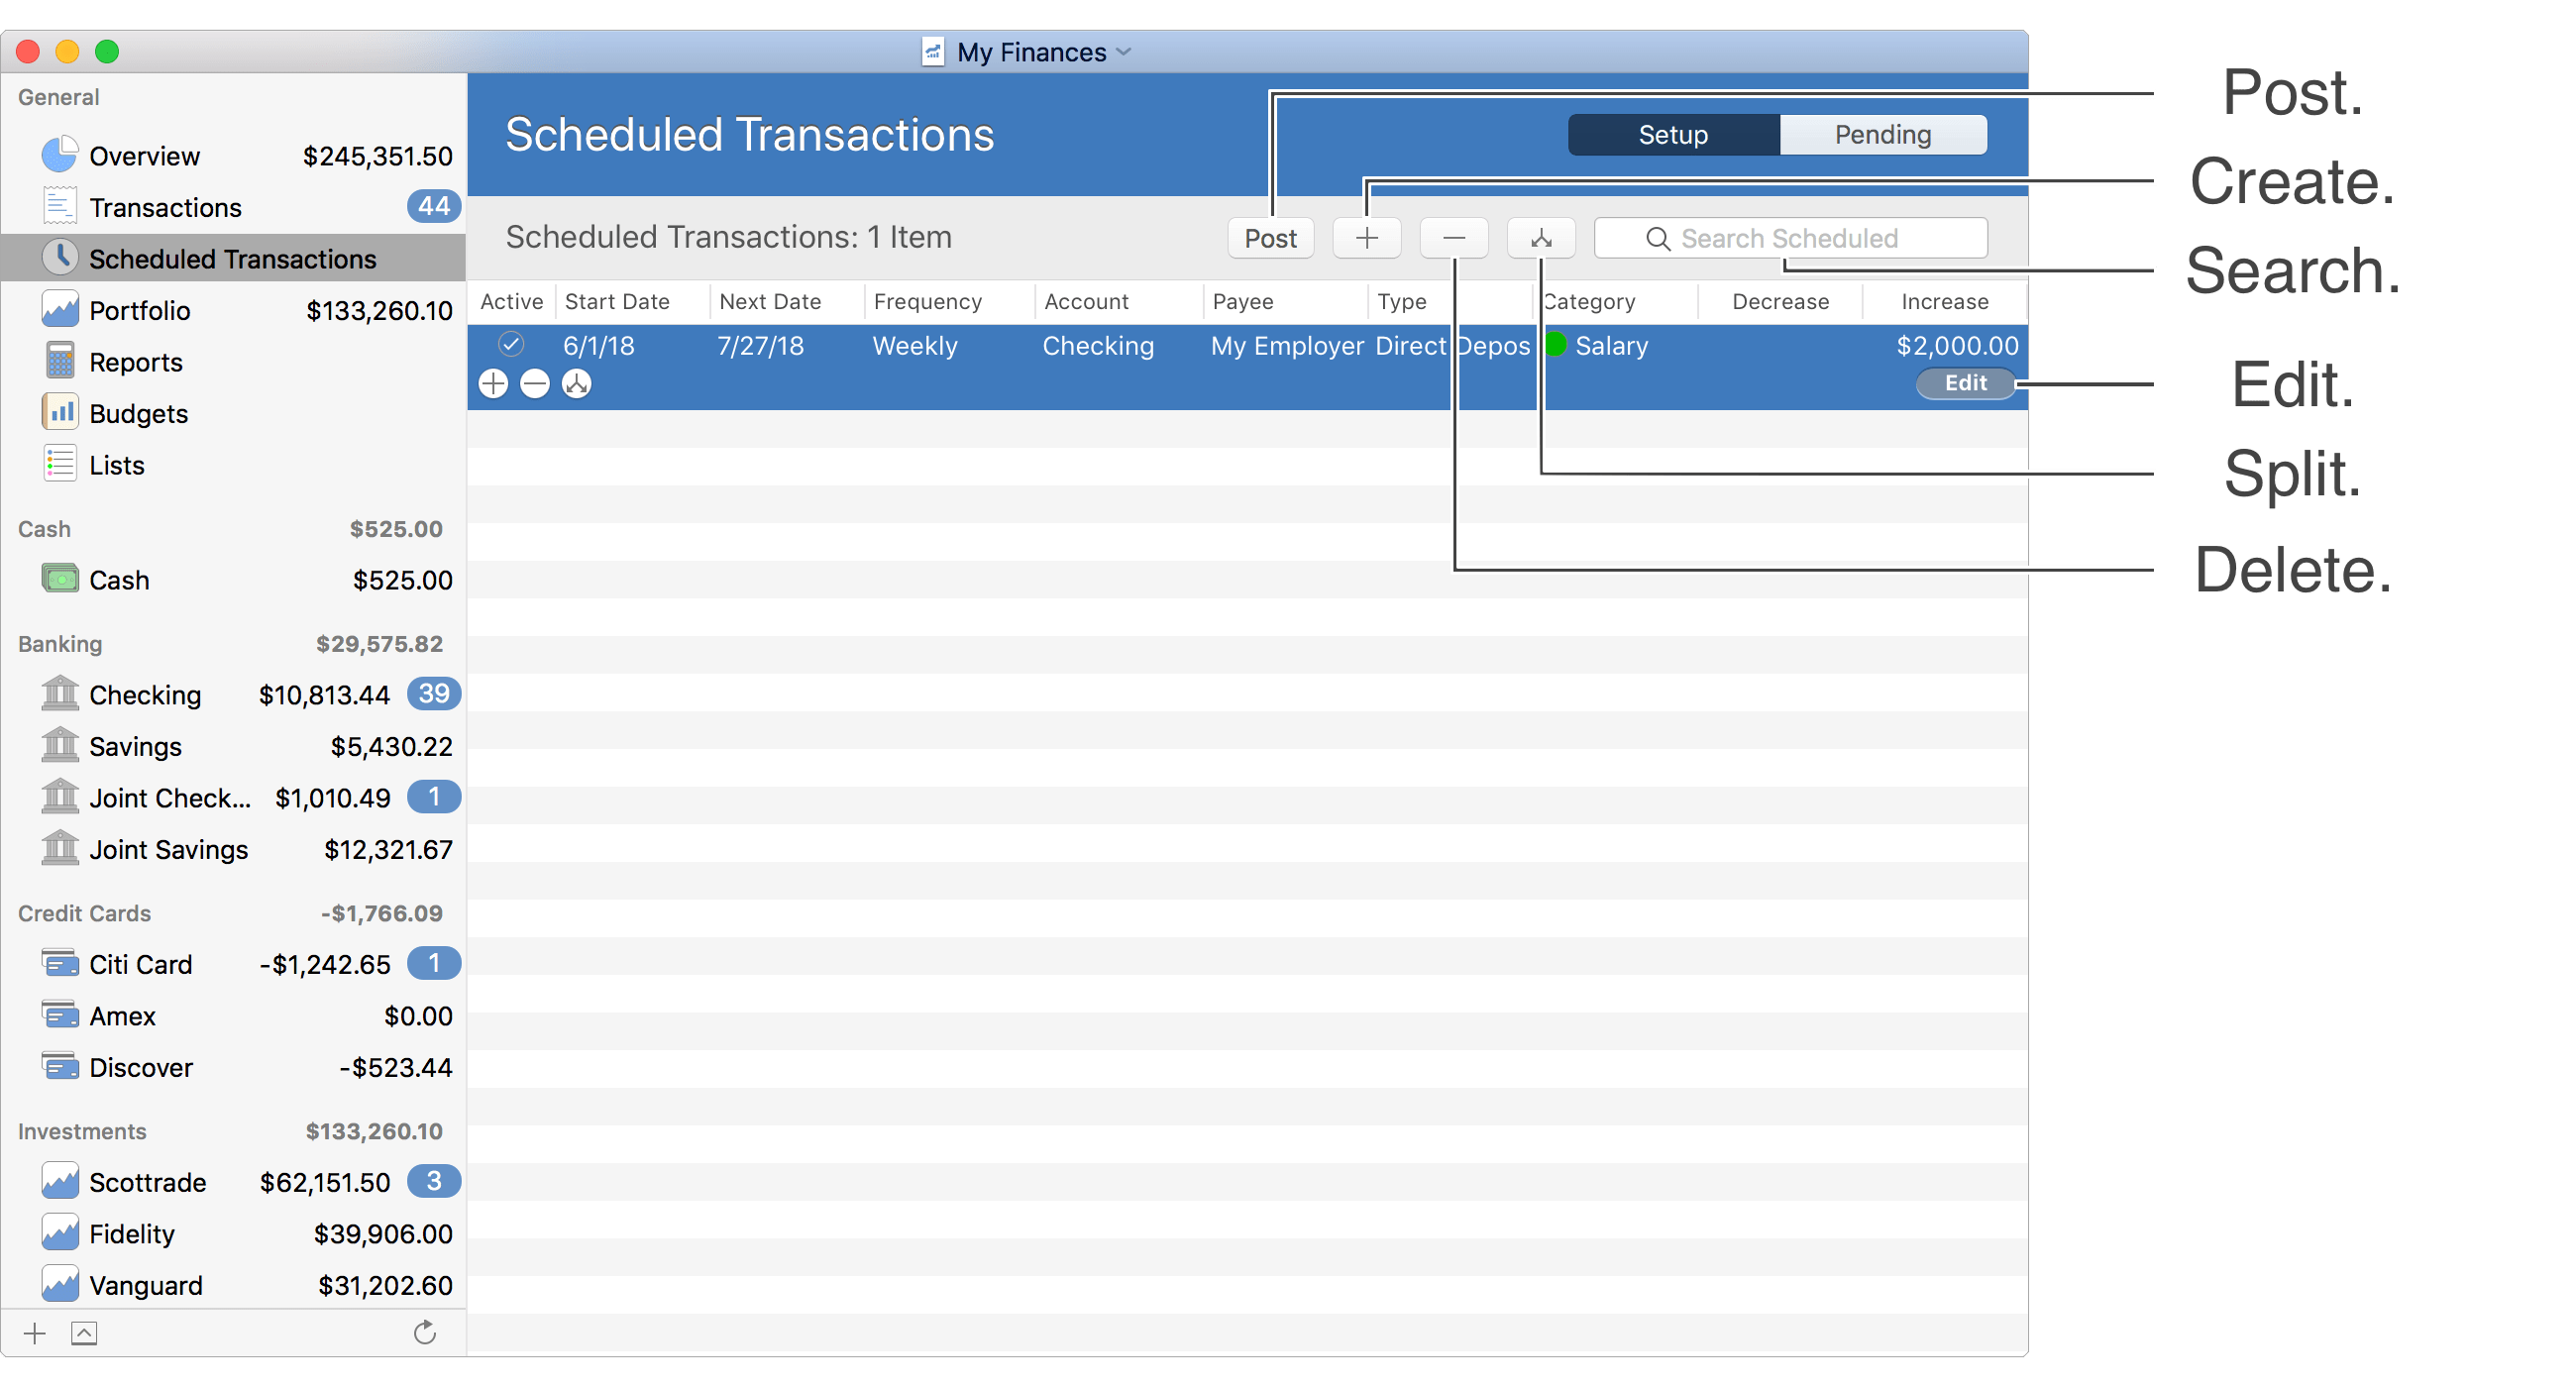
- Click the
 button above the transactions area, or press Command-N to create a new scheduled transaction.
 - Set the "Start Date" to begin having transactions generated from the scheduled transaction.
- Set the "End Date" (an optional column) if needed.
- Set the the Frequency the scheduled transaction should repeat.
- Enter the general details for the transaction as you want the transactions generated from this scheduled transaction to have. Add splits to the transaction if needed.
- Save the transaction by pressing Command-E, by pressing Return, or by clicking "Save". The scheduled transaction will now be activated and generate past transactions. If several past transactions will be generated you will be prompted for confirmation.
- Click "Cancel" or press Escape (Esc) to cancel creating a new scheduled transaction or to cancel any changes made to an existing scheduled transaction.
![]() Tip:
By default, the status is set to "Pending" which can require additional review and updating of the status for the generated transactions.
Use a different status, such as "Recorded", if you don't expect the need to review the generated transactions for this scheduled transaction.
Add the Status optional column to set the status for the generated transactions.
Tip:
By default, the status is set to "Pending" which can require additional review and updating of the status for the generated transactions.
Use a different status, such as "Recorded", if you don't expect the need to review the generated transactions for this scheduled transaction.
Add the Status optional column to set the status for the generated transactions.
Edit scheduled transactions
General layout info:
![]() Tip:
You can control the fields shown for scheduled transactions by adjusting the optional columns.
For example, you can add the "End Date" or "Status" columns in order to view and edit the end date and status for scheduled transactions.
Adjust the optional columns for a table by using the program's View → Columns menu or by Control-clicking on an uneditable area of the table.
Tip:
You can control the fields shown for scheduled transactions by adjusting the optional columns.
For example, you can add the "End Date" or "Status" columns in order to view and edit the end date and status for scheduled transactions.
Adjust the optional columns for a table by using the program's View → Columns menu or by Control-clicking on an uneditable area of the table.
Editing layout info:
Edit a scheduled transaction:
- Select the scheduled transaction you want to edit. Then click "Edit" or press Command-E to begin editing the scheduled transaction.
- Update the "Start Date" if you need to change the "Next Date".
- Update the "End Date" (an optional column) if needed.
- Update the Frequency the scheduled transaction should repeat if needed.
- Update the general details for the transaction as you want the transactions generated from this scheduled transaction to have. Add splits to the transaction if needed.
- Check the "Active" box to activate the scheduled transaction if needed.
- Save the transaction by pressing Command-E, by pressing Return, or by clicking "Save". The scheduled transaction will now be activated and generate past transactions. If several past transactions will be generated you will be prompted for confirmation.
- Click "Cancel" or press Escape (Esc) to cancel any changes made to the transaction.
![]() Note:
To change the "Next Date", update the "Start Date" to be the next date you want a scheduled transaction post.
Note:
To change the "Next Date", update the "Start Date" to be the next date you want a scheduled transaction post.
![]() Tip:
By default, the status is set to "Pending" which can require additional review and updating of the status for the generated transactions.
Use a different status, such as "Recorded", if you don't expect the need to review the generated transactions for this scheduled transaction.
Add the optional column for "Status" and change the status for the generated transactions.
Tip:
By default, the status is set to "Pending" which can require additional review and updating of the status for the generated transactions.
Use a different status, such as "Recorded", if you don't expect the need to review the generated transactions for this scheduled transaction.
Add the optional column for "Status" and change the status for the generated transactions.
Post scheduled transactions early
Scheduled transactions will post on their Next Date, but you can post their next scheduled occurrence at any time.
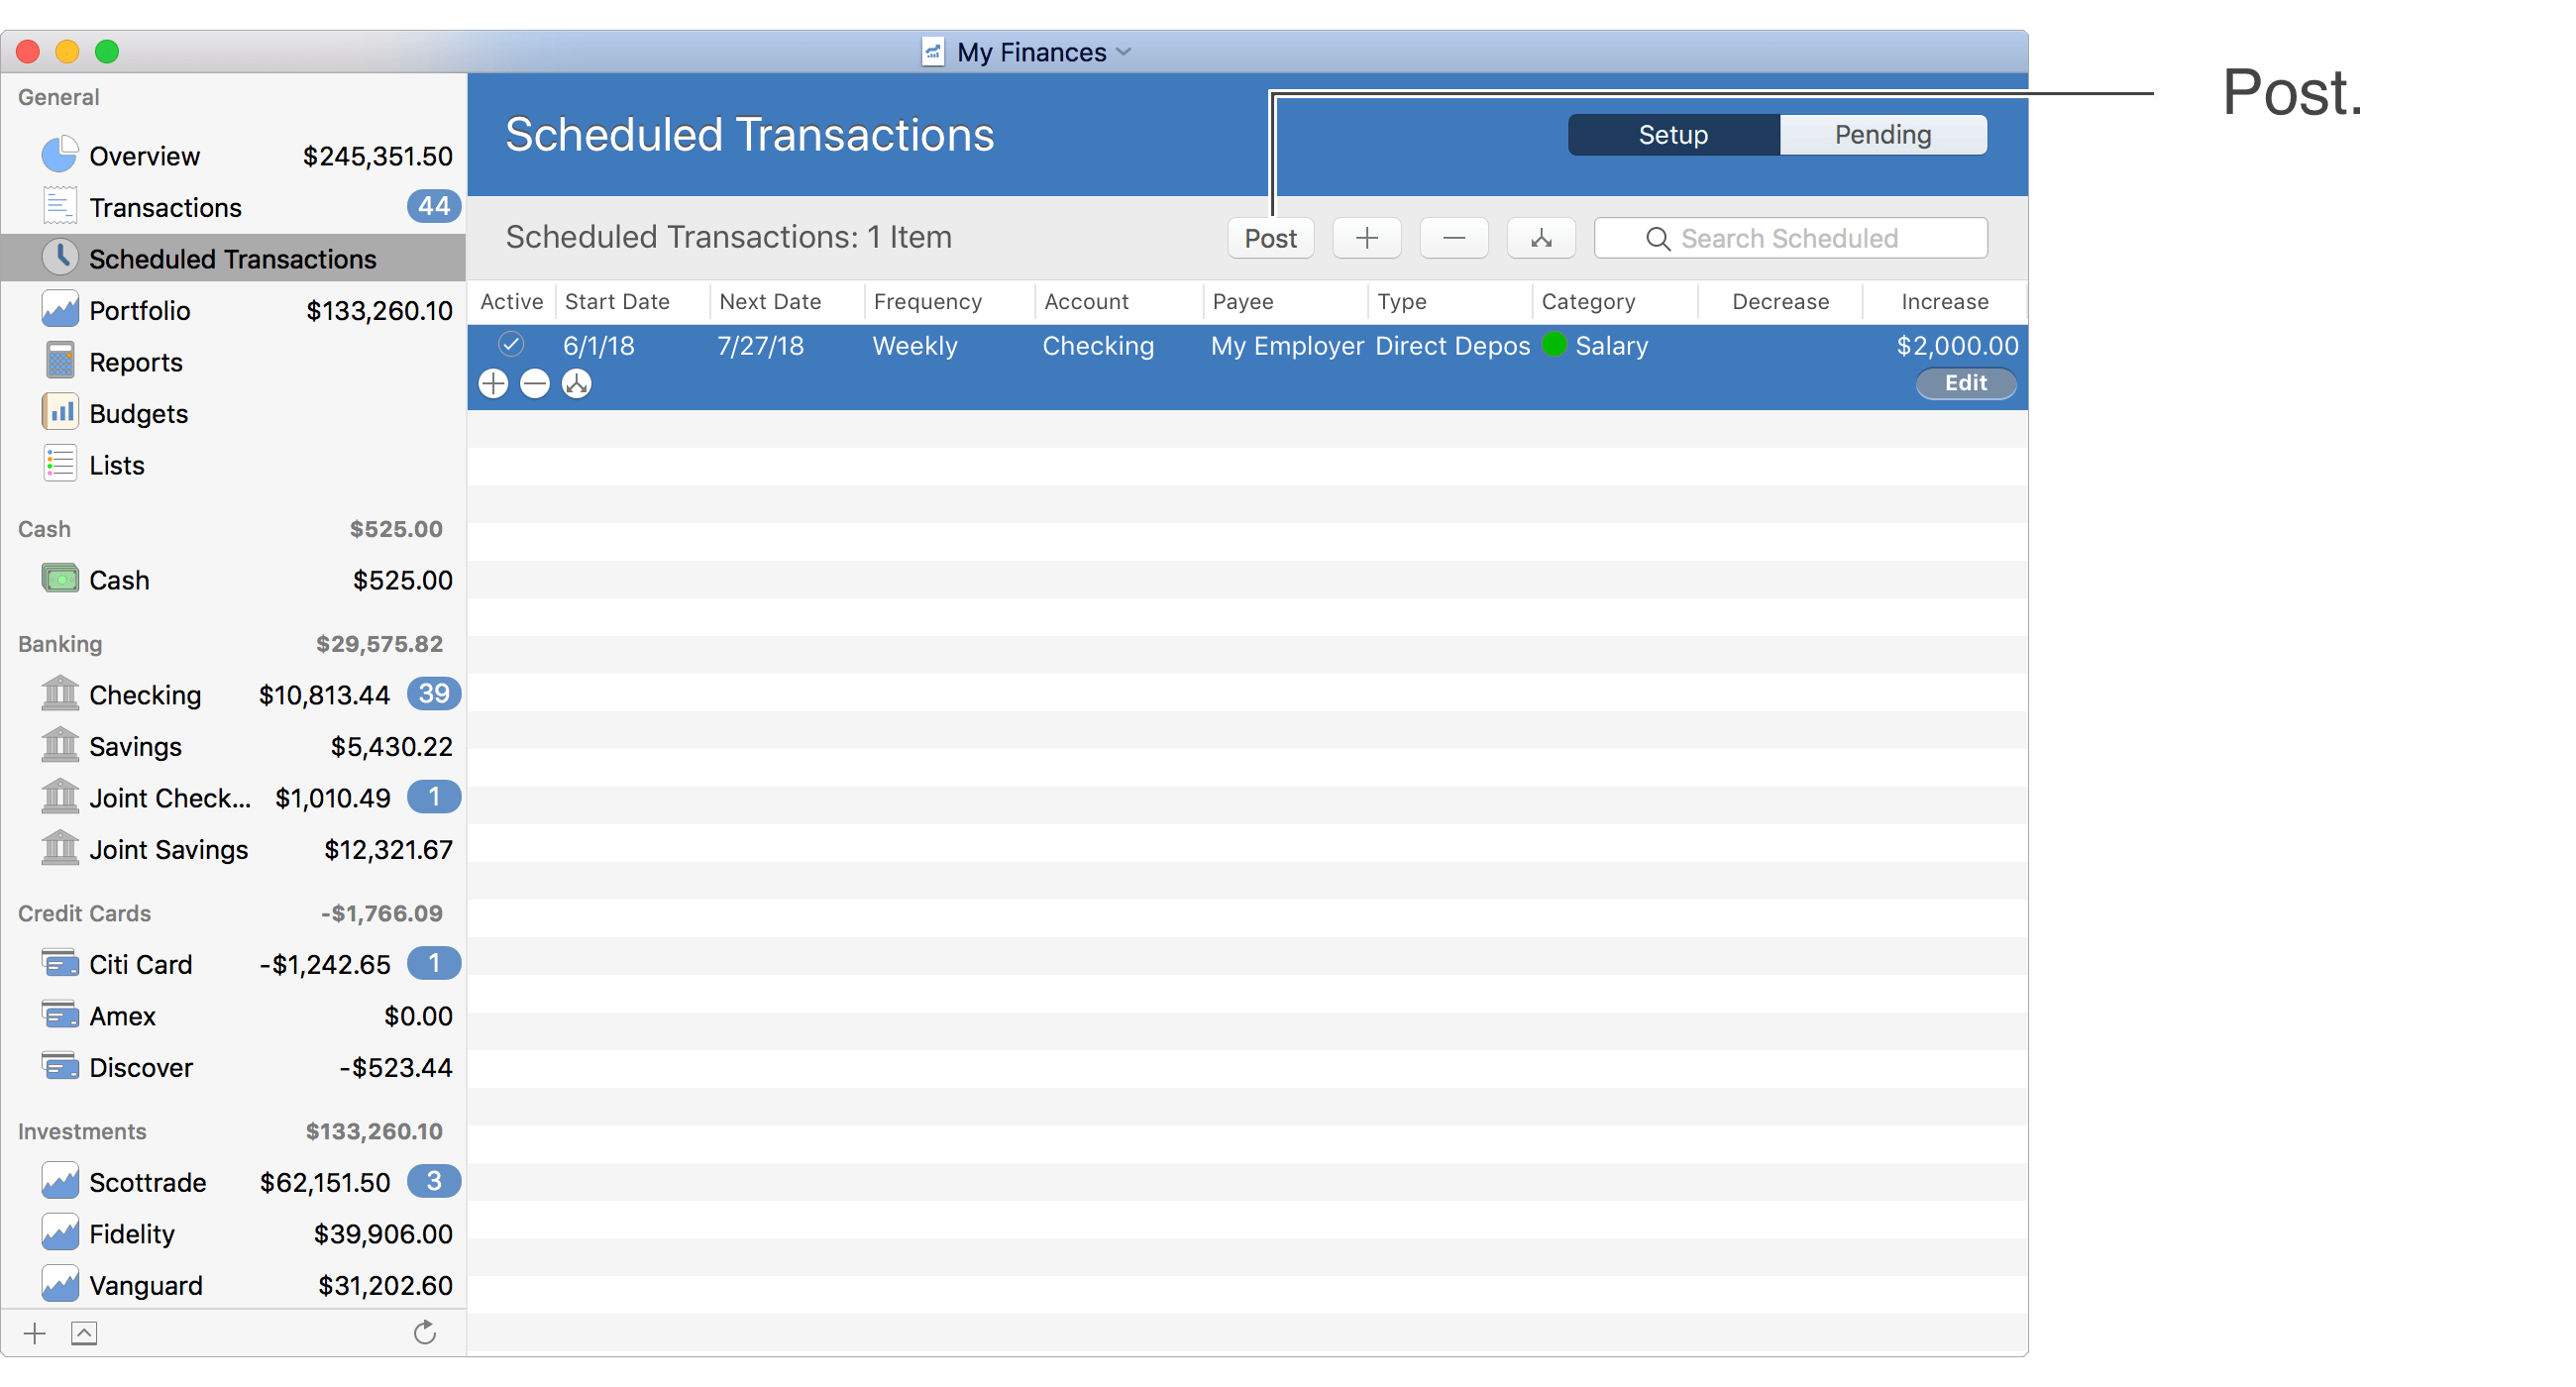
Post a scheduled transaction early:
- Select the scheduled transaction(s) you want to post early.
- Edit the scheduled transaction to activate it if not already active.
- Click "Post".
Frequency options:
- None: Occur on the Start Date and not again.
- Daily: Every day.
- Weekly: Every 7 days.
- Bi-Weekly: Every 14 days.
- Semi-Monthly: Twice a month based on the Start Date with 15 days between occurrences.
- Semi-Monthly (1st & 15th): The 1st and 15th of the month.
- Semi-Monthly (15th & Last): The 15th and the last of the month.
- Four Weeks: Every 28 days.
- Monthly: Every month on the same day*.
- Monthly (Same Day & Week): Repeats on the same day & week of a month as the initial set date. For example, repeat on the third Wednesday of the month.
- Quarterly: Every 3 months on the same day*.
- U.S. Quarterly Taxes: January 15th, April 15th, June 15th and September 15th.
- Semi-Annually: Every 6 months on the same day*.
- Annually: Every year on the same day*.
- Bi-Annually: Every 2 years on the same day*.
- The monthly, quarterly and annual options will post on the last day of a month if the Start Date's day is more than the number of days in that month.
Keyboard shortcuts:
- Create: Command-N
- Begin/End Editing: Command-E
- Add Split: Command-L
- Show/Hide Splits: Shift-Command-L
- Save: Return or Command-E
- Cancel: Escape (Esc)
- Delete: Command-Delete
Review the full list of keyboard shortcuts
![]() Note:
Transactions will be generated from scheduled transactions at 12:00 AM local time.
Note:
Transactions will be generated from scheduled transactions at 12:00 AM local time.